Checkout Experience
The Checkout Experience can handle various use cases:
 One off
|
Your payer selects the country they are paying from and picks one of the available payment methods for this country. 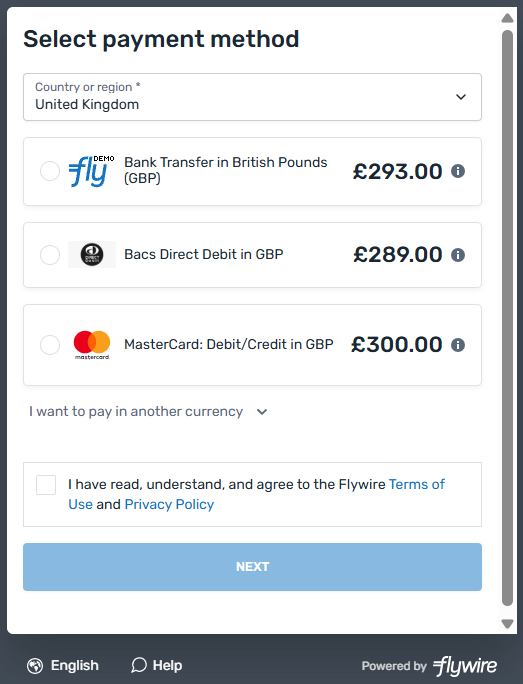
Next, the page to collect payer information is displayed (unless it has been hidden). 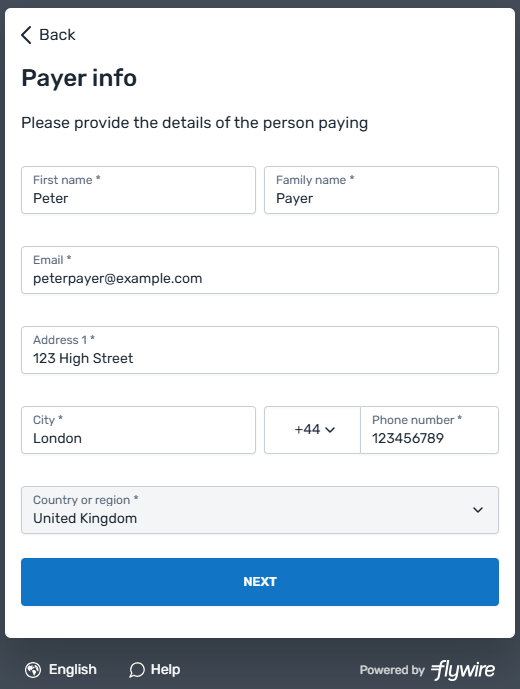
The next page depends on the chosen payment method. It might ask for card or bank account information, or give the payer bank details so that they can make a bank transfer. 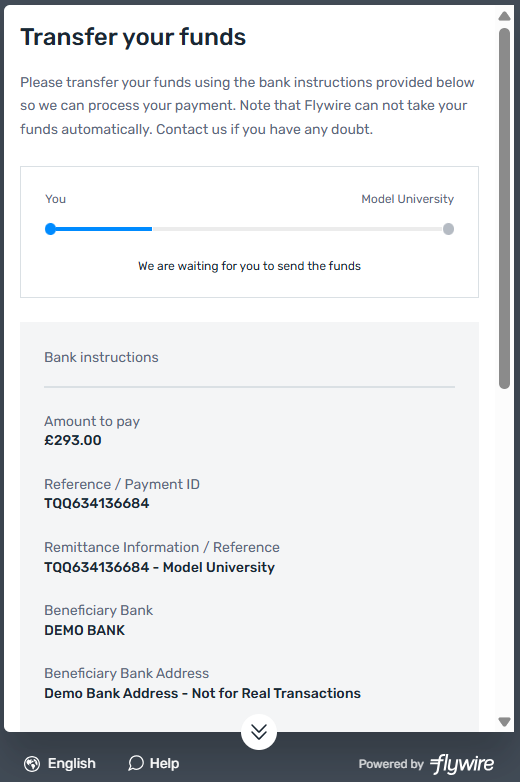
|
One Off Payment This form collects the payer's information (name, etc.) and then asks the payer to pick a payment method. Depending on the payment method, it either asks the payer for their card details, bank account details, or to make a bank transfer. This form is for one time payments, which means card or bank account details are not being stored. Customization Options When creating a Checkout Session, you have the option to configure the form to hide the payer information page using the show_payor_information parameter. To make the Checkout Experience more lean, you can hide the payer information page if you are providing all required payer information fields. Possible values:
Checkout Session Settings
|
Fields
When you are creating a Checkout Session, you have the option to pre-fill the payer fields. You can also control if you want to hide fields or make them read-only.
-
Pre-filling fields is optional. If no values are provided, the fields will be empty for the payer to complete.
-
Pre-filling fields alone does not affect if fields are editable. Pre-filled fields remain editable unless you explicitly made them read-only or hide them via the settings.
Best practice
Before pre-filling payer fields, consider who the actual payer is.
The form asks for the cardholder or bank account owner’s information. There can be cases when the personal data you have on stored (for example, in your ERP system) is different from the data for the actual payer. Always consider which information you store in your system and how useful it is for pre-filling fields.
Example: Students log into your school portal to pay tuition. In most cases, their parents pay the tuition with their credit card. If you automatically pre-fill the payer fields with the student's profile info, every student has to correct the info and change it to their parent's information.
This distinction is crucial if you plan to hide fields or make them read-only. If you use the wrong data for pre-filling fields and make it impossible for the payer to change it, you could prevent them from completing the payment.
When using Elements, you can control which payer fields can be edited by your payer - either by setting them to read-only or be completely hiding the field from the payer.
|
You can configure read-only at three levels: |
|
|
What happens if a field has conflicting settings at multiple levels? Smart Rendering > Individual Field > Global Form This means Smart Rendering settings win over individual field settings, and individual field settings win over global form settings. |
|
You can configure the visibility of fields at two levels: |
|
|
What happens if a field has conflicting settings at multiple levels? Smart Rendering > Individual Field This means Smart Rendering settings win over individual field settings. |
What happens if something goes wrong? - Automatic Field Unlocking
All payer fields are required to send the form. If your settings would prevent the payer from submitting the form - for example you're hiding the email field but provided an invalid address- the field automatically becomes visible and editable.
Automatic field unlocking happens for a hidden or read-only field when:
-
you didn't submit a value through the Checkout Session (results in an empty field for the payer to fill out)
-
you submitted an invalid value through the Checkout Session (results in a field showing the invalid value, highlighted with an error message so that the payer can correct it)
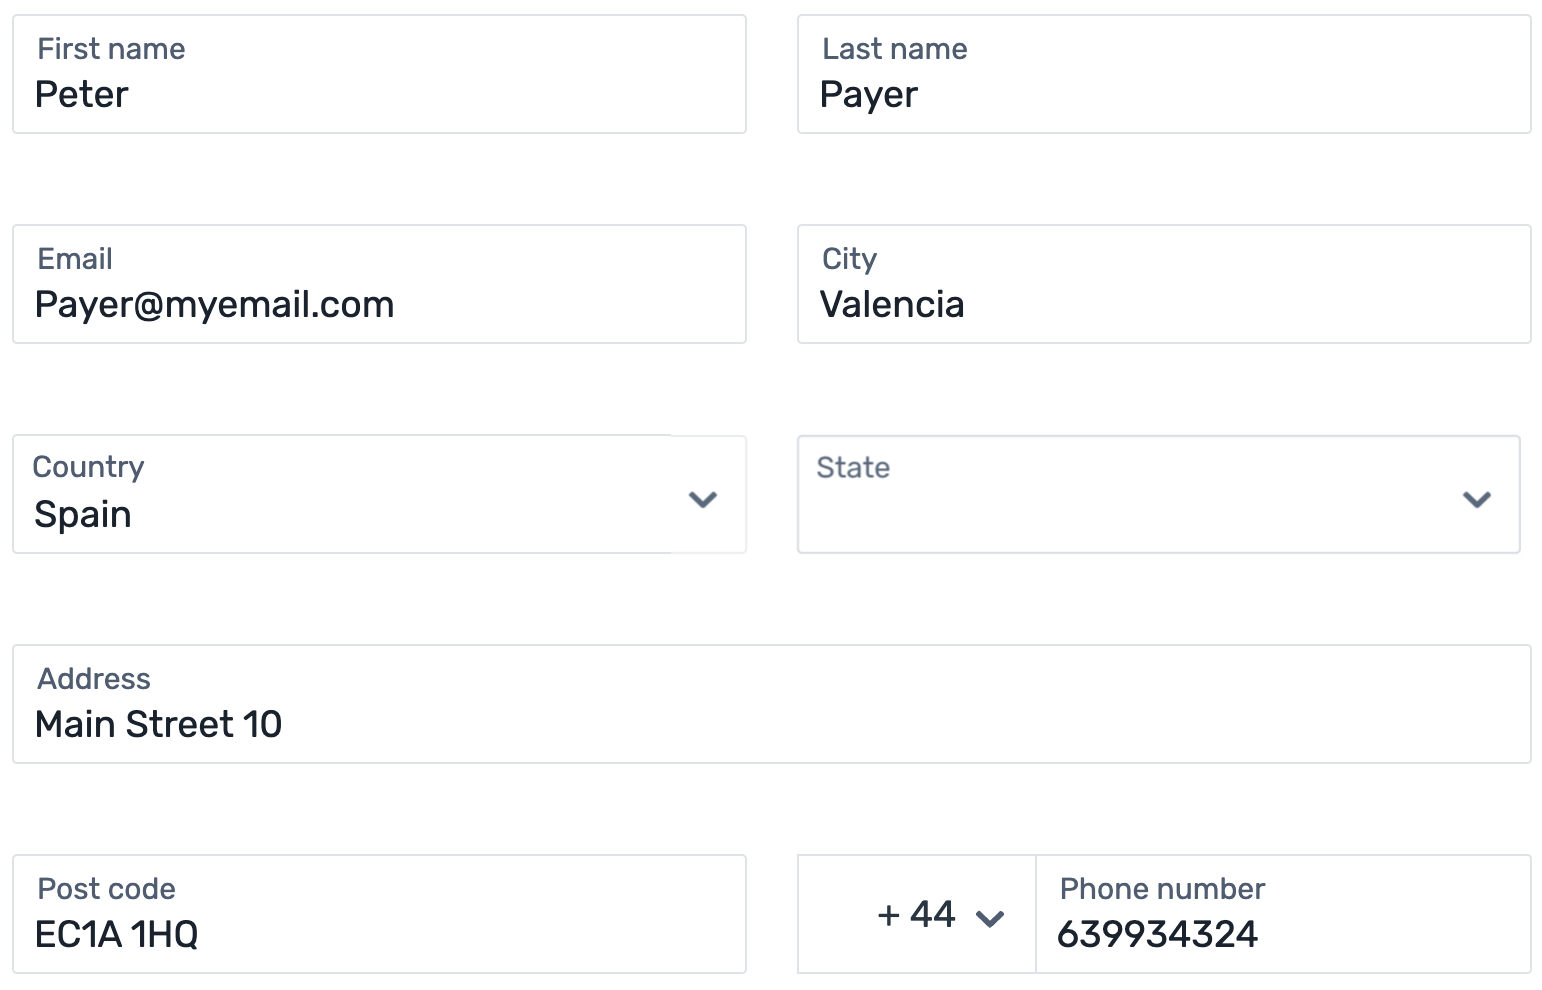
First name
Parameter to pre-fill this field: payor.first_name
The field only accepts Latin characters from A-Z and 0-9. Max. 256 characters.
Last name
Parameter to pre-fill this field: payor.last_name
The field only accepts Latin characters from A-Z and 0-9. Max. 256 characters.
Address
Parameter to pre-fill this field: payor.address
The field only accepts Latin characters from A-Z and 0-9 and the following special characters:
-
, (comma)
-
/ (slash)
-
- (hyphen)
The address can’t be a PO box. If the words "PO" or “box” is detected in this field, it will show an error message.
City
Parameter to pre-fill this field: payor.city
The field only accepts Latin characters from A-Z and 0-9. Max. 256 characters.
The city needs to contain at least a vowel and have more than one character. For example, NY won’t be accepted and must be corrected to New York.
Post code
Parameter to pre-fill this field: payor.zip
If the country is “United States” the field only accepts exactly 5 digits, for any other country it accepts a maximum of 10 digits or characters.
Country or region
Parameter to pre-fill this field: payor.country
Validation rules when you're pre-filling the field via the API:
Two-letter format (ISO 3166-1 alpha-2), for example US for USA or GB for the United Kingdom.
Validation rules in the Elements form:
In the Elements form, this field is a dropdown with fixed country names, which means no validation is necessary in the form.
State
Parameter to pre-fill this field: payor.state
The state field is only displayed when the country is “United States” or “China”. When it is displayed, it is required for sending the form.
Validation rules when you're pre-filling the field via the API:
The state where the payer resides in.
Format:
Only the second part of the ISO 3166-2 code, for example for US-NY the value is NY.
List of ISO codes for states in US
List of ISO codes for states for China
Validation rules in the Elements form:
In the Elements form, this field is a dropdown with fixed state names, which means no validation is necessary in the form.
Parameter to pre-fill this field: payor.email
The field accepts Latin characters from A-Z and 0-9 and the following special characters:
-
+ (plus)
-
_ (underscore)
Max. 256 characters.
Phone number
Parameter to pre-fill this field: payor.phone
Validation rules when you're pre-filling the field via the API:
The phone number of the payer (including the country code).
Use + in front of the country code, for example, "+44123456" for country code 44.
Validation rules in the Elements form:
The country code can be picked from a dropdown with fixed values. The phone number field only accepts digits. Max. 15 digits.
Action Button
Action button that sends the form.

|
Your payer is asked to pick their country, the number of installments, and the payment method they want to use. 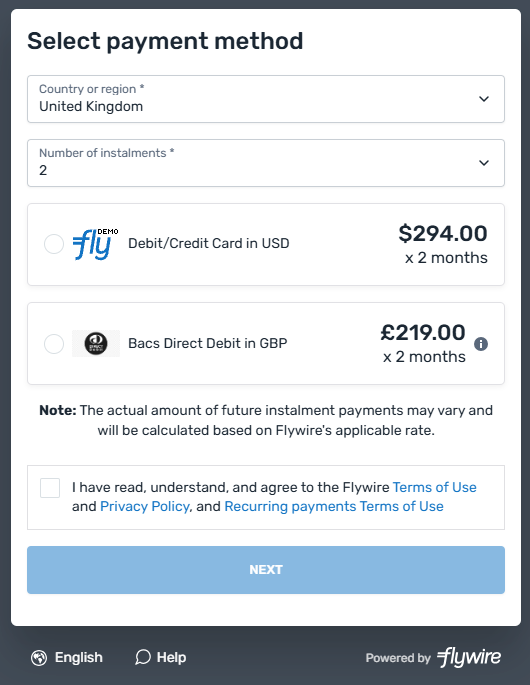
Next, the page that collects payer information is displayed (unless it has been hidden).
The payer sees an overview of the plan they chose. 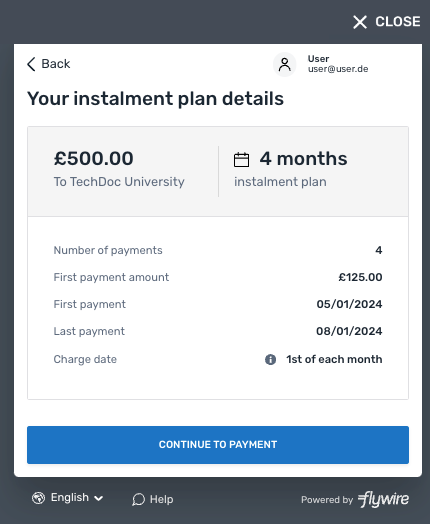
Your payer is then asked to enter their payment information depending on the payment method they chose. 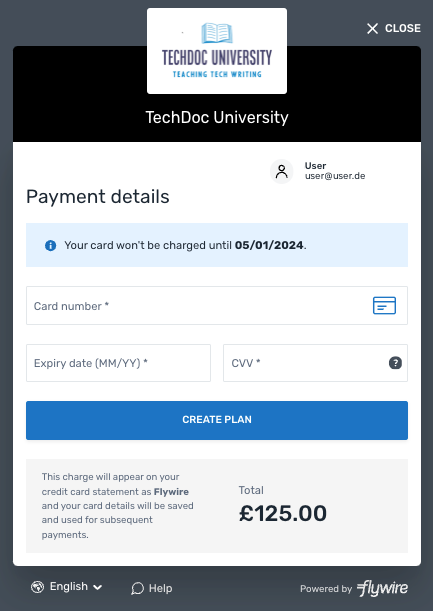
An installment plan with the information provided is now created. The window will close automatically after a few seconds. 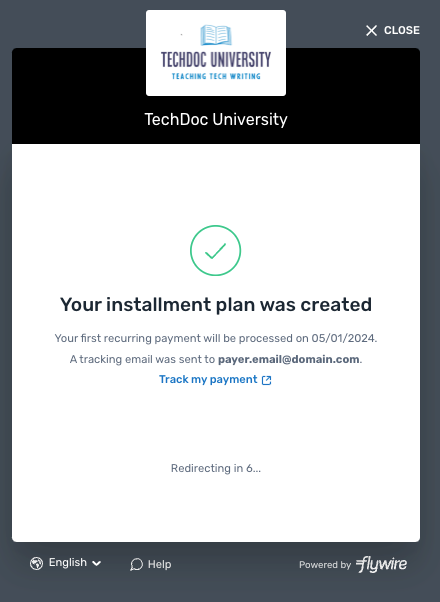
|
Flywire-hosted recurring payments This form collects the payer's information (name, etc.) and then asks the payer to pick their desired installment plan. With Flywire-hosted recurring payments, you use Flywire's pre-defined installment plans. You only have to configure the plan settings (for example the number of installments) in Flywire Dashboard, Flywire will take care of the rest. Since Flywire knows your plan settings, payments get initiated automatically according to the schedule. Flywire also handles all emails to your payers on your behalf - these are mandatory to inform them about the recurring payments. You need access to Flywire Dashboard to define the settings for the plans. If you don't have access yet, contact your Relationship Manager. Available payment methods:
Customization Options When creating a Checkout Session, you have the option to configure the form to hide the payer information page using the show_payor_information parameter. To make the Checkout Experience more lean, you can hide the payer information page if you are providing all required payer information fields. Possible values:
Checkout Session Settings
|
Fields
When you are creating a Checkout Session, you have the option to pre-fill the payer fields. You can also control if you want to hide fields or make them read-only.
-
Pre-filling fields is optional. If no values are provided, the fields will be empty for the payer to complete.
-
Pre-filling fields alone does not affect if fields are editable. Pre-filled fields remain editable unless you explicitly made them read-only or hide them via the settings.
Best practice
Before pre-filling payer fields, consider who the actual payer is.
The form asks for the cardholder or bank account owner’s information. There can be cases when the personal data you have on stored (for example, in your ERP system) is different from the data for the actual payer. Always consider which information you store in your system and how useful it is for pre-filling fields.
Example: Students log into your school portal to pay tuition. In most cases, their parents pay the tuition with their credit card. If you automatically pre-fill the payer fields with the student's profile info, every student has to correct the info and change it to their parent's information.
This distinction is crucial if you plan to hide fields or make them read-only. If you use the wrong data for pre-filling fields and make it impossible for the payer to change it, you could prevent them from completing the payment.
When using Elements, you can control which payer fields can be edited by your payer - either by setting them to read-only or be completely hiding the field from the payer.
|
You can configure read-only at three levels: |
|
|
What happens if a field has conflicting settings at multiple levels? Smart Rendering > Individual Field > Global Form This means Smart Rendering settings win over individual field settings, and individual field settings win over global form settings. |
|
You can configure the visibility of fields at two levels: |
|
|
What happens if a field has conflicting settings at multiple levels? Smart Rendering > Individual Field This means Smart Rendering settings win over individual field settings. |
What happens if something goes wrong? - Automatic Field Unlocking
All payer fields are required to send the form. If your settings would prevent the payer from submitting the form - for example you're hiding the email field but provided an invalid address- the field automatically becomes visible and editable.
Automatic field unlocking happens for a hidden or read-only field when:
-
you didn't submit a value through the Checkout Session (results in an empty field for the payer to fill out)
-
you submitted an invalid value through the Checkout Session (results in a field showing the invalid value, highlighted with an error message so that the payer can correct it)
First name
Parameter to pre-fill this field: payor.first_name
The field only accepts Latin characters from A-Z and 0-9. Max. 256 characters.
Last name
Parameter to pre-fill this field: payor.last_name
The field only accepts Latin characters from A-Z and 0-9. Max. 256 characters.
Address
Parameter to pre-fill this field: payor.address
The field only accepts Latin characters from A-Z and 0-9 and the following special characters:
-
, (comma)
-
/ (slash)
-
- (hyphen)
The address can’t be a PO box. If the words "PO" or “box” is detected in this field, it will show an error message.
City
Parameter to pre-fill this field: payor.city
The field only accepts Latin characters from A-Z and 0-9. Max. 256 characters.
The city needs to contain at least a vowel and have more than one character. For example, NY won’t be accepted and must be corrected to New York.
Post code
Parameter to pre-fill this field: payor.zip
If the country is “United States” the field only accepts exactly 5 digits, for any other country it accepts a maximum of 10 digits or characters.
Country or region
Parameter to pre-fill this field: payor.country
Validation rules when you're pre-filling the field via the API:
Two-letter format (ISO 3166-1 alpha-2), for example US for USA or GB for the United Kingdom.
Validation rules in the Elements form:
In the Elements form, this field is a dropdown with fixed country names, which means no validation is necessary in the form.
State
Parameter to pre-fill this field: payor.state
The state field is only displayed when the country is “United States” or “China”. When it is displayed, it is required for sending the form.
Validation rules when you're pre-filling the field via the API:
The state where the payer resides in.
Format:
Only the second part of the ISO 3166-2 code, for example for US-NY the value is NY.
List of ISO codes for states in US
List of ISO codes for states for China
Validation rules in the Elements form:
In the Elements form, this field is a dropdown with fixed state names, which means no validation is necessary in the form.
Parameter to pre-fill this field: payor.email
The field accepts Latin characters from A-Z and 0-9 and the following special characters:
-
+ (plus)
-
_ (underscore)
Max. 256 characters.
Phone number
Parameter to pre-fill this field: payor.phone
Validation rules when you're pre-filling the field via the API:
The phone number of the payer (including the country code).
Use + in front of the country code, for example, "+44123456" for country code 44.
Validation rules in the Elements form:
The country code can be picked from a dropdown with fixed values. The phone number field only accepts digits. Max. 15 digits.
Action Button
Action button that sends the form.
Implementing the Checkout Experience
Example page
SDK script
Add the Flywire SDK script in the header of your page:
Production:
https://artifacts.flywire.com/sdk/js/v0/main.js
Sandbox:
https://artifacts.flywire.com/sdk/js/v0/sandbox.main.js
Container
Only if you embed Checkout Experience within a container. Define a container where the Checkout Experience will be rendered.
Configuration script
Initialize the Flywire SDK with your frontend key
You receive the frontend key together with your other credentials when you register for the Flywire API.
Create the form
Must be payment.
Load the Checkout Experience via the session ID, see Configuration.
Set the display mode, see Configuration.
Event listeners
Define what happens after the element is closed, see Event handlers for a detailed example.
Mount
See Mounting.
<!DOCTYPE html>
<head>
    <script src="https://artifacts.flywire.com/sdk/js/v0/sandbox.main.js"></script>
</head>
<body>
    <div id="my-container-id"></div>

    <script type="module" crossorigin="anonymous" async type="text/javascript">
        (async () => {
            var sdk = await window.FlywireSDK(
                "your-frontend-key-here" // Replace with your actual frontend key
            );

	var elements = await sdk.elements();
	var checkout = await elements.create("payment", {
		sessionId: "your-session-id-here", // Replace with your actual session ID
		displayMode: "container"
  	});

     checkout.onEvent("success", handleSuccess); // Handle success event
     checkout.onEvent("error", handleError);    // Handle error event

   	 checkout.mount("my-container-id"); // Mount the element to the container

    })();
    </script>
</body>
</html>Session ID
To get a session ID, you need to create a Checkout Session, see:
Display Mode
There are two different display modes:
-
container: To embed the element in a container in your website.
-
full-screen: To display the element in a pop-up (a modal that covers the full-screen with a background)
If you don't provide this value, the default is full-screen.
var element = await elements.create("payment", {
	sessionId: "your-session-id-here", // Replace with your actual session ID
displayMode: "container"There are two key events you need to set up event handlers for:
Success Event (success)
This event is triggered when the element was sent successfully.
A successful postMessage confirms that the form was successfully submitted and that you can confirm the Checkout Session now. However, it does not indicate payment success. Payment status updates will be sent via callback notifications, see Payment Status Notifications for details.
Optional: Display a custom success message to your payer.
Mandatory: Send the postMessage data to your backend. The postMessage contains the confirm URL you need to confirm the Checkout Session, see the postMessage of the Event Listener.
Error Event (error)
This event is triggered when there was an error or when the payer closed the element.
Optional: Display a custom error message to your payer.
Mandatory: Send the error message to your backend for troubleshooting.
// Success event handler
element.onEvent("success", (sessionResult) => {
    // Custom success message for your payer
    const customSuccessMessage = "Your payment was created.";

    // Send the session result to the backend
    fetch('/your-backend-endpoint', {
        method: 'POST',
        headers: {
            'Content-Type': 'application/json',
        },
        body: JSON.stringify(sessionResult),
    });

    // Show the custom success message to the payer
    alert(customSuccessMessage);
});

// Error event handler
element.onEvent("error", (error) => {
    // Custom error message for your payer
    const customErrorMessage = "Something went wrong. Please try again.";

    // Send the error details to the backend
    fetch('/your-backend-endpoint', {
        method: 'POST',
        headers: {
            'Content-Type': 'application/json',
        },
        body: JSON.stringify(error),
    });

    // Show the custom error message to the payer
    alert(customErrorMessage);
});- Full-screen
- Container
Mounting as a pop-up in a full-screen overlay
For mounting the Checkout Experience as a full-screen pop-up, the displayMode must be set to full-screen (see Configuration). Don't specify a container ID, simply use the mount function.
element.mount(); // Mount the element as a pop-up in a full screen overlay Mounting in a container
When you are mounting the Checkout Experience in a container, you need to state a container ID here and ensure to include a container with the same ID on your website .
If you provided a valid container ID and the element still gets rendered as a pop-up, check your displayMode settings. It must be set to container, not full-screen (see Configuration).
checkout.mount("my-container-id"); // Mount the element to the containerExample page
CSS
Add CSS to adjust the layout of the form in the iframe.
iframe
Source
You’ll get the hostedFormUrl from the response after you created a Checkout Session.
See Example for getting the hostedFormUrl for an example of where to find the url.
Dimensions
Give the iframe a fixed height and width to avoid it filling up the whole screen.
| Form | Type | Height | Width |
| Card | tokenization |
823 |
660 |
| tokenization and pay | 1010 | 660 | |
| new mandate | 320 | 660 | |
| Direct debit | SEPA tokenization | 835 | 660 |
| SEPA tokenization and pay | 968 | 660 | |
| BACS tokenization | 928 | 660 | |
| EFT Canada tokenization | 928 | 660 | |
| ACH tokenization | 928 | 660 | |
| Bank transfer | Bank transfer | 835 | 660 |
| Type | Height | Width |
| Bank transfer instructions | 835 | 660 |
Event listener
Implement an event listener in the parent window to receive the postMessages after the form is completed.
See Example for a postMessage of the event listener for an example.
<!DOCTYPE html>
<head>
    <style>
        .my-iframe {
            padding: 18px;
            margin: 32px 0px;
            background: #FFFFFF;
        }
    </style>
</head>
<body>

    <!-- iframe to display the Flywire form -->
    <iframe
        src="{hostedFormUrl}"
        id="flywireform"
        title="Flywire Payment Form"
        class="my-iframe"
        height="928"
        width="660">
    </iframe>

    <script>
     window.addEventListener("message", (event) => {
    // IMPORTANT: Verify the origin of the data to ensure it is from Flywire
    // The use of indexOf ensures that the origin ends with ".flywire.com"
    if (event.origin.indexOf(".flywire.com")) {
        // If the message was sent from Flywire:
        // Extract the data from the event
        const result = event.data;
        if (result.source !== 'checkout_session') {
            return;
        }

        // Check if the session was successful and confirm_url is present:
        if (result.success && result.confirm_url) {
            // The session was successful and the confirm_url has been returned
            const confirm_url = result.confirm_url;
            console.log(result);
            // Use the confirm_url to confirm the Checkout Session
            console.log("Confirm URL:", confirm_url.url);
        } else {
            // Handle failure accordingly
            console.error("Session unsuccessful or confirm_url missing.");
        }
    }
});
    </script>
</body>
</html>
Example for getting the hostedFormUrl
This is a response after creating a Checkout Session that contains the url you need to provide under src="{hostedFormUrl}":
The session ID is the unique identifier for a Checkout Session.
This is the session ID you need if you are using Flywire Elements with Smart Rendering
Smart Rendering means you render Flywire Elements on your website with the help of the Flywire SDK script.
Extensive customization
Select which payer fields to display, choose the language, and customize the appearance, such as fonts and colors.
Responsive layout
Optimized responsive layout for desktop and mobile devices.
Easy event handling
Simply define what should happen in case of success or errors - no need to filter individual postMessages.
The time before the Checkout Session expires in seconds.
hosted_form object
Only relevant when you render the form via iframe. More info:
-
iframe rendering for Flywire Elements
-
iframe rendering for Checkout
The hosted-form-URL. This is the URL your iframe displays.
The method (GET).
warnings array
The field where the error occurred.
For a description of all fields and their valid values form see:
-
Payment Element if you are using Flywire Elements
-
Checkout Experience if you are using Checkout
errors array
You can decide which information from the response you want to filter out in your backend before passing the URL to your frontend.
The error text.
The error type.
{
"id": "494d2e9d-c0c9-407c-9094-5b3b2a02c00f",
"expires_in_seconds": 1800,
"hosted_form": {
	"url": "https://elements.flywire.com/v1/form?session_id=494d2e9d-c0c9-407c-9094-5b3b2a02c00f",
	"method": "GET"
},
"warnings": []
}
Example for a postMessage of the event listener
After your payer sent the form, the event listener will return a successful postMessage.
A successful postMessage confirms that the form was successfully submitted and that you can confirm the Checkout Session now. However, it does not indicate payment success. Payment status updates will be sent via callback notifications, see Payment Status Notifications for details.
The postMessage contains the following information:
Indicates if the Checkout Session was successful.
-
true: Checkout Session successful
-
false: Checkout Session failed
You can use this parameter to filter the PostMessages to only return successful ones. This is only necessary when you render via iframe.
This parameter helps you filter the PostMessages to only return the result of the Checkout Session. This is only necessary when you render via iframe.
payor object
The email address your payer entered in the UI form. If you are handling emails yourself, you need to use this email address to send mandatory emails to your payer.
The payer's email address is returned so you can ensure you have the correct email address.
Even if you pre-filled the payer information with an email address, your payer might have changed it when filling out the form.
If you are handling emails yourself, you need to ensure you have the correct email address for the payer.
confirm_url object
Contains the confirm URL. The confirm URL is the full URL for the request to confirm the session, already resolved with the correct session ID.
The method (POST) indicates that you must send a POST request to the confirm URL.
The confirm URL. The confirm URL is the full url for the request to confirm the session, already resolved with the correct session ID.
{
  "success": true,
  "source": "checkout_session",
  "payor": {
    "email": "[email protected]"
  },
  "confirm_url": {
    "method": "POST",
    "url": "https://api-platform.flywire.com/payments/v1/checkout/sessions/494d2e9d-c0c9-407c-9094-5b3b2a02c00f/confirm",
  }
}
