Intelligent Links
For this Pay-By-Link option, you’re creating the link by adding query parameters to the link you give to your payers.
How does it work?
-
You build the link with these two parts:
- Base URL (depends on the environment you want to use, see Base URL)
-
Query String (depends on your individual settings and use case, see Query parameters)
Example:
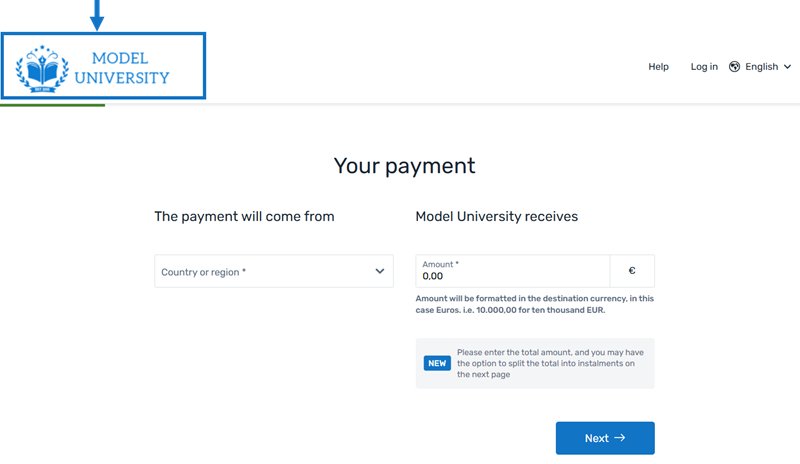
https://payment.demo.flywire.com/pay/payment?recipient=TQQ&amount=200000&sender_first_name=Peter&sender_last_name=Payer
-
You give the link to your payer.
Base URL
There are two different versions of Intelligent Links:
-
IL-Gateway
-
IL-Payment
Which one should I use?
You can use either version, both will bring your payers to your PayEx portal. They offer slightly different functionality, so which one you should choose depends on your current use case. This documentation will help you decide which version you want to use for each link you generate, depending on the features you need.
IL-Gateway
| Production | |
| Demo | |
IL-Payment
| Production | |
| Demo | |
Query parameters
Query parameters define your settings for the payment. With those parameters, you direct payers to your unique PayEx portal and decide which fields will be pre-filled there. Each query parameter has a value that will either define settings (for example, your portal ID that directs your payer to your unique PayEx portal) or will pass data into a field of your PayEx portal (for example, the payment amount).
Required basic settings
These parameters are required to properly direct your payer to your unique PayEx portal.
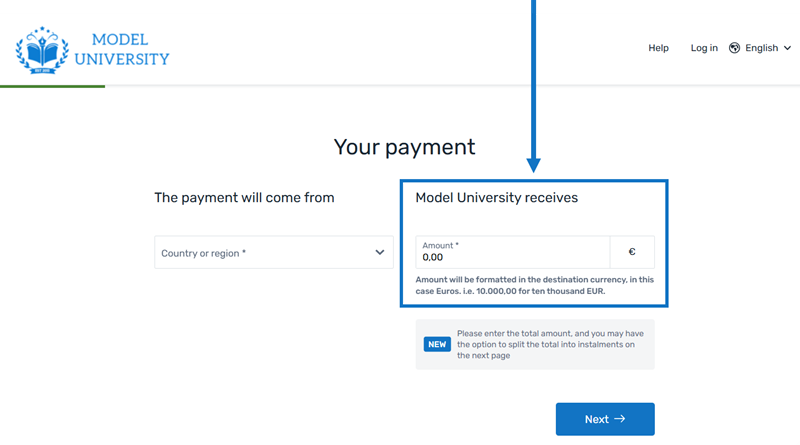
Your logo in the upper left corner tells your payers that they are in your unique PayEx portal:
| Name | Description | Example |
|---|---|---|
| provider |
This parameter can only be used for IL-Gateway links
(Base URL https://gateway.flywire.com/v1/transfers). This parameter is required for IL-Gateway links. Value must be PayByLink The provider value defines the internal tracking protocol for the payment. You must use PayByLink unless a different value has been formally agreed upon with Flywire. |
provider=PayByLink |
| payment_destination |
This parameter can only be used for IL-Gateway links
(Base URL https://gateway.flywire.com/v1/transfers). This parameter is required for IL-Gateway links. The unique subdomain for the portal. The subdomain has been provided to you by Flywire when your portal was set up. You can look up the subdomain by checking your portal configuration.
|
payment_destination=myuniversity |
| recipient |
This parameter can only be used for IL-Payment links
(Base URL https://payment.flywire.com/pay/payment). This parameter is required for IL-Payment links. The recipient ID (also called portal code). The recipient ID identifies the recipient (also called portal). The recipient ID has been assigned by Flywire when the recipient has been set up. Format: Either: 3 letters (ABC) Or: 5 alphanumeric characters, always starting with a letter (ABC1D) |
recipient=FWU |
Payment amount or items
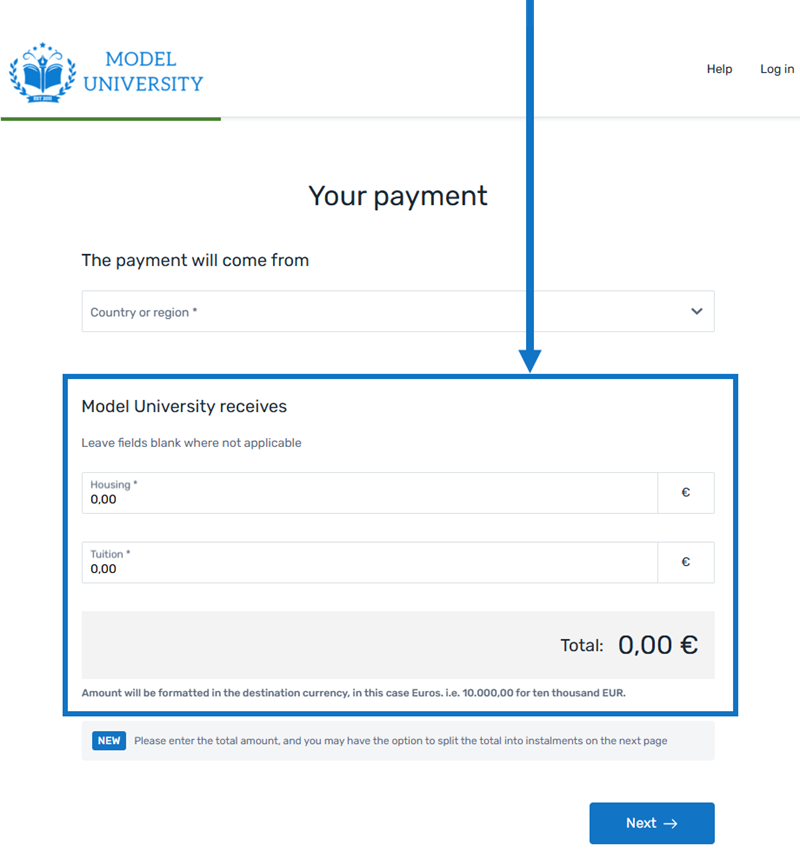
When setting up your portal with Flywire, you can choose how you want to handle amounts. There are two possible configurations:
-
One amount: There is only one field for the total amount.
-
Items: There are multiple fields to breakdown specific costs (e.g., "Tuition" and "Housing"), and each field has an amount.
If you want to change your portal configuration, please contact the Solutions team.
Not sure which one you’re using? Use the portal checker and look at the field IDs for items:
-
One amount: You will see a single field with the ID amount.
-
Items: You will see one or more IDs with specific names (e.g., tuition_fee, housing, etc.).
My portal uses one amount
| Name | Description | Example | ||||||||
|---|---|---|---|---|---|---|---|---|---|---|
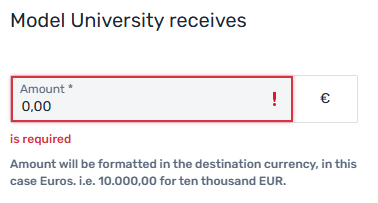
| amount |
The payment amount in the billing currency. The billing currency is the currency in which the recipient of the payment is billing their payer. The billing currency depends on the The amount is specified in the smallest unit of the currency, called subunits. For example, in USD, the subunit is cents, and 100 cents equal 1 USD. So, an amount of 12025 (cents) is equivalent to 120.25 USD. Note that the subunit-to-unit ratio varies by currency, it is not always 100. See Currencies for the subunits of each currency. |
amount=10000 | ||||||||
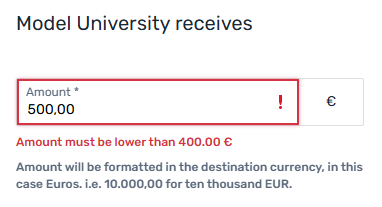
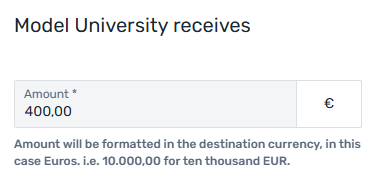
| max_amount |
This parameter can only be used for IL-Gateway links
(Base URL https://gateway.flywire.com/v1/transfers). The max_amount parameter lets you set the maximum amount you're asking for, allowing your payer to change it to a smaller amount. This is useful, for allowing partial payments or when the payer might have already partially paid via a different payment. For this reason, you set always set the max_amount to the same amount as the amount (or total amount of all items) - this gives your payer the option to pay less than the amount you are asking for. If your portal uses items, the maximum amount applies to the sum of all items. It depends on your portal settings if a payer is allowed to edit the amount you passed. Consider your portal settings before you pass amounts or define a maximum amount.
The amount is specified in the smallest unit of the currency, called subunits. For example, in USD, the subunit is cents, and 100 cents equal 1 USD. So, an amount of 12025 (cents) is equivalent to 120.25 USD. Note that the subunit-to-unit ratio varies by currency, it is not always 100. See Currencies for the subunits of each currency. |
max_amount=10000 | ||||||||
| read_only |
This parameter can only be used for IL-Payment links
(Base URL https://payment.flywire.com/pay/payment). You can use the read_only parameter to make a field read-only. The following types of fields can be made read-only:
|
Use the field name(s) of the fields you want to make read only: read_only=amount,student_id You can pass multiple values as a comma-separated list with no spaces in between. Keep in mind: Special characters must be URL-encoded for Pay-By-Link with query parameters (e.g., @ → %40 and , (comma) → %2C). In this example this means: read_only=amount%2Cstudend_id |

My portal uses items
| Name | Description | Example |
|---|---|---|
|
FOR IL-GATEWAY items[item_internal_name]FOR IL-PAYMENT item_internal_name |
The amount for this item in the billing currency, The billing currency is the currency in which the recipient of the payment is billing their payer. The billing currency depends on the The amount is specified in the smallest unit of the currency, called subunits. For example, in USD, the subunit is cents, and 100 cents equal 1 USD. So, an amount of 12025 (cents) is equivalent to 120.25 USD. Note that the subunit-to-unit ratio varies by currency, it is not always 100. See Currencies for the subunits of each currency. |
FOR IL-GATEWAY items[tuition]=200000 FOR IL-PAYMENT tuition=200000 |
| read_only |
This parameter can only be used for IL-Payment links
(Base URL https://payment.flywire.com/pay/payment). You can use the read_only parameter to make a field read-only. The following types of fields can be made read-only:
|
Use the field name(s) of the fields you want to make read only: read_only=amount,student_id You can pass multiple values as a comma-separated list with no spaces in between. Keep in mind: Special characters must be URL-encoded for Pay-By-Link with query parameters (e.g., @ → %40 and , (comma) → %2C). In this example this means: read_only=amount%2Cstudend_id |
Dynamic fields
|
|
Fields of a recipient (also called a portal) are fields that are specific to that recipient. Depending on how you use Flywire, you might know them under the names dynamic fields, custom fields, or student fields. These fields are defined when the recipient (portal) is set up by Flywire. |
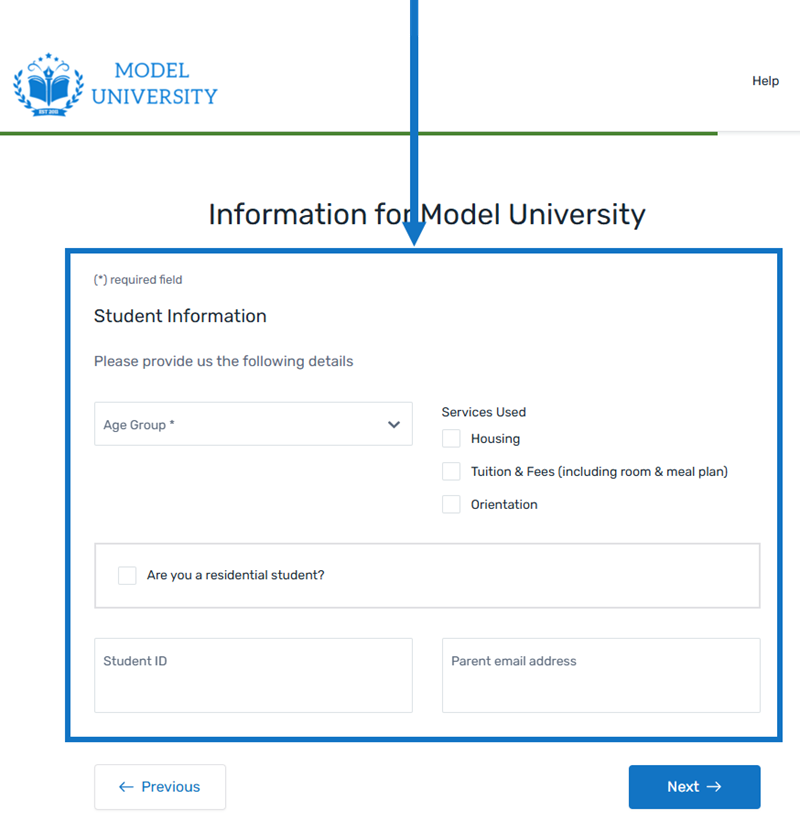
Guide for pre-filling dynamic fields
Pre-filling dynamic fields is optional. If you want to pre-fill them, you need to provide the internal_name of the field (you can check your portals settings to find the internal names of your dynamic fields.).
Dynamic fields can have different types, and it depends on the field type how you pre-fill them via query parameters.
- String
- Dropdown
- Single checkbox
- Multiple checkboxes
| Description | How to pre-fill the field | ||||||||||||||||||||
|---|---|---|---|---|---|---|---|---|---|---|---|---|---|---|---|---|---|---|---|---|---|
|
A field to enter a string. The field can have different formats:
When you are checking your portal settings, this field type is called string - text/phone/country/date. |
Field name: Use the internal name (Id) of the field. You can check your portal settings to find the Id. Values:
|


| Description | How to pre-fill the field |
|---|---|
|
A dropdown field with one possible option to pick.
When you are checking your portal settings, this field type is called string. |
Field name: Use the internal name (Id) of the field. You can check your portal settings to find the Id. Values: Pass the internal name (value, not the label) as a string. If you don't know the internal value, contact the Solutions team. You can only pass one value, since this is a dropdown.
Example: student_status=full_time |

| Description | How to pre-fill the field |
|---|---|
|
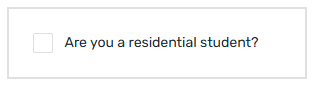
A single checkbox so payers can check it for "yes" or uncheck it for "no"
When you are checking your portal settings, this field type is called boolean. |
Field name: Use the internal name (Id) of the field. You can check your portal settings to find the Id. Values: Pass either true (checkbox activated) or false (checkbox deactivated), since this is a boolean field. Example: residential_student=true |
| Description | How to pre-fill the field |
|---|---|
|
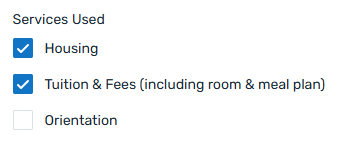
Multiple checkboxes so the payer can pick multiple values.
When you are checking your portal settings, this field type is called array. |
Field name: Use the internal name (Id) of the field. You can check your portal settings to find the Id. Values: Pass the internal name (value, not the label) as a string. If you don't know the internal value, contact the Solutions team. Example: services_used=housing You can pass multiple values as a comma-separated list with no spaces in between. Keep in mind: Special characters must be URL-encoded for Pay-By-Link with query parameters (e.g., @ → %40 and , (comma) → %2C). In this example this means: services_used=housing%2Ctuition |
Controlling if the payer can edit pre-filled fields
For IL-Payment:
When you pre-fill fields via the generated link, the fields will still be editable by default. You can decide if you want to make them read-only for your payers with the read_only parameter. You can use this parameter for:
-
amount
-
dynamic fields
-
payer information fields
| Name | Description | Example |
|---|---|---|
| read_only |
This parameter can only be used for IL-Payment links
(Base URL https://payment.flywire.com/pay/payment). You can use the read_only parameter to make a field read-only. The following types of fields can be made read-only:
|
Use the field name(s) of the fields you want to make read only: read_only=amount,student_id You can pass multiple values as a comma-separated list with no spaces in between. Keep in mind: Special characters must be URL-encoded for Pay-By-Link with query parameters (e.g., @ → %40 and , (comma) → %2C). In this example this means: read_only=amount%2Cstudend_id |
For IL-Gateway:
When you pre-fill fields via a generated link, dynamic fields will be read-only for your payer.
This means:
-
For checkboxes, your payer won't be able to select more values or un-select the ones you selected.
-
If you pass invalid values (because of a typo or because the internal name of a value has been changed), the field will be empty and read-only for your payer. If the field is mandatory, this can mean that your payer can't complete the payment. Be careful with passing values that are prone to change.
Payer information
|
|
Payer information fields contain the details of the payer. The information necessary for Flywire to conduct compliance checks, such as Anti-Money-Laundering (AML). If the payer details are known to you, you can pre-fill the payer fields in your PayEx portal. |
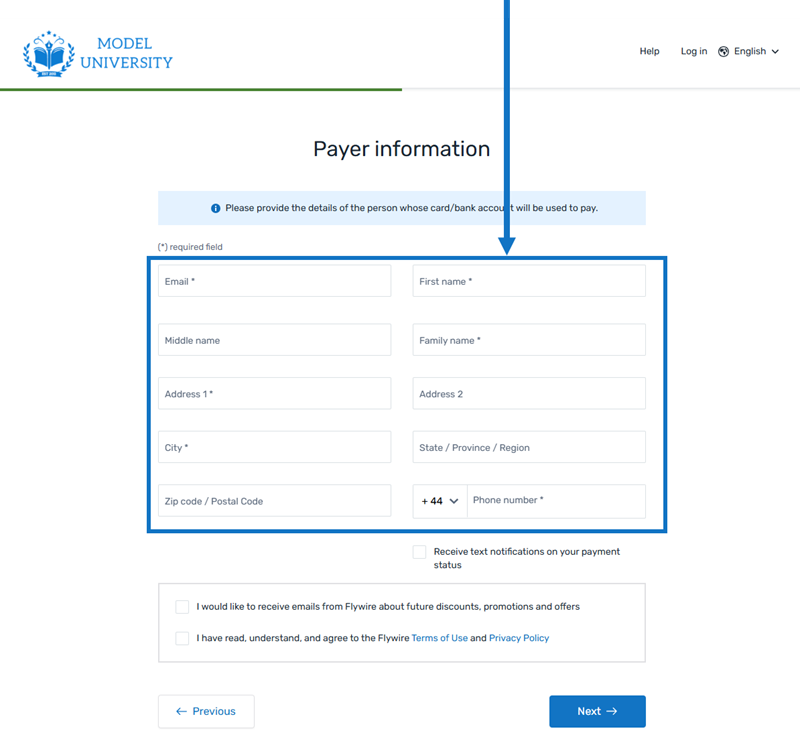
| Name | Description | Example |
|---|---|---|
|
sender_email |
The payer's email address. |
Keep in mind: Special characters must be URL-encoded for Pay-By-Link with query parameters (e.g., @ → %40 and , (comma) → %2C). sender_email=p-payer%40example.com |
| sender_first_name |
The payer's first name. If the payer is a company or organization, use the organization name as the first name. |
sender_first_name=Peter |
| sender_middle_name |
The payer's middle name. |
sender_middle_name=James |
| sender_last_name |
The last name (family name) of the payer. If the payer is a company or organization, use the organization name as the last name. |
sender_last_name=Payer |
| sender_address1 |
The first line of the payer's address. The residential address is required for legal reasons, which is why PO boxes are not permitted. |
sender_address1=Main Street 14 Keep in mind: Special characters must be URL-encoded for Pay-By-Link with query parameters (e.g., @ → %40 and , (comma) → %2C). In this example: sender_address1=Main%20Street%2014 |
| sender_address2 |
The second line of the payer's address. |
sender_address2=Apartment 2 Keep in mind: Special characters must be URL-encoded for Pay-By-Link with query parameters (e.g., @ → %40 and , (comma) → %2C). In this example: sender_address2=Apartment %202 |
| sender_city |
The payer's city. |
sender_city=London |
| sender_state |
The state where the payer resides in. Format: Only the second part of the ISO 3166-2 code, for example for US-NY the value is NY. |
sender_state=NY |
| sender_zip |
The payer's zip code. |
sender_zip=12345 |
| sender_phone |
The phone number of the payer (including the country code). Use + in front of the country code, for example, "+44123456" for country code 44. |
sender_phone=+441234567
Keep in mind: Special characters must be URL-encoded for Pay-By-Link with query parameters (e.g., @ → %40 and , (comma) → %2C). In this example this means: phone_number=%2B44123456789 |
Read only: Controlling if the payer can edit fields
For IL-Payment:
When you pre-fill fields via the generated link, the fields will still be editable by default. You can decide if you want to make them read-only for your payers with the read_only parameter. You can use this parameter for:
-
amount
-
dynamic fields
-
payer information fields
| Name | Description | Example |
|---|---|---|
| read_only |
This parameter can only be used for IL-Payment links
(Base URL https://payment.flywire.com/pay/payment). You can use the read_only parameter to make a field read-only. The following types of fields can be made read-only:
|
Use the field name(s) of the fields you want to make read only: read_only=amount,student_id You can pass multiple values as a comma-separated list with no spaces in between. Keep in mind: Special characters must be URL-encoded for Pay-By-Link with query parameters (e.g., @ → %40 and , (comma) → %2C). In this example this means: read_only=amount%2Cstudend_id |
For IL-Gateway:
Important note for pre-filling dynamic fields:
When you pre-fill fields via a generated link, dynamic fields will be read-only for your payer.
This means:
-
For checkboxes, your payer won't be able to select more values or un-select the ones you selected.
-
If you pass invalid values (because of a typo or because the internal name of a value has been changed), the field will be empty and read-only for your payer. If the field is mandatory, this can mean that your payer can't complete the payment. Be careful with passing values that are prone to change.
Payer redirection
You can display a button in your PayEx portal that redirects your payer somewhere, for example your website. This button is displayed on the final page of the payment creation process, to the right of the payment instructions.
Your portal might have default settings for the return button and its label. In that case, you don't need to provide a URL in order to display the button. But if there are no default settings and you don't provide a valid URL in the return_cta parameter, the button will not be displayed
| Name | Description | Example |
|---|---|---|
| return_cta |
The URL payers are directed to when clicking the return button. Maximal 500 characters. Your portal might have default settings for the return button and its label. In that case, you don't need to provide a URL in order to display the button. But if there are no default settings and you don't provide a valid URL in the return_cta parameter, the button will not be displayed |
return_cta=https://www.my-website.com
Keep in mind: Special characters must be URL-encoded for Pay-By-Link with query parameters (e.g., @ → %40 and , (comma) → %2C). In this case: |
| return_cta_name |
The label of the return button. Maximum 500 characters. If you don't specify a label for your button, the default label "Return to {portal name}" is used. |
return_cta_name =Return to my website Keep in mind: Special characters must be URL-encoded for Pay-By-Link with query parameters (e.g., @ → %40 and , (comma) → %2C). In this case: |
Callback configuration
Payment status notifications are callbacks for payment events, such as a payment status change. They enable you to track a payment while it makes its way through the payment workflow. Whenever a status change event occurs, for example when the payment status changes from  Initiated to
  Processed, you'll get a notification to the URL you provided.
Why should I use callbacks?
Using callbacks has several benefits:
-
Callbacks can be used to facilitate reconciliation of Flywire payments to accounting systems, ERPs, etc.
-
Callbacks provide real-time updates for payment statuses, no manual checks in Dashboard needed.
-
Callbacks are especially useful for direct debit payments where the payment capture will take a few working days and may be subject to future failure.
-
You can use callbacks to trigger processes that start after the payment is completed.
When should I use callbacks?
If you have access to Flywire Dashboard, callbacks are optional (but recommended) since you have the option to manually track the payment progress there. If you don't have access to Flywire Dashboard, it is highly recommended to use callbacks enable you to track the payment progress.
If you are using the ![]() Flywire API, callbacks are essential to ensure you get reliable updates about the payment in real-time. Without callbacks, your system would have to poll the API for updates, which is resource-intensive and can lead to performance bottlenecks or rate-limiting.
Flywire API, callbacks are essential to ensure you get reliable updates about the payment in real-time. Without callbacks, your system would have to poll the API for updates, which is resource-intensive and can lead to performance bottlenecks or rate-limiting.
Enabling callbacks
To enable callbacks, you need to provide a notification URL where Flywire will send HTTP requests. This can be done in two ways:
There are two different URLs for receiving callbacks:
Static URL
For API integrations:
When you set up your application that accesses the Flywire API, you had the option to define a notifications URL. This is the static notifications URL. Callbacks will be sent to this URL for all payments you created via the Flywire API.
The recipient of a payment may also have a static notifications URL defined which might be different from your static notifications URL as a client. In that case, callbacks will also be sent to the recipient's notifications URL.For other integrations:
When you set up your portal together with Flywire, you had the option to define a callback URL for that portal. Callbacks will be sent to this URL for all payments for this portal.
If you don't use a static callback URL yet and want to start using it, please contact the Solutions team.
Dynamic URL
The URL you can set in a parameter when you are creating a payment is the dynamic notifications URL. Since this URL can be different for every payment you create, it is called dynamic.
How defining static and dynamic URLs affect callbacks
 = not set = not set |
 = set = set |
| Static URL |
Dynamic URL |
Result |
|
|
|
You won't receive notifications. |
|
|
|
You'll receive notifications to your static URL. |
|
|
|
For API integrations: The dynamic URL will override the static URL and you'll receive notifications only to the dynamic URL. For other integrations: You'll receive callbacks to both URLs. This is called "dual callback URL". A dual callback URL means you defined a static URL in your portal and you are sending callbacks to a different callback URL via the parameter for the payment. In this case, callbacks will be sent to both URLs. This
approach can be useful if you want to update two separate systems.
|
|
|
|
You'll receive notifications to your dynamic URL |
| Name | Description | Example | ||||||||||||||||||
|---|---|---|---|---|---|---|---|---|---|---|---|---|---|---|---|---|---|---|---|---|
| callback_url |
The URL for receiving notifications. The notifications URL enables you to receive callbacks about the payment status (see Payment Status Notifications). The notifications URL is the dynamic URL for receiving callbacks. There are two different URLs for receiving callbacks: Static URL
Dynamic URL
How defining static and dynamic URLs affect callbacks
|
callback_url=https://www.example.com Keep in mind: Special characters must be URL-encoded for Pay-By-Link with query parameters (e.g., @ → %40 and , (comma) → %2C). In this case: |
||||||||||||||||||
| callback_id |
The external reference. The external reference helps you to identify a payment, since the Flywire-generated payment reference might not be the way you typically identify payments. With the external reference, you can enter your own identifier, such as an ID or invoice number. The external reference is included in all status notifications to help you map a payment to a callback notification. (see Payment Status Notifications) |
callback_id=my-callback-id Keep in mind: Special characters must be URL-encoded for Pay-By-Link with query parameters (e.g., @ → %40 and , (comma) → %2C). |
||||||||||||||||||
| callback_version |
The version of the callback. Possible values:
If you want to receive callbacks, you must provide the callback version and it must be version 2. For details about callbacks see Payment Status Notifications. |
callback_version=2 |
