Testing Pre-Authorization Payments
This page guides you through testing your integration - it guides you through creating payments and testing various behaviors. It does not cover all possible payment flows. For simulating payment flows and testing callbacks for each payment status, refer to Testing Payment Flows.
Testing requires you to make API calls in the Sandbox environment:
https://api-platform-sandbox.flywire.com/
1. Choose the recipient for the test payment.
A recipient - also called a portal - contains the information that is needed for receiving funds, like the receiving bank account, the currency in which Flywire takes payments from your payers, or specific fields your system requires to process a payment. Flywire assigns each recipient a unique identifier, called recipient ID or portal code.
You as a client can have multiple recipients, for example for different bank accounts or currencies.
The list of recipients contains all the recipients that are available to you as a client. You can display this list in your UI, for example as a drop down, so that the person creating the payment in your system can choose one of the recipients.
Parameters for the Request Body
No request body needed.
Optional Query Parameters for Pagination
This endpoint supports pagination. If you are not providing any pagination parameters, the response is returned with default pagination settings.
Pagination parameters are added as query parameters with the request in the format {endpoint_path}?page=2&per_page=10
The default setting is:
page=1 (start on page 1)
per_page=10 (display 10 entries per page)
Enables you to access a specific page of the results.
Possible values: Any positive number except zero.
Enables you to define how many results will be included per page.
Possible values: min 1, max 100
curl https://base-url-placeholder/recipients?page=1&per_page=100
  -X GET
  -H "Content-Type: application/json"
  -H "X-Authentication-Key: {api_key}"
2. Create a Checkout Session.
Parameters for the Request Body
The type of the Checkout Session. Must be one_off for Pre-Authorization Payments.
Must be cards for Pre-Authorization Payments since only card payments can be pre-authorized.
charge_intent object
Must be manual. This parameter ensures that you are able to manually capture the funds within the holding period.
The authorization type defines if the blocked amount can be changed during the holding phase and if the holding period can be extended.
If you leave this parameter out it defaults to preauth.
Possible values:
-
preauth (default): The amount that has been authorized can be changed during the holding phase and the holding period can be extended, see Adjusting or Extending a Pre-Authorization Payment.
-
final: The amount that has been authorized is final and cannot be changed, and the holding period cannot be extended.
Must be one_off.
payor object
These fields enable you to pass payer data to pre-fill the fields of the form.
For a description of all fields and their valid values form see:
-
Payment Element if you are using Flywire Elements
-
Checkout Experience if you are using Checkout
-
Pre-filling fields is optional. If no values are provided, the fields will be empty for the payer to complete.
-
Pre-filling fields alone does not affect if fields are editable. Pre-filled fields remain editable unless you explicitly made them read-only or hide them via the settings.
Best practice
Before pre-filling payer fields, consider who the actual payer is.
The form asks for the cardholder or bank account owner’s information. There can be cases when the personal data you have on stored (for example, in your ERP system) is different from the data for the actual payer. Always consider which information you store in your system and how useful it is for pre-filling fields.
Example: Students log into your school portal to pay tuition. In most cases, their parents pay the tuition with their credit card. If you automatically pre-fill the payer fields with the student's profile info, every student has to correct the info and change it to their parent's information.
This distinction is crucial if you plan to hide fields or make them read-only. If you use the wrong data for pre-filling fields and make it impossible for the payer to change it, you could prevent them from completing the payment.
You can to set these fields to hidden or read-only for the payer through settings in the options object.
When using Elements, you can control which payer fields can be edited by your payer - either by setting them to read-only or be completely hiding the field from the payer.
|
You can configure read-only at three levels: |
|
|
What happens if a field has conflicting settings at multiple levels? Smart Rendering > Individual Field > Global Form This means Smart Rendering settings win over individual field settings, and individual field settings win over global form settings. |
|
You can configure the visibility of fields at two levels: |
|
|
What happens if a field has conflicting settings at multiple levels? Smart Rendering > Individual Field This means Smart Rendering settings win over individual field settings. |
What happens if something goes wrong? - Automatic Field Unlocking
All payer fields are required to send the form. If your settings would prevent the payer from submitting the form - for example you're hiding the email field but provided an invalid address- the field automatically becomes visible and editable.
Automatic field unlocking happens for a hidden or read-only field when:
-
you didn't submit a value through the Checkout Session (results in an empty field for the payer to fill out)
-
you submitted an invalid value through the Checkout Session (results in a field showing the invalid value, highlighted with an error message so that the payer can correct it)
The payer's first name.
The field only accepts Latin characters from A-Z and 0-9. Max. 256 characters.
The last name (family name) of the payer.
The field only accepts Latin characters from A-Z and 0-9. Max. 256 characters.
The payer's address.
The field only accepts Latin characters from A-Z and 0-9 and the following special characters:
-
, (comma)
-
/ (slash)
-
- (hyphen)
The address can’t be a PO box. If the words "PO" or “box” is detected in this field, it will show an error message.
The payer's city.
The field only accepts Latin characters from A-Z and 0-9. Max. 256 characters.
The city needs to contain at least a vowel and have more than one character. For example, NY won’t be accepted and must be corrected to New York.
The country of the payer.
Format:
Two-letter format (ISO 3166-1 alpha-2), for example US for USA or GB for the United Kingdom.
The state field is only displayed when the country is “United States” or “China”. When it is displayed, it is required for sending the form.
The state where the payer resides in.
Format:
Only the second part of the ISO 3166-2 code, for example for US-NY the value is NY.
The phone number of the payer (including the country code).
Validation rules when you're pre-filling the field via the API:
To fill out the country code field of the phone number, you need to put 00 in front of it. For example, "0044123456" will be turned into "44" in the country code field and "123456" in the phone number field. If you don't use 00, the country code field will be left empty and only the phone number field will be populated.
Validation rules in the Elements form:
The country code can be picked from a dropdown with fixed values. The phone number field only accepts digits. Max. 15 digits.
The payer's email address.
The field accepts Latin characters from A-Z and 0-9 and the following special characters:
-
+ (plus)
-
_ (underscore)
Max. 256 characters.
The payer's zip code.
If the country is “United States” the field only accepts exactly 5 digits, for any other country it accepts a maximum of 10 digits or characters.
options object
These settings affect how the Elements form is displayed to your payer.
When using Elements, you can control which payer fields can be edited by your payer - either by setting them to read-only or be completely hiding the field from the payer.
|
You can configure read-only at three levels: |
|
|
What happens if a field has conflicting settings at multiple levels? Smart Rendering > Individual Field > Global Form This means Smart Rendering settings win over individual field settings, and individual field settings win over global form settings. |
|
You can configure the visibility of fields at two levels: |
|
|
What happens if a field has conflicting settings at multiple levels? Smart Rendering > Individual Field This means Smart Rendering settings win over individual field settings. |
What happens if something goes wrong? - Automatic Field Unlocking
All payer fields are required to send the form. If your settings would prevent the payer from submitting the form - for example you're hiding the email field but provided an invalid address- the field automatically becomes visible and editable.
Automatic field unlocking happens for a hidden or read-only field when:
-
you didn't submit a value through the Checkout Session (results in an empty field for the payer to fill out)
-
you submitted an invalid value through the Checkout Session (results in a field showing the invalid value, highlighted with an error message so that the payer can correct it)
form object
Controls the label for the action button of the UI form.
Possible values
-
save (default value)
-
next
-
pay
Note: The label will be translated according to the locale parameter.
The language you want to translate the form to. The localization affects the labels of the form fields and the action button.
The default is English (“en”).
| Language | Value for locale |
|---|---|
| English | en |
| Spanish | es-ES |
| Chinese | zh-CN |
| Korean | ko |
| Portuguese | pt-PT |
| Japanese | ja |
| French | fr-FR |
| Bahasa Indonesia | id |
| Arabic | ar |
| Vietnamese | vi |
| Italian | it-IT |
| German | de-DE |
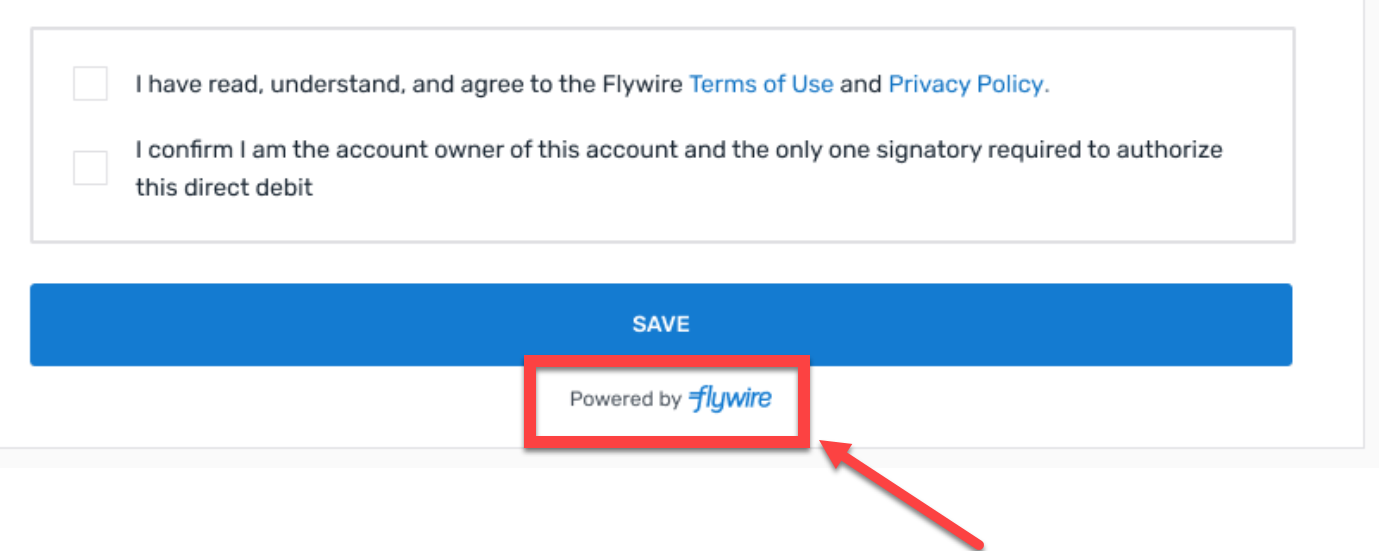
Controls if the "Powered by Flywire" logo is shown at the bottom of the form.
true displays the logo, false hides the logo.
The logo is shown below the action button of the Elements form:
You can use this parameter to hide the amount you will receive in the Elements form to avoid redundant info if your UI already displays it. If hidden, you must ensure the amount you will receive remains visible elsewhere for transparency. The form will only display the amount the payer has to send, which may differ from your requested amount due to FX or fees.
If this parameter is not provided, the default is true.
Possible values:
-
true (default): Both the amount the payer sends and the amount

-
false: Only the amount the payer sends is shown.


Controls if the payer fields in the Element form can be edited by the payer:
-
true: All payer fields will be displayed but are not editable.
-
false (default): All payer fields will be displayed and are editable.
You can set all fields to read-only and then overwrite the setting for individual fields.
When using Elements, you can control which payer fields can be edited by your payer - either by setting them to read-only or be completely hiding the field from the payer.
|
You can configure read-only at three levels: |
|
|
What happens if a field has conflicting settings at multiple levels? Smart Rendering > Individual Field > Global Form This means Smart Rendering settings win over individual field settings, and individual field settings win over global form settings. |
|
You can configure the visibility of fields at two levels: |
|
|
What happens if a field has conflicting settings at multiple levels? Smart Rendering > Individual Field This means Smart Rendering settings win over individual field settings. |
What happens if something goes wrong? - Automatic Field Unlocking
All payer fields are required to send the form. If your settings would prevent the payer from submitting the form - for example you're hiding the email field but provided an invalid address- the field automatically becomes visible and editable.
Automatic field unlocking happens for a hidden or read-only field when:
-
you didn't submit a value through the Checkout Session (results in an empty field for the payer to fill out)
-
you submitted an invalid value through the Checkout Session (results in a field showing the invalid value, highlighted with an error message so that the payer can correct it)
payor_fields object
Here you can define hidden and read_only settings for individual payer fields.
-
first_name
-
last_name
-
business_name (only displayed for direct debit payments with account type business)
-
address
-
city
-
country
-
state
-
phone
-
email
-
zip
If you defined a global setting via the payor_fields_read_only parameter, the settings for an individual field will overwrite the global setting.
When using Elements, you can control which payer fields can be edited by your payer - either by setting them to read-only or be completely hiding the field from the payer.
|
You can configure read-only at three levels: |
|
|
What happens if a field has conflicting settings at multiple levels? Smart Rendering > Individual Field > Global Form This means Smart Rendering settings win over individual field settings, and individual field settings win over global form settings. |
|
You can configure the visibility of fields at two levels: |
|
|
What happens if a field has conflicting settings at multiple levels? Smart Rendering > Individual Field This means Smart Rendering settings win over individual field settings. |
What happens if something goes wrong? - Automatic Field Unlocking
All payer fields are required to send the form. If your settings would prevent the payer from submitting the form - for example you're hiding the email field but provided an invalid address- the field automatically becomes visible and editable.
Automatic field unlocking happens for a hidden or read-only field when:
-
you didn't submit a value through the Checkout Session (results in an empty field for the payer to fill out)
-
you submitted an invalid value through the Checkout Session (results in a field showing the invalid value, highlighted with an error message so that the payer can correct it)
Example:
first_name object
Controls if this payer field will be visible to the payer in the Element form:
-
true: This field will not be displayed in the form.
-
false (default): This field will be displayed in the form.
Controls if this payer field will be editable for the payer in the Element form:
-
true: This field will not be editable in the form.
-
false (default): This field will be editable in the form.
recipient object
Contains the fields of the recipient.
fields array
It depends on the recipient which fields are optional or required. If a field is required, you must provide it here. Optional fields can be left out.
You have two options:
Checking via the API
You can check which fields are required for a recipient (portal) with this request (replace {recipientId} with the recipient ID):
Required fields have the required parameter set to true. For more info see Getting Details about a Recipient.
Checking online
You can check which fields are required by checking your portal configuration.
Identifier of the field.
The value for this field.
items array
An item is something that your payer can pay for (for example: tuition fees, housing, etc.). When you create a payment, you display the items to your payer and they can choose for which items they want to pay. How many items there are depends on the recipient's configuration.
You can only use one item in this request. The id of the item must be called default.
Identifier of the item.
You can only use one item in this request. The id of the item must be called default.
The amount for this item in the billing currency,
The billing currency is the currency in which the recipient of the payment is billing their payer. The billing currency depends on the
The amount is specified in the smallest unit of the currency, called subunits. For example, in USD, the subunit is cents, and 100 cents equal 1 USD. So, an amount of 12025 (cents) is equivalent to 120.25 USD.
Note that the subunit-to-unit ratio varies by currency, it is not always 100. See Currencies for the subunits of each currency.
The notifications URL enables you to receive callbacks about the payment status (see Payment Status Notifications).
The notifications URL is the dynamic URL for receiving callbacks.
There are two different URLs for receiving callbacks:
Static URL
For API integrations:
When you set up your application that accesses the Flywire API, you had the option to define a notifications URL. This is the static notifications URL. Callbacks will be sent to this URL for all payments you created via the Flywire API.
The recipient of a payment may also have a static notifications URL defined which might be different from your static notifications URL as a client. In that case, callbacks will also be sent to the recipient's notifications URL.For other integrations:
When you set up your portal together with Flywire, you had the option to define a callback URL for that portal. Callbacks will be sent to this URL for all payments for this portal.
If you don't use a static callback URL yet and want to start using it, please contact the Solutions team.
Dynamic URL
The URL you can set in a parameter when you are creating a payment is the dynamic notifications URL. Since this URL can be different for every payment you create, it is called dynamic.
How defining static and dynamic URLs affect callbacks
 = not set = not set |
 = set = set |
| Static URL |
Dynamic URL |
Result |
|
|
|
You won't receive notifications. |
|
|
|
You'll receive notifications to your static URL. |
|
|
|
For API integrations: The dynamic URL will override the static URL and you'll receive notifications only to the dynamic URL. For other integrations: You'll receive callbacks to both URLs. This is called "dual callback URL". A dual callback URL means you defined a static URL in your portal and you are sending callbacks to a different callback URL via the parameter for the payment. In this case, callbacks will be sent to both URLs. This
approach can be useful if you want to update two separate systems.
|
|
|
|
You'll receive notifications to your dynamic URL |
The external reference.
The external reference helps you to identify a payment, since the Flywire-generated payment reference might not be the way you typically identify payments. With the external reference, you can enter your own identifier, such as an ID or invoice number.
The external reference is included in all status notifications to help you map a payment to a callback notification. (see Payment Status Notifications)
The recipient ID (also called portal code).
The recipient ID identifies the recipient (also called portal). The recipient ID has been assigned by Flywire when the recipient has been set up.
Format:
Either: 3 letters (ABC)
Or: 5 alphanumeric characters, always starting with a letter (ABC1D)
You can use this request to get a list of all recipients that are available to you as a client and what their recipient ID is:
For details see Getting a List of all available Recipients.
The payor_id depends on how you want to uniquely identify a payer. Usually, you use an ID from another system, for example your ERP. Spaces are not allowed.
When you are creating follow-up payments you must use the same payor_id you used when you created the Checkout Session.
curl https://base-url-placeholder/checkout/sessions
  -X POST
  -H "Content-Type: application/json"
  -H "X-Authentication-Key: {api_key}"
  -d '{
    "type": "one_off",
    "schema": "cards",
	"charge_intent": {
		"capture": "manual",
		"authorization": "preauth",
		"mode": "one_off"
	},
   "payor": {
		"first_name": "Peter",
		"last_name": "Payer",
		"address": "123 High Street",
		"city": "London",
		"country": "GB",
		"state": "",
		"phone": "0044123456789",
		"email": "[email protected]",
		"zip": "SW1A 1AA"
    },
   "options": {
        "form": {
            "action_button": "save",
            "locale": "en",
            "show_flywire_logo": true,
            "show_amount_to": false,
            "payor_fields_read_only": true,
            "payor_fields": {
               "first_name": {
                  "hidden": false,
                  "read_only": false
                  },
              "last_name": {
                 "hidden": true,
                 "read_only": false
                 }
              }
    },
	"recipient": {
   		"fields": [
            {
                "id": "custom_field_1",
                "value": "ID12345"
            },
			{
				"id": "custom_field_2",
				"value": "2020"
			}
        ]
	},
    "items": [
        {
            "id": "default",
            "amount": 33000
        }
    ],
    "notifications_url": "https://webhook.site/9bf9cf8d-1d8c-46d1-b147-ca5841ff2ede",
    "external_reference": "Payment ID12456",
    "recipient_id": "FLW",
    "payor_id": "MyPayerID"
}
You'll receive a URL for the UI form in the API response.
3. Open the URL for the form in your browser.
4. In your browser, add the event listener code to the page.
|
Open the developer tools for your browser and add the following event listener code via the console. |
|
5. Enter the magic values for the scenario you want to test.
Enter the magic values in the fields First Name and Last Name. All other fields do not affect the test scenario, you can fill them with any data you want.
| First Name | Last Name | Payment behavior | Callbacks you will receive | Scenario Description | |
|---|---|---|---|---|---|
| MAGICVALUE | AUTH |
Payment will stay in |
|
"Happy path" with 3DS Use this scenario if you want to test 3DS behavior. |
|
| MAGICVALUE | APPROVED |
Payment will stay in |
|
"Happy path" without 3DS Use this scenario if you want to skip the 3DS verification. |
|

6. Enter test card details.
Does it matter which card I use for the scenario?
No. All test cards work with all magic values and trigger the chosen scenario.
What is the purpose of the different test cards?
You can try out different cards from different countries to test the behavior of the element when card country and payer country don't match.
Choose currency
If the card currency doesn't match the currency of the payer's country, and if there is an option to pay in either of them, the payer can choose which currency they want to pay in. They have two options: The currency of the card they are paying with and the currency of the country they have chosen for their address.
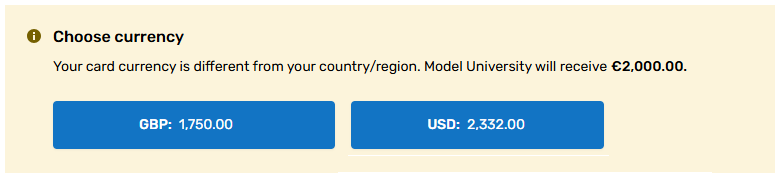
Accept to pay in card currency
This message appears if the card currency doesn't match the currency of the payer's country and there is no option to pay in the country's currency.
After clicking "Accept", the payer can proceed to pay. Alternatively, they can use a different card for the payment.

The demo cards must be used together with cardholder name magic values.
| Number | Expiration date | CVV | Currency | Issuing Country | Type |
|---|---|---|---|---|---|
|
Visa |
|||||
| 4010 1000 0000 0016 | 03/30 | 737 | EUR | DE | Debit |
| 4988 4388 4000 0012 | 03/30 | 737 | EUR | ES | Debit |
| 4242 4201 0000 0017 | 03/30 | 737 | GBP | GB | Credit |
| 4761 3600 0000 0017 | 03/30 | 737 | INR | IN | Debit |
| 4111 1111 1111 1111 | 03/30 | 737 | USD | US | Credit |
|
Mastercard |
|||||
| 2222 4000 1000 0016 | 03/30 | 737 | CAD | CA | Credit |
| 5163 6136 0000 0014 | 03/30 | 737 | AUD | AU | Debit |
| 5252 5202 0000 0017 | 03/30 | 737 | JPY | JP | Debit |
| 5454 5454 5454 5454 | 03/30 | 737 | USD | US | Credit |
|
American Express (Amex) |
|||||
| 3700 0000 0000 002 | 03/30 | 7373 | USD |
US |
Credit |
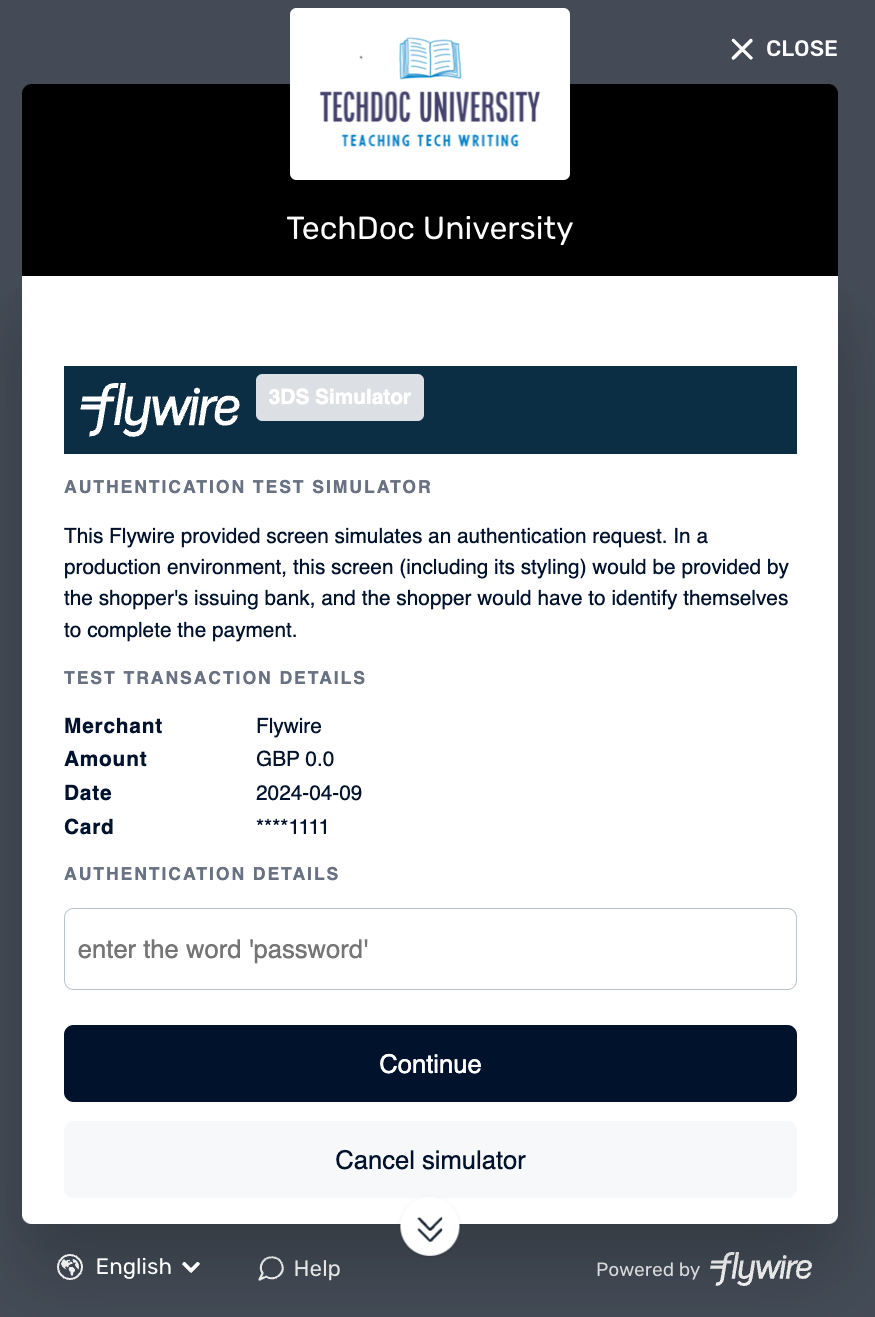
7. Send the form.
|
|
If you used a scenario that triggers 3DS authentication, you now see the Flywire 3DS authentication simulator. Enter the word password in the password field and click on continue to complete the authentication. |
8. Check the console in your browser's development tools.
The event listener will return the URL for confirming the Checkout Session.
9. Confirm the Checkout Session.
As a security measure to ensure that you are the one who created the session, you have to confirm the Checkout Session.
How to Resolve the Path Placeholders of the Endpoint
You don't need to manually resolve the {ID} in the endpoint, as Flywire provides the fully resolved URL via the postMessage (see 3. The postMessage of the Event Listener).
Why should you use the confirm url from the postMessage?
Parameters for the Request Body
No request body needed.
curl https://base-url-placeholder/checkout/sessions/494d2e9d-c0c9-407c-9094-5b3b2a02c00f/confirm
  -X POST
  -H "Content-Type: application/json"
  -H "X-Authentication-Key: {api_key}"
You'll receive the payment reference in the response.
10. Check the notifications.
The Pre-Authorization Payment is now created. You'll receive the following notifications:
![]() Initiated
Initiated
![]() Authorized (immediately after initiated)
Authorized (immediately after initiated)
11. Capture the payment.
How to Resolve the Path Placeholders of the Endpoint
Replace {paymentID} in the endpoint with the payment reference.
The payment reference is an ID generated by Flywire to identify a payment.
Format:
Either: ABC123456789
3-letter portal/recipient ID 9 numbers
Or: 1AB12CD452ABC1D
number 8 alphanums number 5-alphanum portal/recipient ID
With the payment reference, the payment can be tracked through the different stages of the payment process.
The payment reference is also important in other situations, for example:
-
When a payer is using bank transfer as payment method, they usually must provide the payment reference when sending the funds.
-
The payment reference helps Flywire to identify the payment if you or your payer needs support.
The payment reference is returned in an API response right after the payment is created .
For existing payments, you have various options to look up a payment reference:
Flywire API: You can find payment references by Getting a List of all Payments.
Callbacks: All payment callbacks contain the payment reference, see Payment Status Notifications.
Parameters for the Request Body
The payment amount in the billing currency.
The billing currency is the currency in which the recipient of the payment is billing their payer. The billing currency depends on the
The amount is specified in the smallest unit of the currency, called subunits. For example, in USD, the subunit is cents, and 100 cents equal 1 USD. So, an amount of 12025 (cents) is equivalent to 120.25 USD.
Note that the subunit-to-unit ratio varies by currency, it is not always 100. See Currencies for the subunits of each currency.
curl https://base-url-placeholder/payments/UUI754118889/captures
  -X POST
  -H "Content-Type: application/json"
  -H "X-Authentication-Key: {api_key}"
  -d '
{
    "amount": 60000
}
12. Check the notifications.
You'll receive the following notifications:
![]() Processed
Processed
![]() Guaranteed
Guaranteed
