 Checkout for Self-Managed Recurring Payments
With self-managed recurring payments, you define the plans yourself. You have complete freedom, for example regarding the number of installments and when payments are made.
Since Flywire doesn't know your settings, you have to manually initiate each payment for those plans yourself.
You also have to send mandatory emails to your payers that inform them about the recurring payments.
Available payment methods:
-
Card
-
Direct debit
 Which direct debit schemes are supported?
Supported direct debit schemes
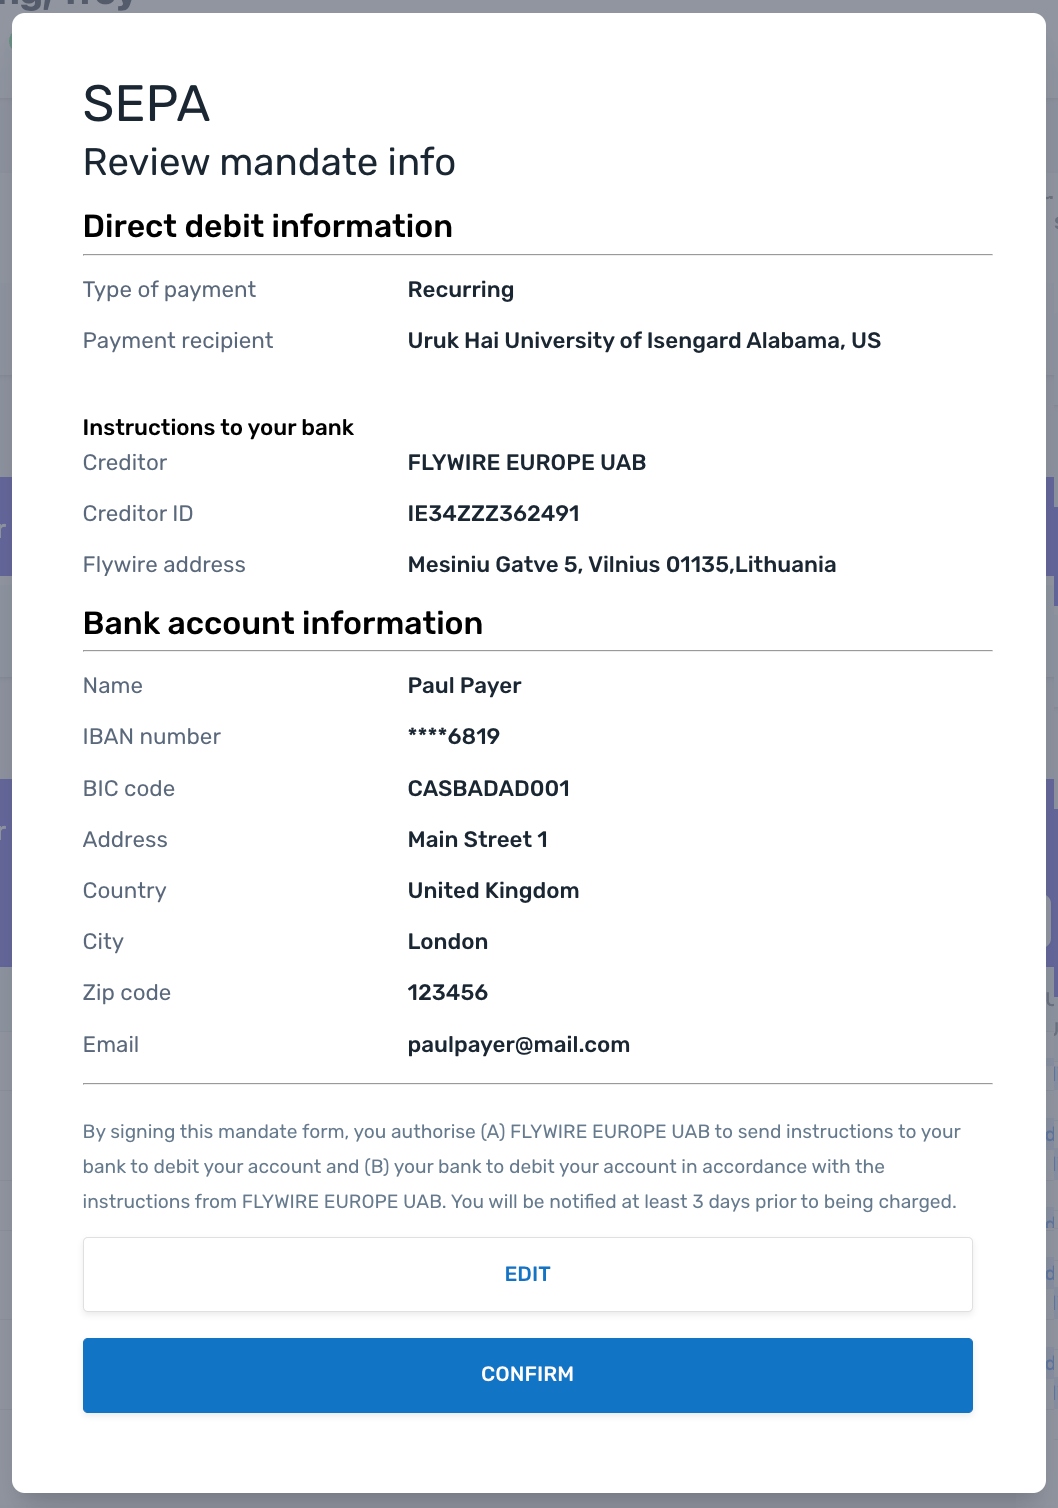
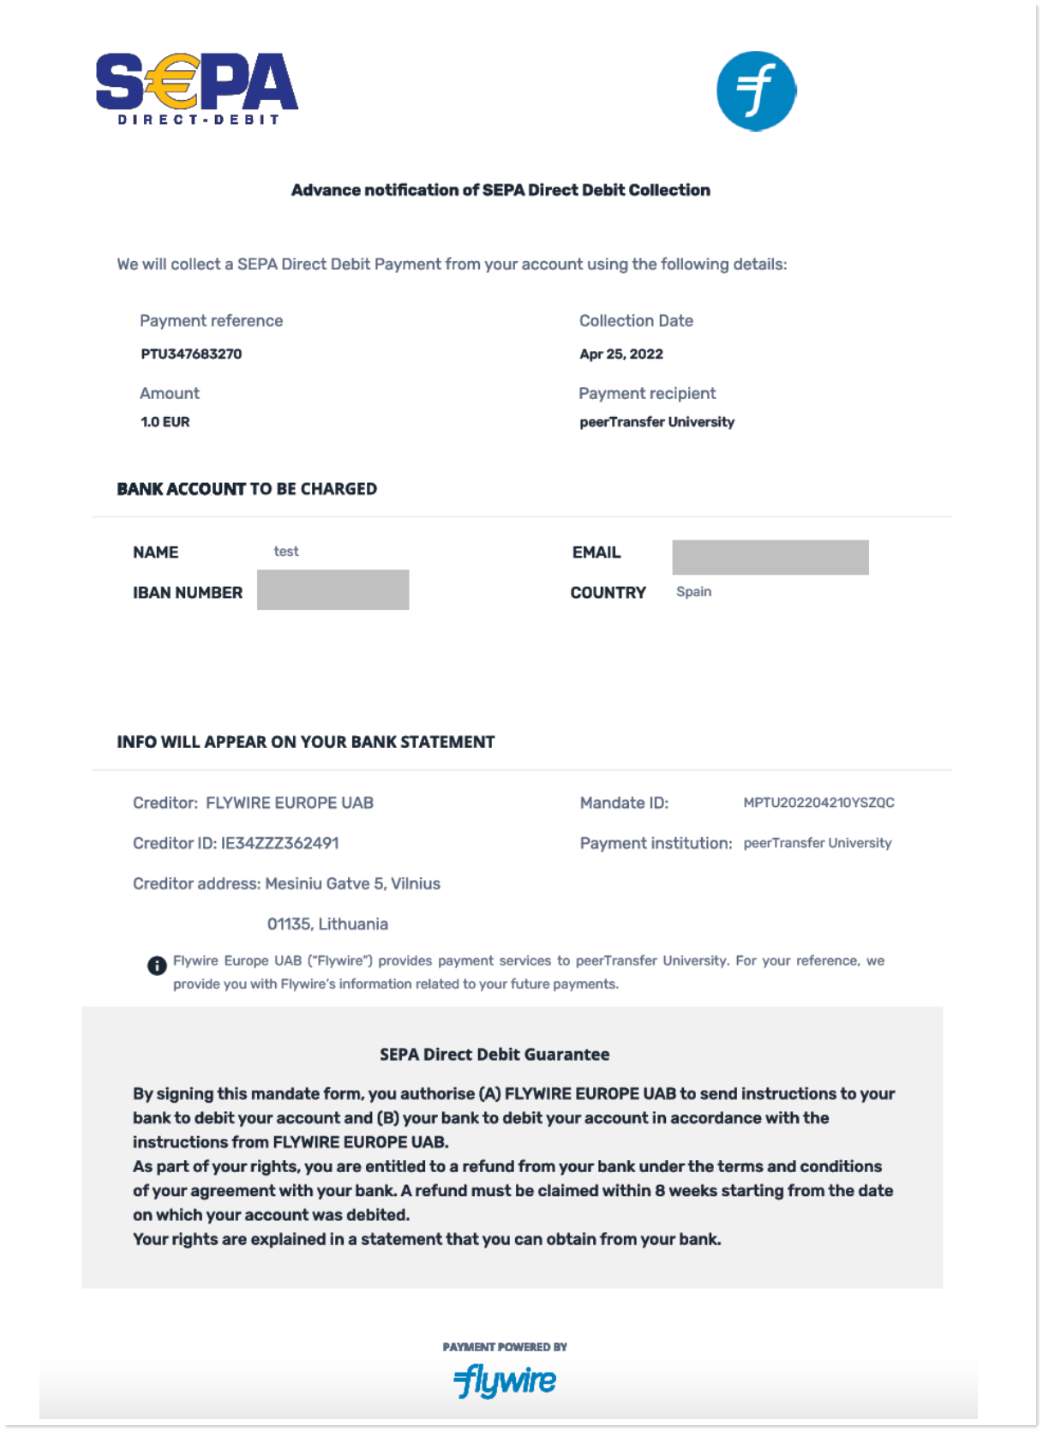
SEPA SEPA (Single Euro Payments Area) direct debit is a payment system that makes payments in Europe easier and cheaper. SEPA allows you to collect payments in all countries that follow the SEPA scheme (36 countries in the Eurozone). The currency for all SEPA direct debits is Euros.
BACS BACS (Bankers' Automated Clearing System) is a network of banks and building societies that participate in the BACS payments scheme. BACS payments are made in GBP and are only available in the UK. BACS payments are one of the most common bank-to-bank transfers in the UK.
EFT Canada EFT ("Electronic Funds Transfer") Canada is the most common direct debit scheme for payments in Canada. Flywire uses the third-party implementation Plaid to connect your payers to their bank accounts for EFT Canada.
ACH ACH ("Automated Clearing House") is an electronic network used in the United States of America for processing financial transactions. The ACH system is designed for domestic transactions within the United States, which means the currency for ACH payments is USD.
Checkout Sessions for Self-Managed Recurring Payments
A Checkout Session is the basis for displaying a form to your payer on your website:
|
How would you like to pay?
Card
Just save new card
Save new card and make first payment
Use existing card
Direct Debit
SEPA
BACS
EFT Canada
ACH
|
UI forms for self-managed recurring payments are shown in an iframe on your website. The purpose of the forms is to gather the payment information (payer's details and credit card details), and to save the payment details (card or bank account) for future payments. By saving, the card or bank account is assigned a payment method token and mandate ID that you can use to charge recurring payments without the payer being present.
|
How do Checkout Sessions of this type work?
-
You have to create a Checkout Session to either generate a URL or a session ID, depending on your implementation.
-
Your payer accesses the UI form on your website where they fill it out and confirm it.
-
You get a postMessage via the event listener that contains a URL you need for confirming the Checkout Session.
-
You receive the token and mandate in the response. If you created a payment with the Checkout Session, you also receive the payment reference.
Creating a Checkout Session for Self-Managed Recurring Payments
Request
Creating a Checkout Session returns a unique URL that allows you to display a UI form to your payers. To get the URL, you have to post the request body to the endpoint. The content of the request body depends on your use case:
-
 Save Card
 -
Save Card & Pay
-
New Mandate for saved Card
-
 Direct Debit Save
 -
Direct Debit Save & Pay
Tokenizing a card requires a payment. Since there is no payment when the payer only saves (tokenizes) their card, Flywire creates a payment with an amount of 0 in the background for the purpose of tokenization. Your payer will be able to see this "0 charge" payment in their bank statement.
Parameters for the Request Body
The type of the Checkout Session.
Possible values:
| For saving a card or bank account without creating the first payment immediately. | tokenization |
|
For saving card or bank account and creating the first payment immediately. Currently only available for cards and direct debit scheme SEPA.
|
tokenization_and_pay |
| For creating a new mandate for an existing card. | new_mandate |
charge_intent object
The mode of a payment depends on three factors:
-
Frequency: Are the intervals for the payment regular or irregular?
-
Purchase: Is it one single purchase or are new goods/services purchased?
-
Delivery: Are the goods/services delivered once or in multiple deliveries?
Available modes
| Mode | Frequency | Purchase | Delivery |
|---|---|---|---|
|
installment |
regular or irregular intervals |
Single purchase of goods or services |
Single delivery (can be in advance, at any time during the plan, or at the end) |
|
subscription |
Regular intervals |
Multiple purchases (for new or renewed goods or services) |
Multiple and regular deliveries |
|
unscheduled |
No pre-agreed intervals |
Multiple purchases (for new or renewed goods or services) |
Multiple deliveries at no pre-agreed intervals |
payor object
You have the option to pass payer information to pre-fill the fields of the UI form.
For a description of all fields and their valid values form see:
-
Payment Element if you are using Flywire Elements
-
Checkout Experience if you are using Checkout
Before pre-filling the payer fields, consider your use case and who the actual payer will be. The UI forms collect the card holder or bank account owner information. There can be cases when this person is different from the payer in your system.
For example, if you are a school and your system stores information about a student, you consider the student as the “payer”. But the person who actually pays could be the student’s parent. In this case, it would not make sense to pre-fill the fields with the student’s information, since the card holder is a different person. On the other hand, the payer can always edit the fields in the UI form, which means even if you are pre-filling the fields with the wrong details the payer can always correct them.
In order to create the best payment experience for your payers, consider which information you store in your system and how useful it is for them when fields are already filled out.
options object
Contains settings for the UI form.
form object
Controls the label for the action button of the UI form.
Possible values
-
save (default value)
-
next
-
pay
Note: The label will be translated according to the locale parameter.
The language you want to translate the form to. The localization affects the labels of the form fields and the action button.
The default is English (“en”).
| Language | Value for locale |
|---|---|
| English | en |
| Spanish | es-ES |
| Chinese | zh-CN |
| Korean | ko |
| Portuguese | pt-PT |
| Japanese | ja |
| French | fr-FR |
| Bahasa Indonesia | id |
| Arabic | ar |
| Vietnamese | vi |
| Italian | it-IT |
| German | de-DE |
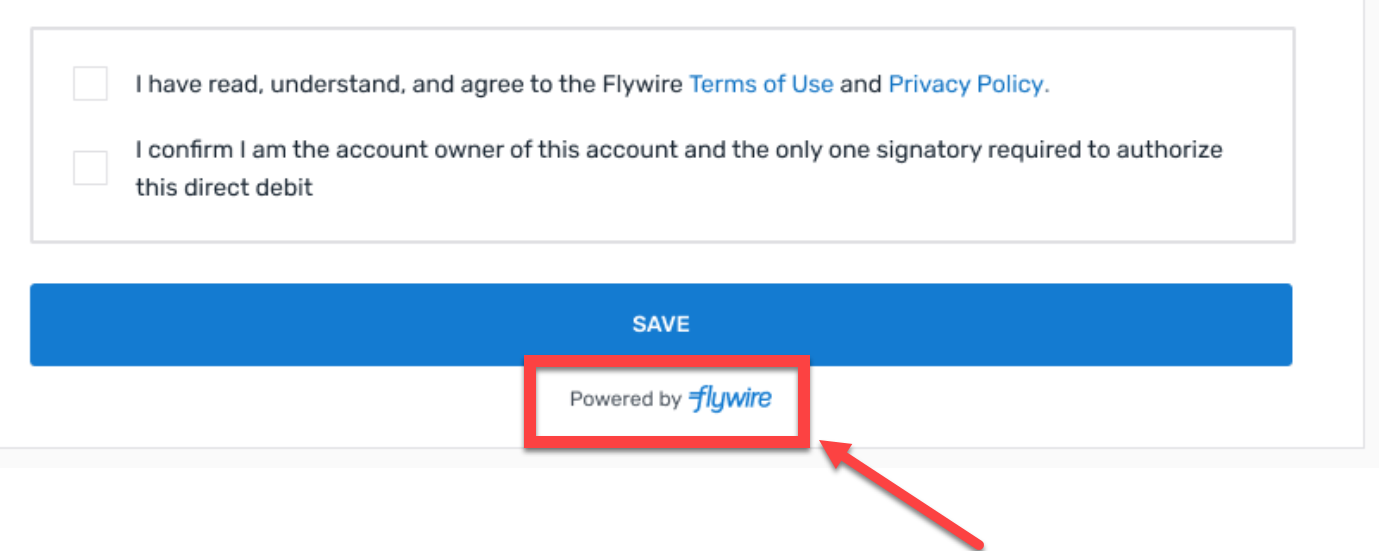
Controls if the "Powered by Flywire" logo is shown at the bottom of the form.
true displays the logo, false hides the logo.
The logo is shown below the action button of the UI form:
Defines if this Checkout Session is for card or direct debit payments. For direct debit, it also defines the type of direct debit scheme.
Possible values:
| Card payments | cards |
| SEPA direct debit | dd_sepa |
| BACS direct debit | dd_bacs
Only available in mode tokenization.
|
| EFT Canada direct debit | dd_eft
Only available in mode tokenization.
|
| ACH direct debit | dd_ach
Only available in mode tokenization.
|
The payor_id depends on how you want to uniquely identify a payer. Usually, you use an ID from another system, for example your ERP. Spaces are not allowed.
The recipient ID.
The recipient ID is the unique three-letter ID that identifies the recipient, for example FWU for Flywire University. The recipient ID has been assigned by Flywire when the recipient has been set up.
You can use this request to get a list of all recipients that are available to you as a client and what their recipient ID is:
For details see Getting a List of all available Recipients.
curl https://base-url-placeholder/checkout/sessions
  -X POST
  -H "Content-Type: application/json"
  -H "X-Authentication-Key: {api_key}"
  -d '{
    "type": "tokenization",
    "charge_intent": {
	   "mode": "subscription"
    },
   "payor": {
		"first_name": "Peter",
		"last_name": "Payer",
		"address": "123 High Street",
		"city": "London",
		"country": "GB",
		"state": "",
		"phone": "0044123456789",
		"email": "[email protected]",
		"zip": "SW1A 1AA"
    },
	"options": {
        "form": {
            "action_button": "save",
            "locale": "en",
            "show_flywire_logo": true
        }
    },
    "schema": "cards",
    "payor_id": "MyPayerID",
    "recipient_id": "FLW"
}'
Mandatory emails
Self-managed recurring payments require you to send mandatory emails to your payer.
Parameters for the Request Body
The type of the Checkout Session.
Possible values:
| For saving a card or bank account without creating the first payment immediately. | tokenization |
|
For saving card or bank account and creating the first payment immediately. Currently only available for cards and direct debit scheme SEPA.
|
tokenization_and_pay |
| For creating a new mandate for an existing card. | new_mandate |
charge_intent object
You have two options for the charge_intent:
-
Standard: Payment gets processed immediately.
-
Pre-Authorization: You have to capture the funds manually.
- Standard
- Pre-Authorization
The mode of a payment depends on three factors:
-
Frequency: Are the intervals for the payment regular or irregular?
-
Purchase: Is it one single purchase or are new goods/services purchased?
-
Delivery: Are the goods/services delivered once or in multiple deliveries?
Available modes
| Mode | Frequency | Purchase | Delivery |
|---|---|---|---|
|
installment |
regular or irregular intervals |
Single purchase of goods or services |
Single delivery (can be in advance, at any time during the plan, or at the end) |
|
subscription |
Regular intervals |
Multiple purchases (for new or renewed goods or services) |
Multiple and regular deliveries |
|
unscheduled |
No pre-agreed intervals |
Multiple purchases (for new or renewed goods or services) |
Multiple deliveries at no pre-agreed intervals |
Must be manual. This parameter ensures that you are able to manually capture the funds within the holding period.
The authorization type defines if the blocked amount can be changed during the holding phase.
Possible values:
-
preauth : The amount that has been authorized can be changed during the holding phase, see .
-
final: The amount that has been authorized is final and cannot be changed.
The mode of a payment depends on three factors:
-
Frequency: Are the intervals for the payment regular or irregular?
-
Purchase: Is it one single purchase or are new goods/services purchased?
-
Delivery: Are the goods/services delivered once or in multiple deliveries?
Available modes
| Mode | Frequency | Purchase | Delivery |
|---|---|---|---|
|
installment |
regular or irregular intervals |
Single purchase of goods or services |
Single delivery (can be in advance, at any time during the plan, or at the end) |
|
subscription |
Regular intervals |
Multiple purchases (for new or renewed goods or services) |
Multiple and regular deliveries |
|
unscheduled |
No pre-agreed intervals |
Multiple purchases (for new or renewed goods or services) |
Multiple deliveries at no pre-agreed intervals |
payor object
You have the option to pass payer information to pre-fill the fields of the UI form.
For a description of all fields and their valid values form see:
-
Payment Element if you are using Flywire Elements
-
Checkout Experience if you are using Checkout
Before pre-filling the payer fields, consider your use case and who the actual payer will be. The UI forms collect the card holder or bank account owner information. There can be cases when this person is different from the payer in your system.
For example, if you are a school and your system stores information about a student, you consider the student as the “payer”. But the person who actually pays could be the student’s parent. In this case, it would not make sense to pre-fill the fields with the student’s information, since the card holder is a different person. On the other hand, the payer can always edit the fields in the UI form, which means even if you are pre-filling the fields with the wrong details the payer can always correct them.
In order to create the best payment experience for your payers, consider which information you store in your system and how useful it is for them when fields are already filled out.
options object
Contains settings for the UI form.
form object
Controls the label for the action button of the UI form.
Possible values
-
save (default value)
-
next
-
pay
Note: The label will be translated according to the locale parameter.
The language you want to translate the form to. The localization affects the labels of the form fields and the action button.
The default is English (“en”).
| Language | Value for locale |
|---|---|
| English | en |
| Spanish | es-ES |
| Chinese | zh-CN |
| Korean | ko |
| Portuguese | pt-PT |
| Japanese | ja |
| French | fr-FR |
| Bahasa Indonesia | id |
| Arabic | ar |
| Vietnamese | vi |
| Italian | it-IT |
| German | de-DE |
Controls if the "Powered by Flywire" logo is shown at the bottom of the form.
true displays the logo, false hides the logo.
The logo is shown below the action button of the UI form:
recipient object
Contains the fields of the recipient.
fields array
It depends on the recipient which fields are optional or required. If a field is required, you must provide it here. Optional fields can be left out.
You can check which fields are required for a recipient with this request (replace {recipientId} with the recipient ID):
Required fields have the required parameter set to true. For more info see Getting Details about a Recipient.
Identifier of the field.
The value for this field.
items array
An item is something that your payer can pay for (for example: tuition fees, housing, etc.). When you create a payment, you display the items to your payer and they can choose for which items they want to pay. How many items there are depends on the recipient's configuration.
You can only use one item in this request. The id of the item must be called default.
Identifier of the item.
You can only use one item in this request. The id of the item must be called default.
The amount for this item in the billing currency,
The billing currency is the currency in which the recipient of the payment is billing their payer. The billing currency depends on the
The amount is specified in the smallest unit of the currency, called subunits. For example, in USD, the subunit is cents, and 100 cents equal 1 USD. So, an amount of 12025 (cents) is equivalent to 120.25 USD.
Note that the subunit-to-unit ratio varies by currency, it is not always 100. See Currencies for the subunits of each currency.
The notifications URL enables you to receive callbacks about the payment status (see Payment Status Notifications).
The notifications URL is the dynamic URL for receiving callbacks.
There are two different URLs for receiving callbacks:
Static URL
For API integrations:
When you set up your application that accesses the Flywire API, you had the option to define a notifications URL. This is the static notifications URL. Callbacks will be sent to this URL for all payments you created via the Flywire API.
The recipient of a payment may also have a static notifications URL defined which might be different from your static notifications URL as a client. In that case, callbacks will also be sent to the recipient's notifications URL.For other integrations:
When you set up your portal together with Flywire, you had the option to define a callback URL for that portal. Callbacks will be sent to this URL for all payments for this portal.
If you don't use a static callback URL yet and want to start using it, please contact the Solutions team.
Dynamic URL
The URL you can set in a parameter when you are creating a payment is the dynamic notifications URL. Since this URL can be different for every payment you create, it is called dynamic.
How defining static and dynamic URLs affect callbacks
 = not set = not set |
 = set = set |
| Static URL |
Dynamic URL |
Result |
|
|
|
You won't receive notifications. |
|
|
|
You'll receive notifications to your static URL. |
|
|
|
For API integrations: The dynamic URL will override the static URL and you'll receive notifications only to the dynamic URL. For other integrations: You'll receive callbacks to both URLs. This is called "dual callback URL". A dual callback URL means you defined a static URL in your portal and you are sending callbacks to a different callback URL via the parameter for the payment. In this case, callbacks will be sent to both URLs. This
approach can be useful if you want to update two separate systems.
|
|
|
|
You'll receive notifications to your dynamic URL |
The external reference.
The external reference is used to match a notification to a particular payment. You can use any kind of identifier or reference from your own system you might need to identify the payment.
The recipient ID.
The recipient ID is the unique three-letter ID that identifies the recipient, for example FWU for Flywire University. The recipient ID has been assigned by Flywire when the recipient has been set up.
You can use this request to get a list of all recipients that are available to you as a client and what their recipient ID is:
For details see Getting a List of all available Recipients.
Defines if this Checkout Session is for card or direct debit payments. For direct debit, it also defines the type of direct debit scheme.
Possible values:
| Card payments | cards |
| SEPA direct debit | dd_sepa |
| BACS direct debit | dd_bacs
Only available in mode tokenization.
|
| EFT Canada direct debit | dd_eft
Only available in mode tokenization.
|
| ACH direct debit | dd_ach
Only available in mode tokenization.
|
The payor_id depends on how you want to uniquely identify a payer. Usually, you use an ID from another system, for example your ERP. Spaces are not allowed.
curl https://base-url-placeholder/checkout/sessions
  -X POST
  -H "Content-Type: application/json"
  -H "X-Authentication-Key: {api_key}"
  -d '{
    "type": "tokenization_and_pay",
    "charge_intent": {
        "mode": "subscription"
    },
   "payor": {
		"first_name": "Peter",
		"last_name": "Payer",
		"address": "123 High Street",
		"city": "London",
		"country": "GB",
		"state": "",
		"phone": "0044123456789",
		"email": "[email protected]",
		"zip": "SW1A 1AA"
    },
    "options": {
        "form": {
            "action_button": "save",
            "locale": "en",
            "show_flywire_logo": true
        }
    },
	"recipient": {
   		"fields": [
            {
                "id": "custom_field_1",
                "value": "ID12345"
            },
			{
				"id": "custom_field_2",
				"value": "2020"
			}
        ]
	},
    "items": [
        {
            "id": "default",
            "amount": 33000
        }
    ],
    "notifications_url": "https://webhook.site/9bf9cf8d-1d8c-46d1-b147-ca5841ff2ede",
    "external_reference": "Payment ID12456",
    "recipient_id": "FLW",
    "schema": "cards",
    "payor_id": "MyPayerID"
}Tokenizing a card requires a payment. Since there is no payment when the payer only saves (tokenizes) their card, Flywire creates a payment with an amount of 0 in the background for the purpose of tokenization. Your payer will be able to see this "0 charge" payment in their bank statement.
Parameters for the Request Body
The type of the Checkout Session.
Possible values:
| For saving a card or bank account without creating the first payment immediately. | tokenization |
|
For saving card or bank account and creating the first payment immediately. Currently only available for cards and direct debit scheme SEPA.
|
tokenization_and_pay |
| For creating a new mandate for an existing card. | new_mandate |
charge_intent object
The mode of a payment depends on three factors:
-
Frequency: Are the intervals for the payment regular or irregular?
-
Purchase: Is it one single purchase or are new goods/services purchased?
-
Delivery: Are the goods/services delivered once or in multiple deliveries?
Available modes
| Mode | Frequency | Purchase | Delivery |
|---|---|---|---|
|
installment |
regular or irregular intervals |
Single purchase of goods or services |
Single delivery (can be in advance, at any time during the plan, or at the end) |
|
subscription |
Regular intervals |
Multiple purchases (for new or renewed goods or services) |
Multiple and regular deliveries |
|
unscheduled |
No pre-agreed intervals |
Multiple purchases (for new or renewed goods or services) |
Multiple deliveries at no pre-agreed intervals |
The payment method token. You need this token to charge recurring payments for this payment method.
The payment method token is a unique string of numbers and characters that gets assigned to a card or bank account when they are stored. It identifies the payment method (e.g., last four digits of a card or bank account) and includes payer details, such as the cardholder or account owner. Note: the payer may differ from the purchaser, like a parent paying a student’s tuition.
options object
Contains settings for the UI form.
form object
Controls the label for the action button of the UI form.
Possible values
-
save (default value)
-
next
-
pay
Note: The label will be translated according to the locale parameter.
The language you want to translate the form to. The localization affects the labels of the form fields and the action button.
The default is English (“en”).
| Language | Value for locale |
|---|---|
| English | en |
| Spanish | es-ES |
| Chinese | zh-CN |
| Korean | ko |
| Portuguese | pt-PT |
| Japanese | ja |
| French | fr-FR |
| Bahasa Indonesia | id |
| Arabic | ar |
| Vietnamese | vi |
| Italian | it-IT |
| German | de-DE |
Controls if the "Powered by Flywire" logo is shown at the bottom of the form.
true displays the logo, false hides the logo.
The logo is shown below the action button of the UI form:
Defines if this Checkout Session is for card or direct debit payments. For direct debit, it also defines the type of direct debit scheme.
Possible values:
| Card payments | cards |
| SEPA direct debit | dd_sepa |
| BACS direct debit | dd_bacs
Only available in mode tokenization.
|
| EFT Canada direct debit | dd_eft
Only available in mode tokenization.
|
| ACH direct debit | dd_ach
Only available in mode tokenization.
|
The payor_id depends on how you want to uniquely identify a payer. Usually, you use an ID from another system, for example your ERP. Spaces are not allowed.
The recipient ID.
The recipient ID is the unique three-letter ID that identifies the recipient, for example FWU for Flywire University. The recipient ID has been assigned by Flywire when the recipient has been set up.
You can use this request to get a list of all recipients that are available to you as a client and what their recipient ID is:
For details see Getting a List of all available Recipients.
curl https://base-url-placeholder/checkout/sessions
  -X POST
  -H "Content-Type: application/json"
  -H "X-Authentication-Key: {api_key}"
  -d '{
    "type": "new_mandate",
    "charge_intent": {
        "mode": "subscription",
		"payment_method_token": "UW6JqAuMcJje-SyR3iIG"
    },
    "options": {
        "form": {
            "action_button": "save",
            "locale": "en",
            "show_flywire_logo": true
        }
    },
    "schema": "cards",
    "payor_id": "MyPayerID",
    "recipient_id": "FLW"
}'SEPA (Single Euro Payments Area) direct debit is a payment system that makes payments in Europe easier and cheaper. SEPA allows you to collect payments in all countries that follow the SEPA scheme (36 countries in the Eurozone). The currency for all SEPA direct debits is Euros.
Your payer sees the SEPA form where they can enter their payer and bank account information.
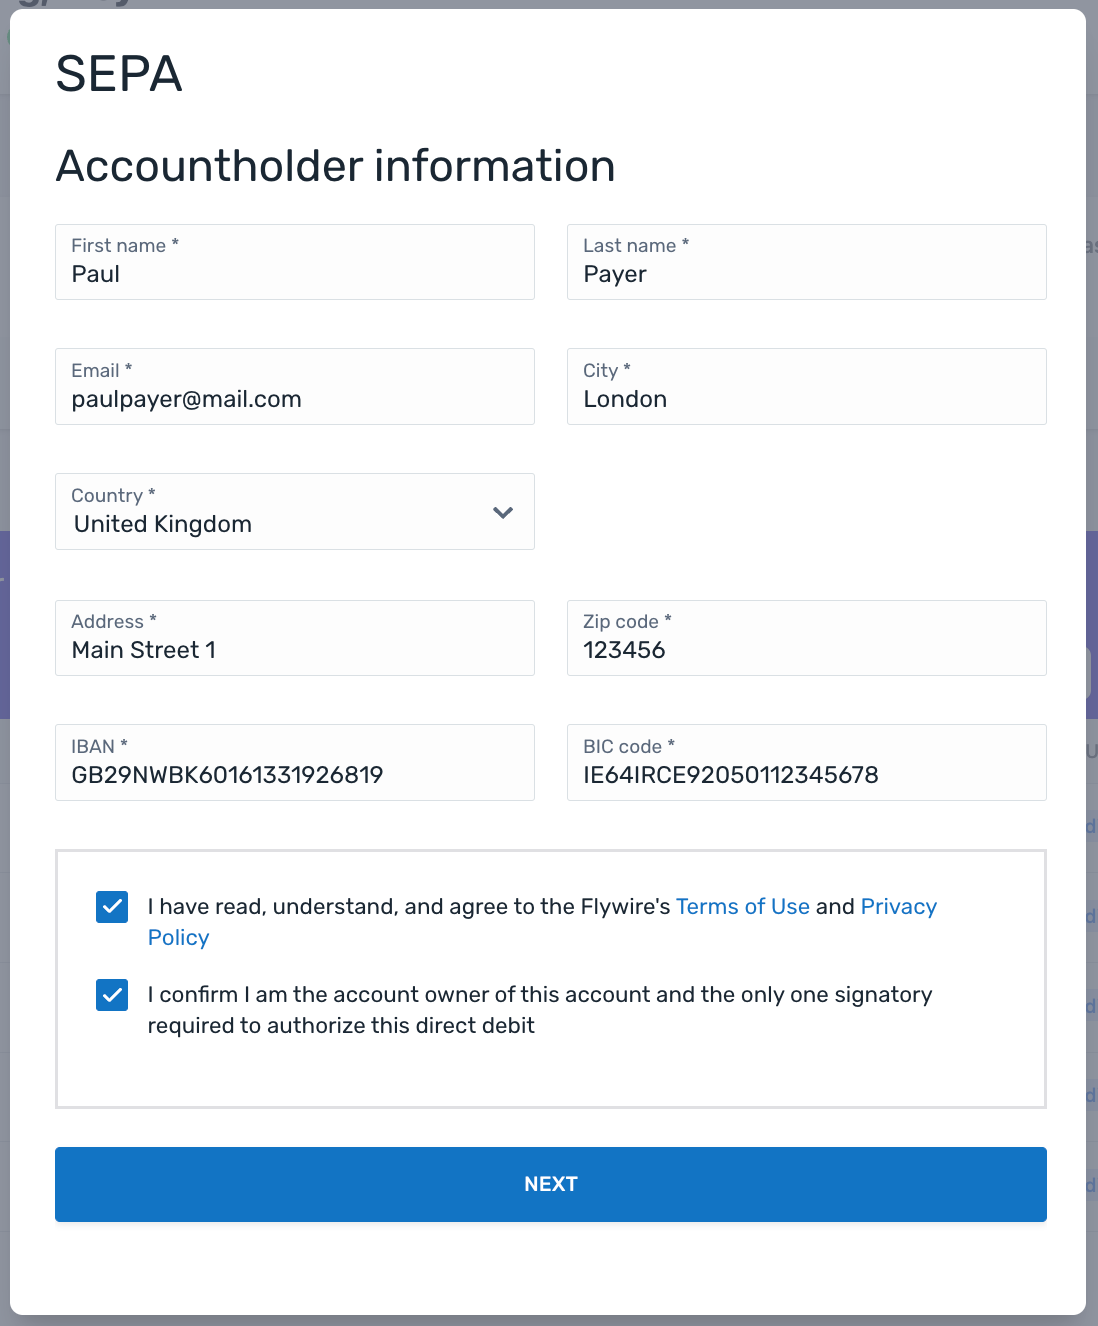
After entering their info, your payer will see the mandate confirmation screen ("Review mandate info") to confirm or edit their info.
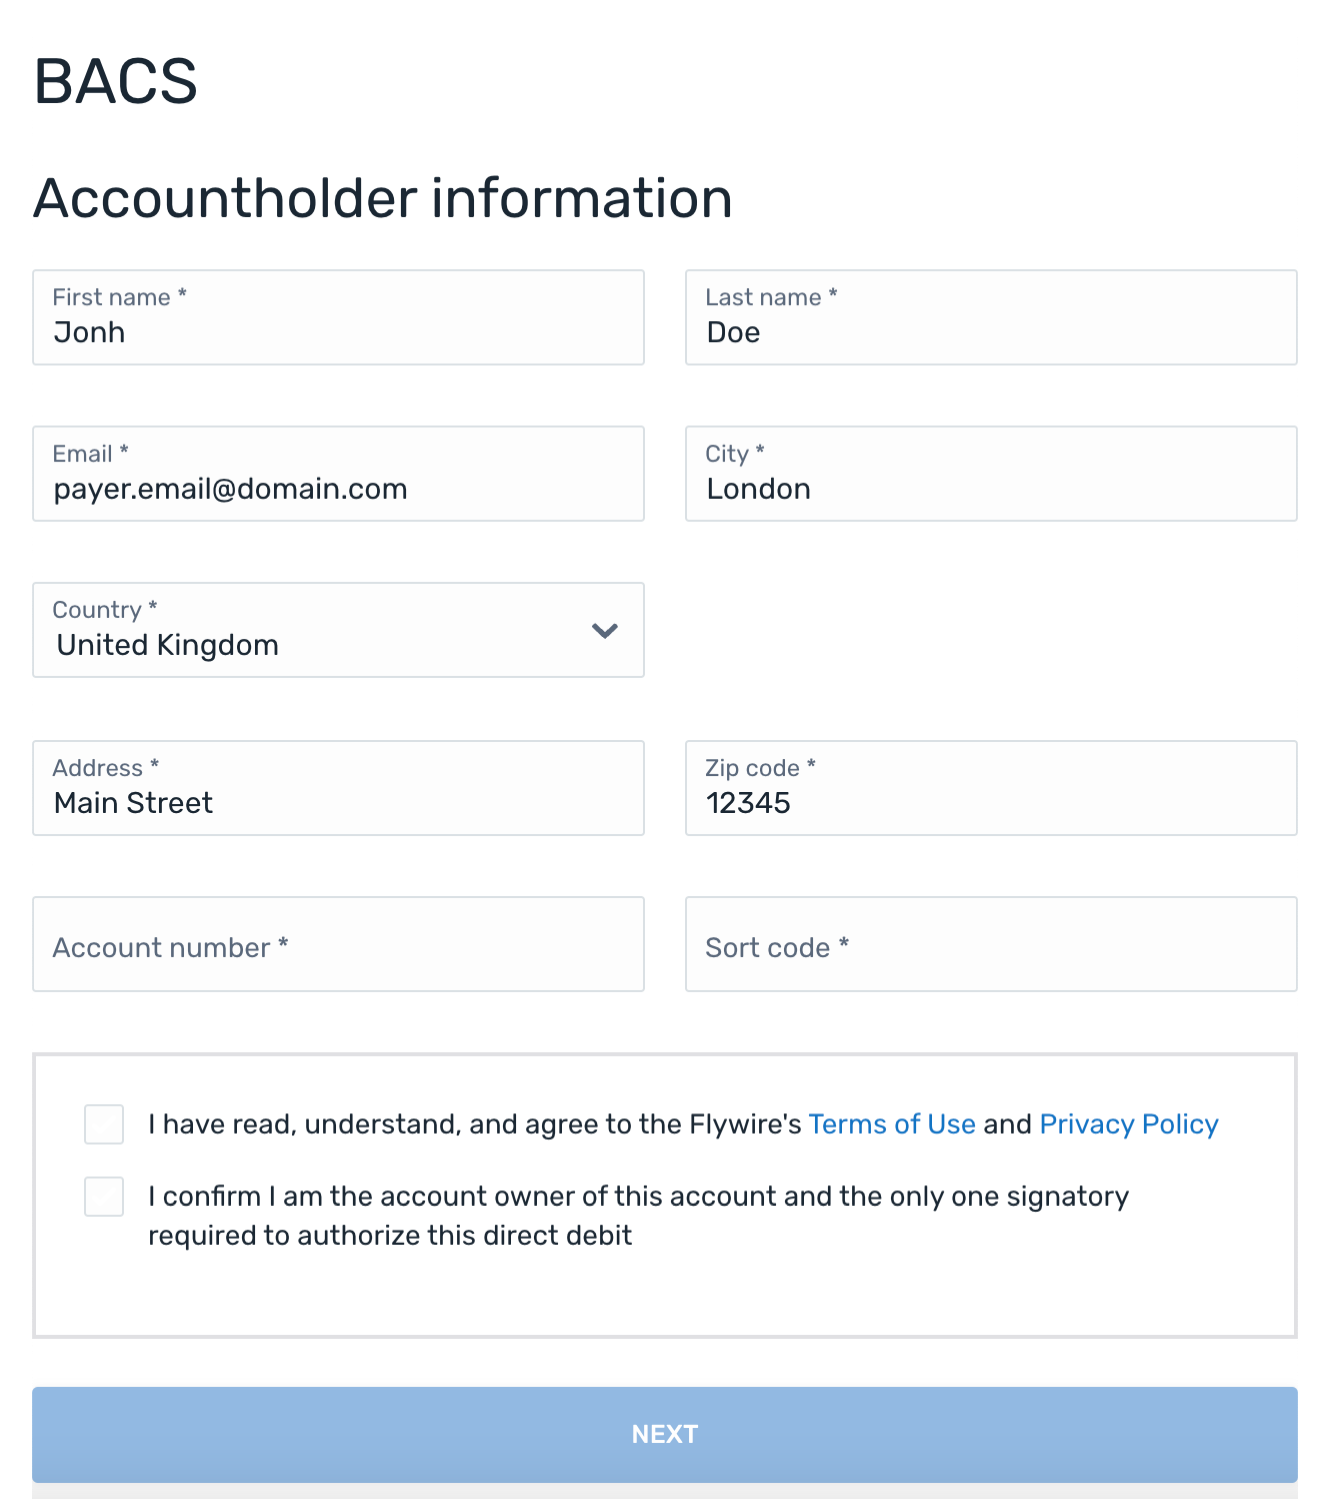
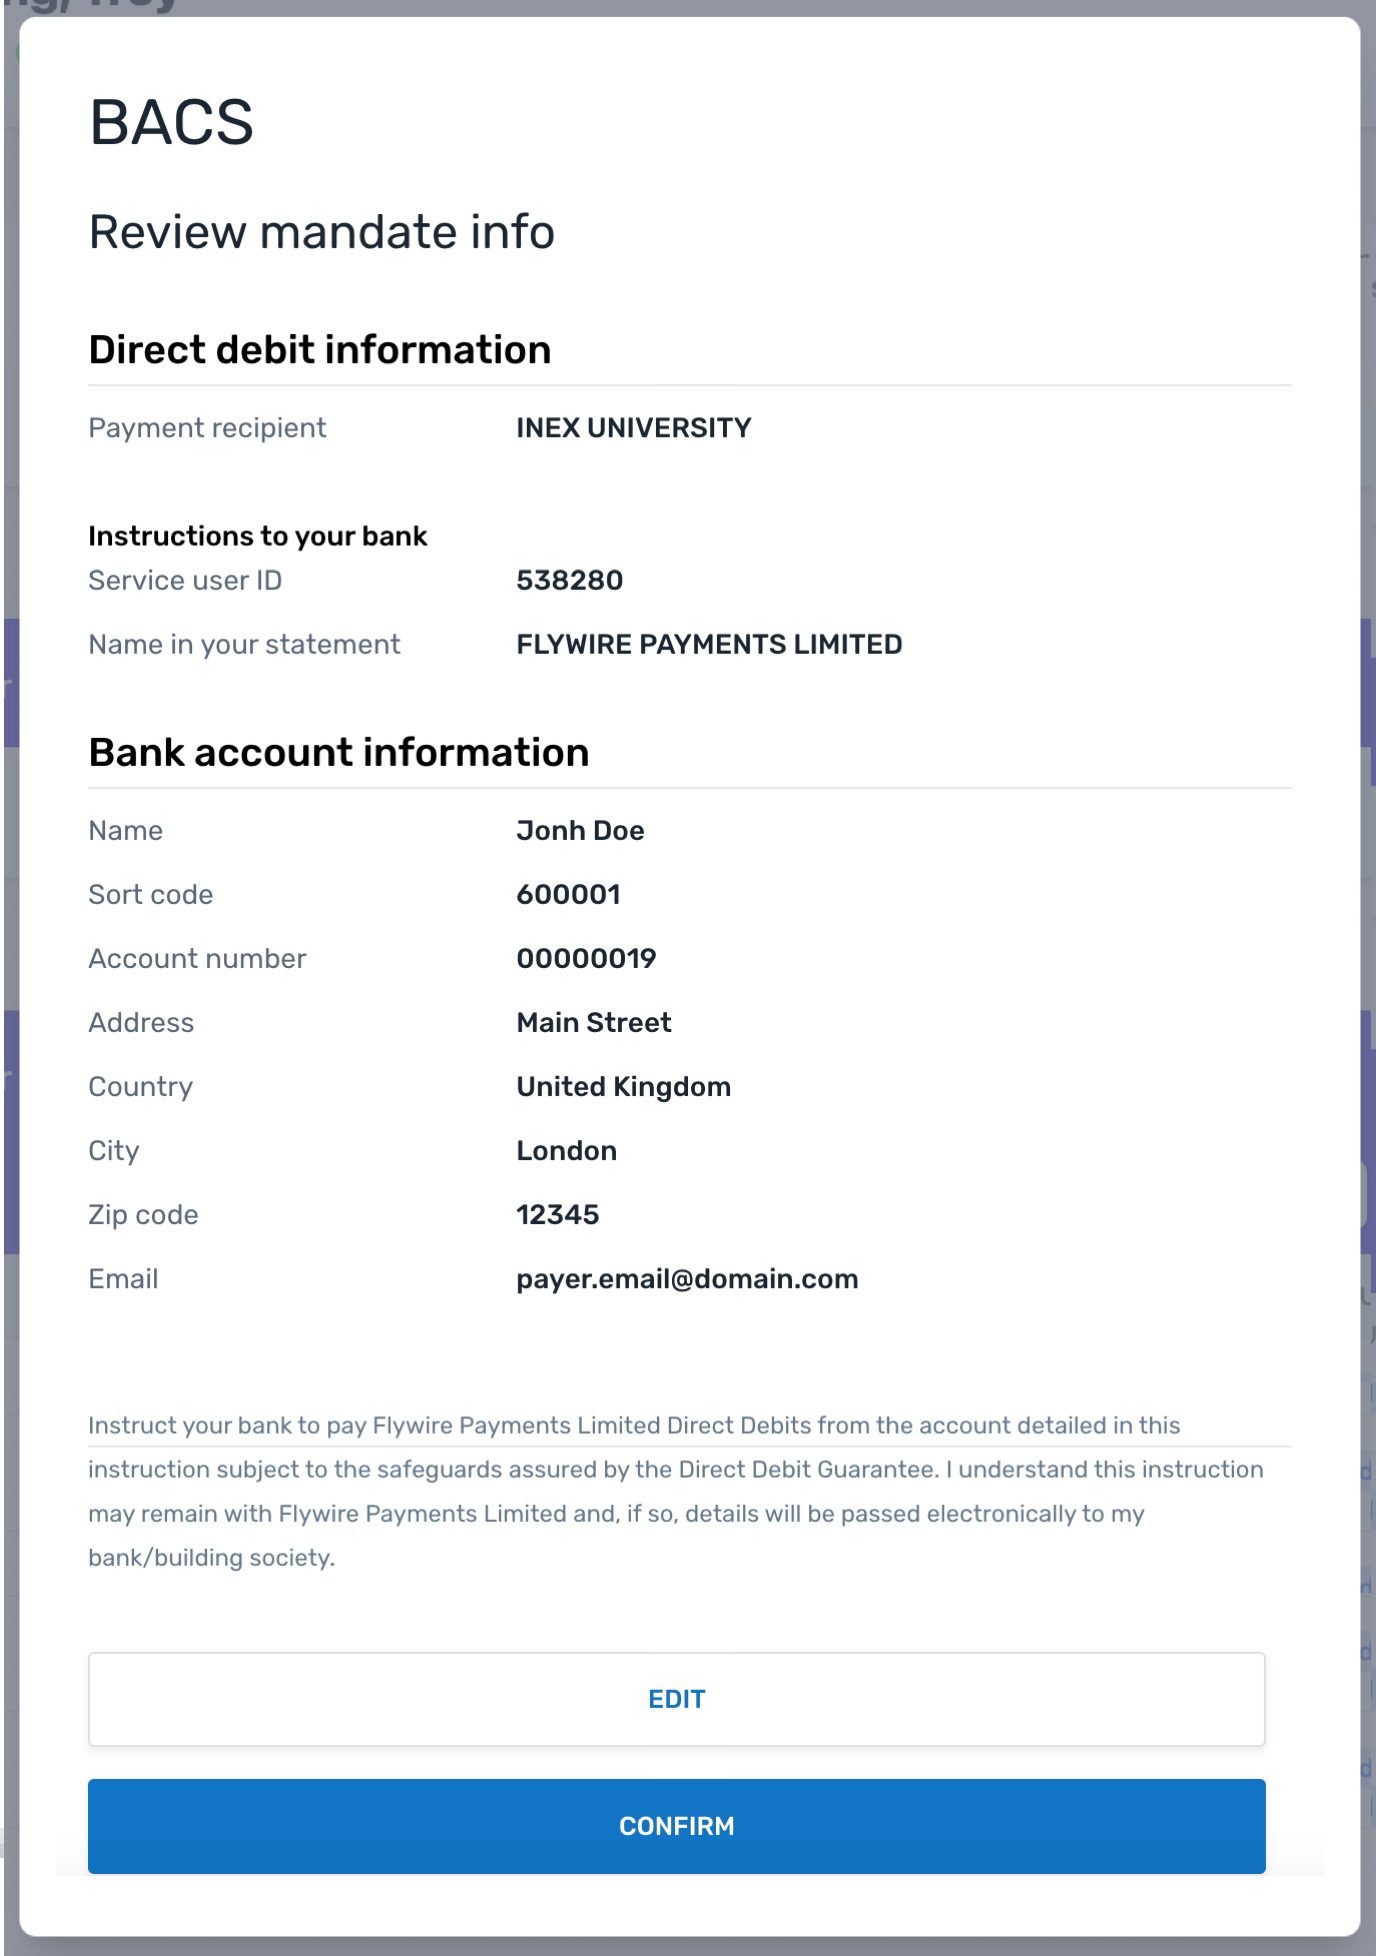
BACS (Bankers' Automated Clearing System) is a network of banks and building societies that participate in the BACS payments scheme. BACS payments are made in GBP and are only available in the UK. BACS payments are one of the most common bank-to-bank transfers in the UK.
Your payer sees the BACS form where they can enter their payer and bank account information.
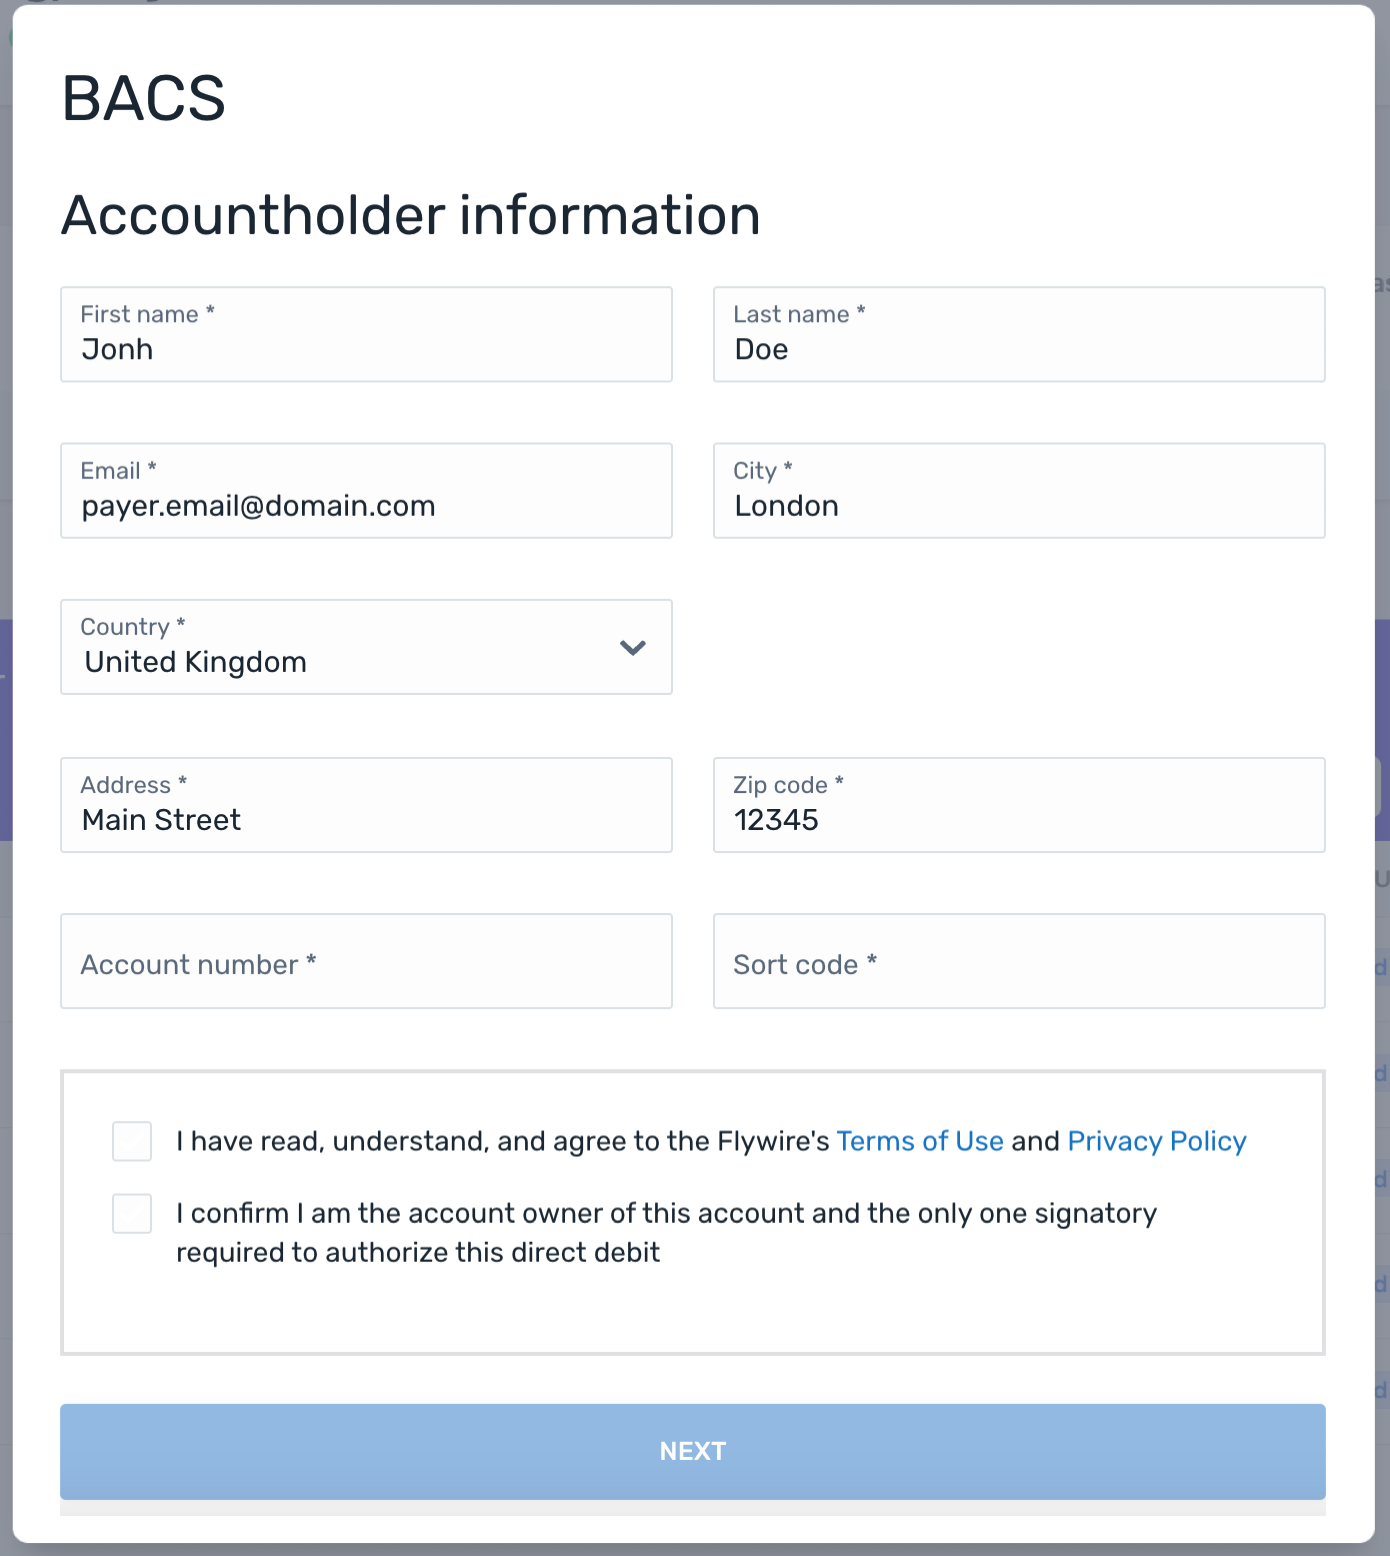
After entering their info, your payer will see the mandate confirmation screen ("Review mandate info") to confirm or edit their info.
EFT ("Electronic Funds Transfer") Canada is the most common direct debit scheme for payments in Canada. Flywire uses the third-party implementation Plaid to connect your payers to their bank accounts for EFT Canada.
Your payer sees the EFT Canada form where they can enter their payer information.
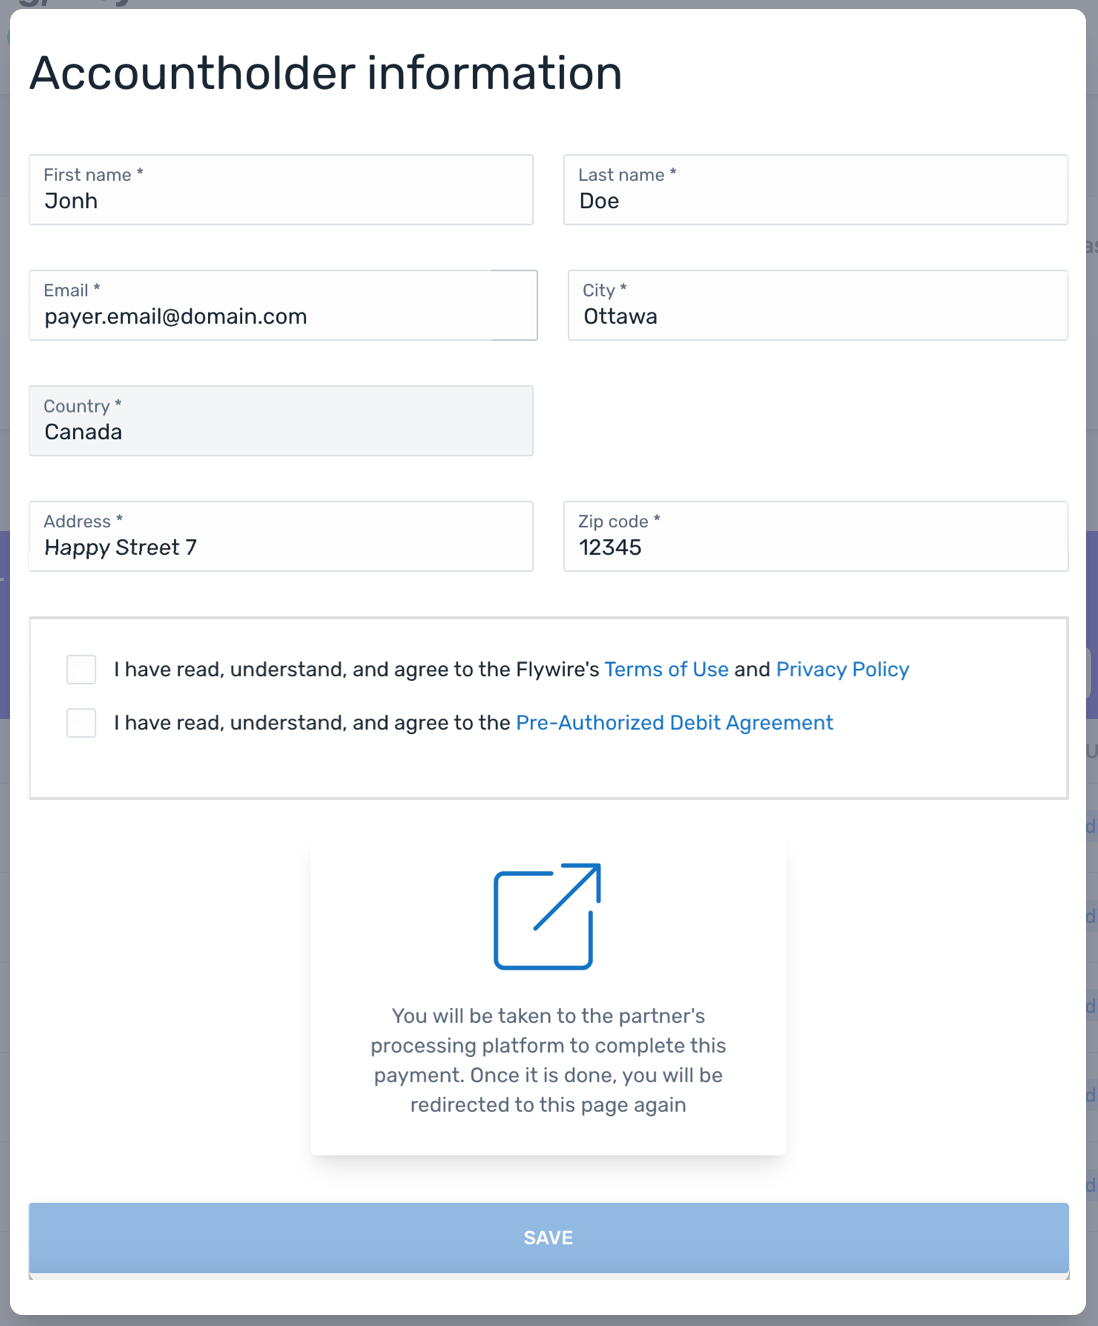
After entering their information, your payer will be redirected to Plaid. The third-party implementation will lead your payer through the steps to connect to their bank account.

After your payer successfully connected to their bank account, they will be redirected to the EFT Canada direct debit Form.
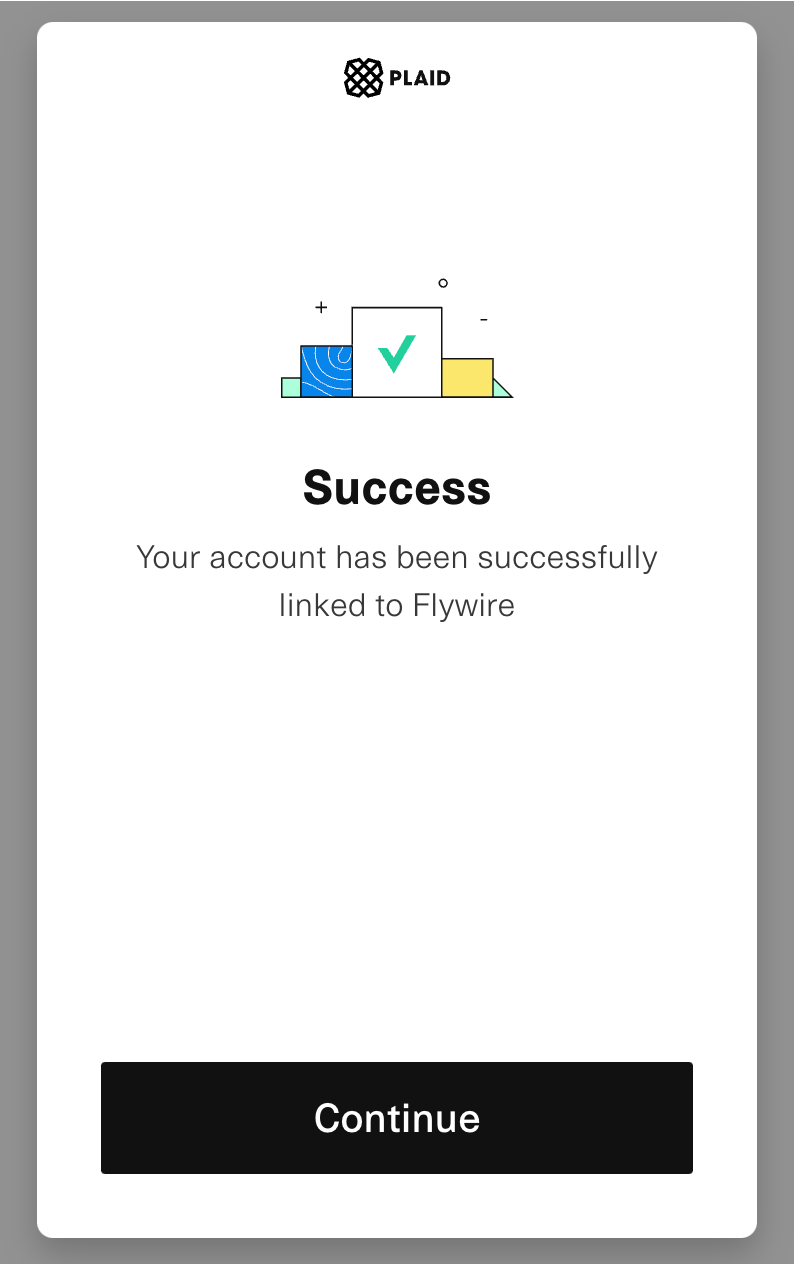
Back at the EFT Canada direct debit form, your payer can either edit their payer info, connect to a different bank account or confirm the information.
ACH ("Automated Clearing House") is an electronic network used in the United States of America for processing financial transactions. The ACH system is designed for domestic transactions within the United States, which means the currency for ACH payments is USD.
Your payer sees the ACH form where they can enter their payer and bank account information.
After entering their info, your payer will see the mandate confirmation screen ("Review mandate info") to confirm or edit their info.

Parameters for the Request Body
The type of the Checkout Session.
Possible values:
| For saving a card or bank account without creating the first payment immediately. | tokenization |
|
For saving card or bank account and creating the first payment immediately. Currently only available for cards and direct debit scheme SEPA.
|
tokenization_and_pay |
| For creating a new mandate for an existing card. | new_mandate |
charge_intent object
The mode of a payment depends on three factors:
-
Frequency: Are the intervals for the payment regular or irregular?
-
Purchase: Is it one single purchase or are new goods/services purchased?
-
Delivery: Are the goods/services delivered once or in multiple deliveries?
Available modes
| Mode | Frequency | Purchase | Delivery |
|---|---|---|---|
|
installment |
regular or irregular intervals |
Single purchase of goods or services |
Single delivery (can be in advance, at any time during the plan, or at the end) |
|
subscription |
Regular intervals |
Multiple purchases (for new or renewed goods or services) |
Multiple and regular deliveries |
|
unscheduled |
No pre-agreed intervals |
Multiple purchases (for new or renewed goods or services) |
Multiple deliveries at no pre-agreed intervals |
payor object
You have the option to pass payer information to pre-fill the fields of the UI form.
For a description of all fields and their valid values form see:
-
Payment Element if you are using Flywire Elements
-
Checkout Experience if you are using Checkout
Before pre-filling the payer fields, consider your use case and who the actual payer will be. The UI forms collect the card holder or bank account owner information. There can be cases when this person is different from the payer in your system.
For example, if you are a school and your system stores information about a student, you consider the student as the “payer”. But the person who actually pays could be the student’s parent. In this case, it would not make sense to pre-fill the fields with the student’s information, since the card holder is a different person. On the other hand, the payer can always edit the fields in the UI form, which means even if you are pre-filling the fields with the wrong details the payer can always correct them.
In order to create the best payment experience for your payers, consider which information you store in your system and how useful it is for them when fields are already filled out.
options object
Contains settings for the UI form.
form object
Controls the label for the action button of the UI form.
Possible values
-
save (default value)
-
next
-
pay
Note: The label will be translated according to the locale parameter.
The language you want to translate the form to. The localization affects the labels of the form fields and the action button.
The default is English (“en”).
| Language | Value for locale |
|---|---|
| English | en |
| Spanish | es-ES |
| Chinese | zh-CN |
| Korean | ko |
| Portuguese | pt-PT |
| Japanese | ja |
| French | fr-FR |
| Bahasa Indonesia | id |
| Arabic | ar |
| Vietnamese | vi |
| Italian | it-IT |
| German | de-DE |
Controls if the "Powered by Flywire" logo is shown at the bottom of the form.
true displays the logo, false hides the logo.
The logo is shown below the action button of the UI form:
Defines if this Checkout Session is for card or direct debit payments. For direct debit, it also defines the type of direct debit scheme.
Possible values:
| Card payments | cards |
| SEPA direct debit | dd_sepa |
| BACS direct debit | dd_bacs
Only available in mode tokenization.
|
| EFT Canada direct debit | dd_eft
Only available in mode tokenization.
|
| ACH direct debit | dd_ach
Only available in mode tokenization.
|
The payor_id depends on how you want to uniquely identify a payer. Usually, you use an ID from another system, for example your ERP. Spaces are not allowed.
The recipient ID.
The recipient ID is the unique three-letter ID that identifies the recipient, for example FWU for Flywire University. The recipient ID has been assigned by Flywire when the recipient has been set up.
You can use this request to get a list of all recipients that are available to you as a client and what their recipient ID is:
For details see Getting a List of all available Recipients.
For BACS
Since BACS is only available in the UK you can only use recipients that have GBP as their billing currency. If you are trying to use a non-GPB recipient you'll receive a 422 error, see Response after creating a Checkout Session.
The billing currency is the currency in which the recipient of the payment is billing their payer. The billing currency depends on the
curl https://base-url-placeholder/checkout/sessions
  -X POST
  -H "Content-Type: application/json"
  -H "X-Authentication-Key: {api_key}"
  -d '{
    "type": "tokenization",
    "charge_intent": {
        "mode": "subscription"
    },
   "payor": {
		"first_name": "Peter",
		"last_name": "Payer",
		"address": "123 High Street",
		"city": "London",
		"country": "GB",
		"state": "",
		"phone": "0044123456789",
		"email": "[email protected]",
		"zip": "SW1A 1AA"
    },
    "options": {
        "form": {
			"action_button": "save",
			"locale": "en",
            "show_flywire_logo": true
        }
    },
    "schema": "dd_sepa",
    "payor_id": "payorCCC",
    "recipient_id": "UUI"
}
Mandatory emails
Self-managed recurring payments require you to send mandatory emails to your payer.
Parameters for the Request Body
The type of the Checkout Session.
Possible values:
| For saving a card or bank account without creating the first payment immediately. | tokenization |
|
For saving card or bank account and creating the first payment immediately. Currently only available for cards and direct debit scheme SEPA.
|
tokenization_and_pay |
| For creating a new mandate for an existing card. | new_mandate |
charge_intent object
The mode of a payment depends on three factors:
-
Frequency: Are the intervals for the payment regular or irregular?
-
Purchase: Is it one single purchase or are new goods/services purchased?
-
Delivery: Are the goods/services delivered once or in multiple deliveries?
Available modes
| Mode | Frequency | Purchase | Delivery |
|---|---|---|---|
|
installment |
regular or irregular intervals |
Single purchase of goods or services |
Single delivery (can be in advance, at any time during the plan, or at the end) |
|
subscription |
Regular intervals |
Multiple purchases (for new or renewed goods or services) |
Multiple and regular deliveries |
|
unscheduled |
No pre-agreed intervals |
Multiple purchases (for new or renewed goods or services) |
Multiple deliveries at no pre-agreed intervals |
payor object
You have the option to pass payer information to pre-fill the fields of the UI form.
For a description of all fields and their valid values form see:
-
Payment Element if you are using Flywire Elements
-
Checkout Experience if you are using Checkout
Before pre-filling the payer fields, consider your use case and who the actual payer will be. The UI forms collect the card holder or bank account owner information. There can be cases when this person is different from the payer in your system.
For example, if you are a school and your system stores information about a student, you consider the student as the “payer”. But the person who actually pays could be the student’s parent. In this case, it would not make sense to pre-fill the fields with the student’s information, since the card holder is a different person. On the other hand, the payer can always edit the fields in the UI form, which means even if you are pre-filling the fields with the wrong details the payer can always correct them.
In order to create the best payment experience for your payers, consider which information you store in your system and how useful it is for them when fields are already filled out.
options object
Contains settings for the UI form.
form object
Controls the label for the action button of the UI form.
Possible values
-
save (default value)
-
next
-
pay
Note: The label will be translated according to the locale parameter.
The language you want to translate the form to. The localization affects the labels of the form fields and the action button.
The default is English (“en”).
| Language | Value for locale |
|---|---|
| English | en |
| Spanish | es-ES |
| Chinese | zh-CN |
| Korean | ko |
| Portuguese | pt-PT |
| Japanese | ja |
| French | fr-FR |
| Bahasa Indonesia | id |
| Arabic | ar |
| Vietnamese | vi |
| Italian | it-IT |
| German | de-DE |
Controls if the "Powered by Flywire" logo is shown at the bottom of the form.
true displays the logo, false hides the logo.
The logo is shown below the action button of the UI form:
recipient object
Contains the fields of the recipient.
fields array
It depends on the recipient which fields are optional or required. If a field is required, you must provide it here. Optional fields can be left out.
You can check which fields are required for a recipient with this request (replace {recipientId} with the recipient ID):
Required fields have the required parameter set to true. For more info see Getting Details about a Recipient.
Identifier of the field.
The value for this field.
items array
An item is something that your payer can pay for (for example: tuition fees, housing, etc.). When you create a payment, you display the items to your payer and they can choose for which items they want to pay. How many items there are depends on the recipient's configuration.
You can only use one item in this request. The id of the item must be called default.
Identifier of the item.
You can only use one item in this request. The id of the item must be called default.
The amount for this item in the billing currency,
The billing currency is the currency in which the recipient of the payment is billing their payer. The billing currency depends on the
The amount is specified in the smallest unit of the currency, called subunits. For example, in USD, the subunit is cents, and 100 cents equal 1 USD. So, an amount of 12025 (cents) is equivalent to 120.25 USD.
Note that the subunit-to-unit ratio varies by currency, it is not always 100. See Currencies for the subunits of each currency.
The notifications URL enables you to receive callbacks about the payment status (see Payment Status Notifications).
The notifications URL is the dynamic URL for receiving callbacks.
There are two different URLs for receiving callbacks:
Static URL
For API integrations:
When you set up your application that accesses the Flywire API, you had the option to define a notifications URL. This is the static notifications URL. Callbacks will be sent to this URL for all payments you created via the Flywire API.
The recipient of a payment may also have a static notifications URL defined which might be different from your static notifications URL as a client. In that case, callbacks will also be sent to the recipient's notifications URL.For other integrations:
When you set up your portal together with Flywire, you had the option to define a callback URL for that portal. Callbacks will be sent to this URL for all payments for this portal.
If you don't use a static callback URL yet and want to start using it, please contact the Solutions team.
Dynamic URL
The URL you can set in a parameter when you are creating a payment is the dynamic notifications URL. Since this URL can be different for every payment you create, it is called dynamic.
How defining static and dynamic URLs affect callbacks
|
= not set |
= set |
| Static URL |
Dynamic URL |
Result |
|
|
|
You won't receive notifications. |
|
|
|
You'll receive notifications to your static URL. |
|
|
|
For API integrations: The dynamic URL will override the static URL and you'll receive notifications only to the dynamic URL. For other integrations: You'll receive callbacks to both URLs. This is called "dual callback URL". A dual callback URL means you defined a static URL in your portal and you are sending callbacks to a different callback URL via the parameter for the payment. In this case, callbacks will be sent to both URLs. This
approach can be useful if you want to update two separate systems.
|
|
|
|
You'll receive notifications to your dynamic URL |
The external reference.
The external reference is used to match a notification to a particular payment. You can use any kind of identifier or reference from your own system you might need to identify the payment.
The recipient ID.
The recipient ID is the unique three-letter ID that identifies the recipient, for example FWU for Flywire University. The recipient ID has been assigned by Flywire when the recipient has been set up.
You can use this request to get a list of all recipients that are available to you as a client and what their recipient ID is:
For details see Getting a List of all available Recipients.
Defines if this Checkout Session is for card or direct debit payments. For direct debit, it also defines the type of direct debit scheme.
Possible values:
| Card payments | cards |
| SEPA direct debit | dd_sepa |
| BACS direct debit | dd_bacs
Only available in mode tokenization.
|
| EFT Canada direct debit | dd_eft
Only available in mode tokenization.
|
| ACH direct debit | dd_ach
Only available in mode tokenization.
|
The payor_id depends on how you want to uniquely identify a payer. Usually, you use an ID from another system, for example your ERP. Spaces are not allowed.
curl https://base-url-placeholder/checkout/sessions
  -X POST
  -H "Content-Type: application/json"
  -H "X-Authentication-Key: {api_key}"
  -d '{
    "type": "tokenization_and_pay",
    "charge_intent": {
        "mode": "subscription"
    },
   "payor": {
		"first_name": "Peter",
		"last_name": "Payer",
		"address": "123 High Street",
		"city": "London",
		"country": "GB",
		"state": "",
		"phone": "0044123456789",
		"email": "[email protected]",
		"zip": "SW1A 1AA"
    },
    "options": {
        "form": {
			"action_button": "save",
			"locale": "en",
            "show_flywire_logo": true
        }
    },
	"recipient": {
   		"fields": [
            {
                "id": "custom_field_1",
                "value": "ID12345"
            },
			{
				"id": "custom_field_2",
				"value": "2020"
			}
        ]
	},
    "items": [
        {
            "id": "default",
            "amount": 3300
        }
    ],
    "notifications_url": "https://webhook.site/9bf9cf8d-1d8c-46d1-b147-ca5841ff2ede",
    "external_reference": "Payment ID12456",
    "recipient_id": "UUI",
    "schema": "dd_sepa",
	"payor_id": "payorCCC"
}'
Response
No matter which type of Checkout Session you created, the response is always the same.
-
 Response with no warnings
 -
 Response with warnings
 -
 422 Error for BACS
The Checkout Session ID.
This is the session ID you need if you are using Flywire Elements with Smart Rendering or Checkout as Javascript with API.
Smart Rendering means you render Flywire Elements on your website with the help of the Flywire SDK script.
Extensive customization
-
Select which payer fields to display.
-
Customize the appearance, such as fonts and colors.
-
Choose the language.
Responsive layout
Optimized responsive layout for desktop and mobile devices.
Easy event handling
Simply define what should happen in case of success or errors - no need to filter individual postMessages.
The time before the Checkout Session expires in seconds.
hosted_form object
Only relevant when you render the form via iframe. More info:
-
iframe rendering for Flywire Elements
-
iframe rendering for Checkout
The hosted-form-URL. This is the URL your iframe displays.
The method (GET).
warnings array
The field where the error occurred.
For a description of all fields and their valid values form see:
-
Payment Element if you are using Flywire Elements
-
Checkout Experience if you are using Checkout
errors array
You can decide which information from the response you want to filter out in your backend before passing the URL to your frontend.
The error text.
The error type.
{
"id": "494d2e9d-c0c9-407c-9094-5b3b2a02c00f",
"expires_in_seconds": 1800,
"hosted_form": {
	"url": "https://payment-checkout-dev-apache.flywire.cc/v1/form?session_id=494d2e9d-c0c9-407c-9094-5b3b2a02c00f",
	"method": "GET"
},
"warnings": []
}
When are warnings returned?
If the warning array contains warnings, it means that you tried to pre-fill the UI form with invalid values. You can use these warnings to check the data in your system for mistakes.
Are warnings an error?
No, warnings inform you of issues with field values, but you will still receive the URL and can display the form to your payer.
How do the warnings affect the form?
If a drop down field (like country) is affected by invalid values, the field will be empty, meaning no selection from the drop down is made yet. Your payer has to select the value from the drop down manually.
The Checkout Session ID.
This is the session ID you need if you are using Flywire Elements with Smart Rendering or Checkout as Javascript with API.
Smart Rendering means you render Flywire Elements on your website with the help of the Flywire SDK script.
Extensive customization
-
Select which payer fields to display.
-
Customize the appearance, such as fonts and colors.
-
Choose the language.
Responsive layout
Optimized responsive layout for desktop and mobile devices.
Easy event handling
Simply define what should happen in case of success or errors - no need to filter individual postMessages.
The time before the Checkout Session expires in seconds.
hosted_form object
Only relevant when you render the form via iframe. More info:
-
iframe rendering for Flywire Elements
-
iframe rendering for Checkout
The hosted-form-URL. This is the URL your iframe displays.
The method (GET).
warnings array
The field where the error occurred.
For a description of all fields and their valid values form see:
-
Payment Element if you are using Flywire Elements
-
Checkout Experience if you are using Checkout
errors array
You can decide which information from the response you want to filter out in your backend before passing the URL to your frontend.
The error text.
The error type.
{
"id": "e6bf6f63-46e0-4bd7-9bce-8106c02d0b3f",
"expires_in_seconds": 1800,
"hosted_form": {
	"url": "https://payment-checkout-dev-apache.flywire.cc/v1/form?session_id=e6bf6f63-46e0-4bd7-9bce-8106c02d0b3f",
	"method": "GET"
},
"warnings": [
	{
		"source": "email",
		"errors": [
			{
				"text": "must be a valid email",
				"error_type": "invalid_email"
    		}
   		]
  	}
  ]
}
Creating the Checkout Session failed - Recipient currency is not GBP
422 Error
When does this happen?
You tried to create a Checkout Session with a recipient that does not have GBP set as its currency.
What should you do?
-
Use a different direct debit scheme (not BACS).
-
Alternative: Use a different recipient (if you can't use a different recipient, contact Flywire to change the settings of the recipient).
{
    "type": "https://developers.flywire.com",
    "title": "Unprocessable entity",
    "status": 422,
    "detail": "Invalid parameters",
    "errors": [
        {
            "source": "/",
            "param": "recipient_id",
            "type": "invalid_param",
            "message": "BACS direct debit requires GBP. The recipient ARA cannot receive payments in GBP."
        }
    ]
}
The Payer's side: Filling out and sending the UI Form
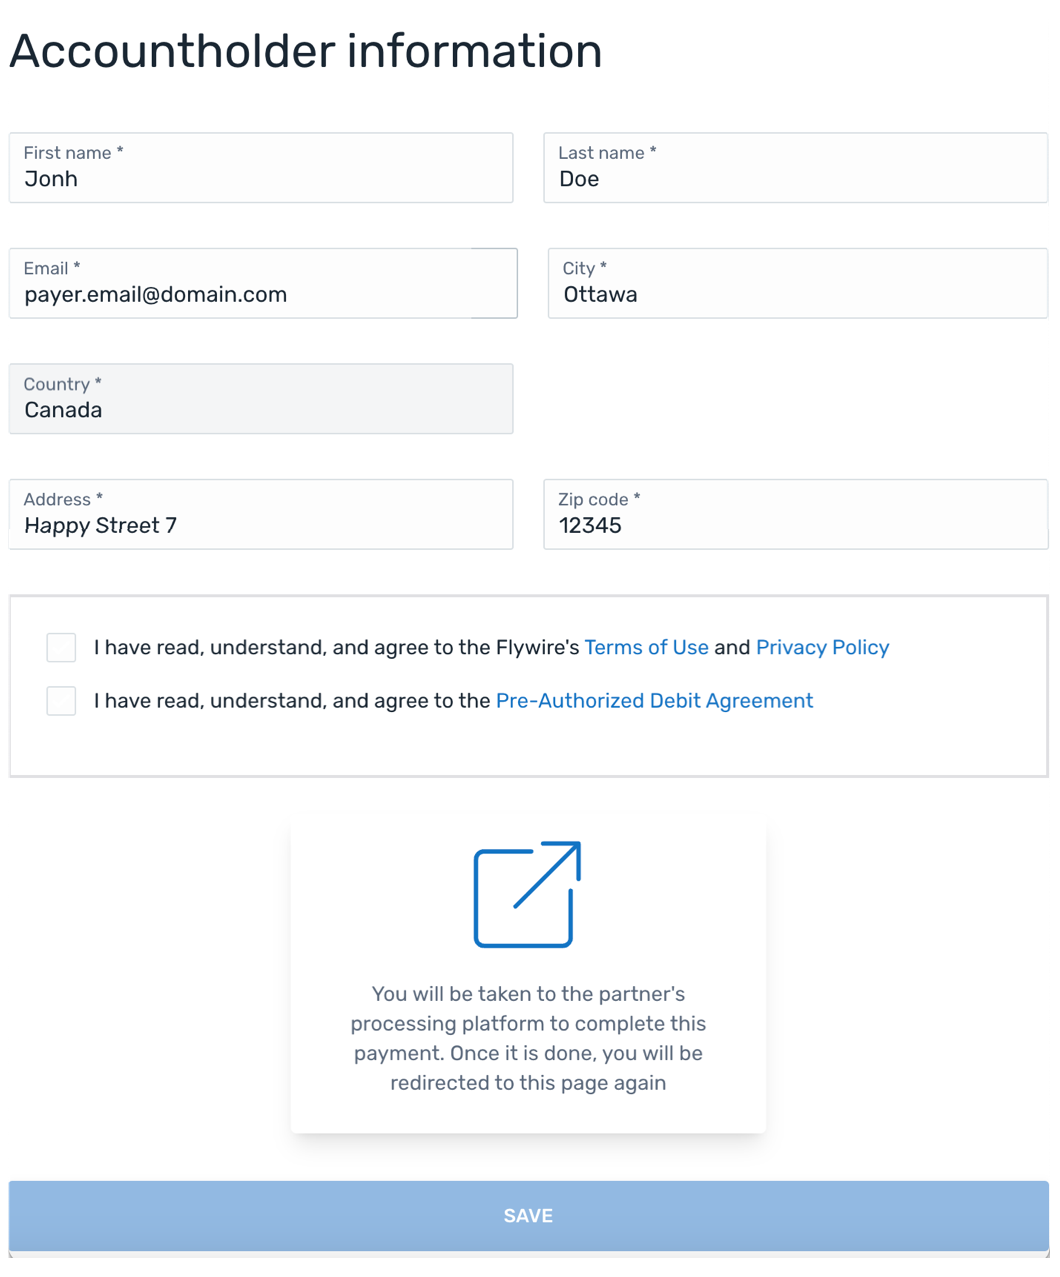
After you created the Checkout Session, your payer accesses the UI Form on your website. Depending on the UI Form, your payer goes through different steps to fill it out and send it.
What does my payer see?
-
Card
-
Direct Debit SEPA
-
Direct Debit BACS
-
Direct Debit EFT Canada
-
Direct Debit ACH
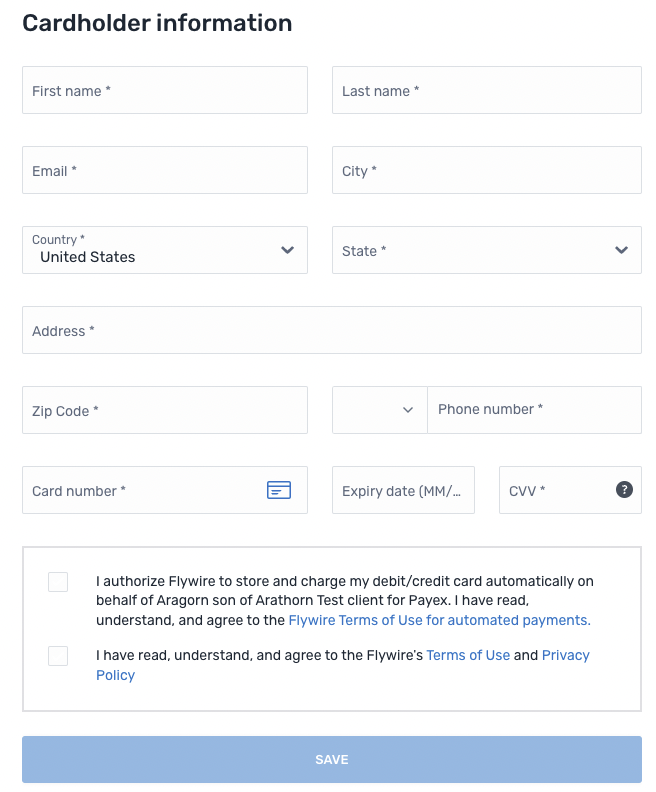
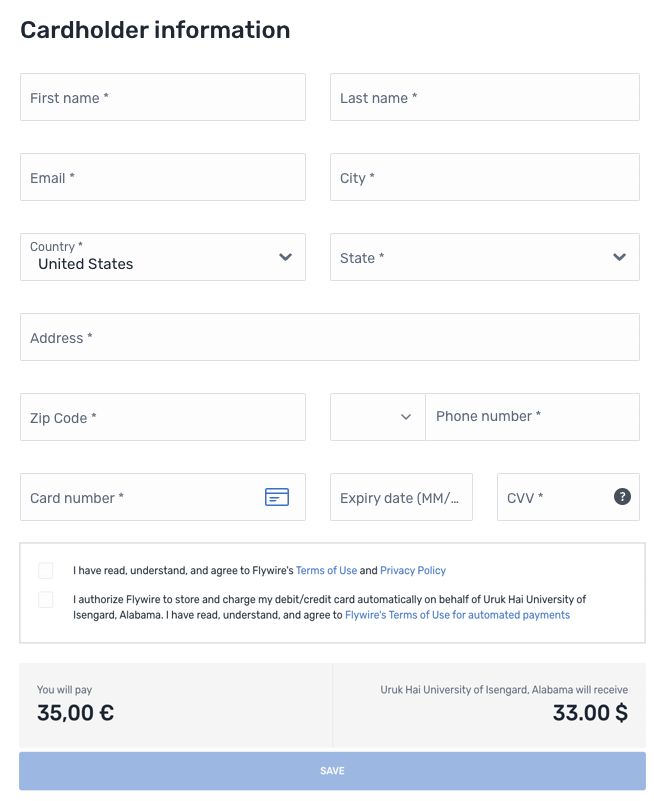
The payer sees a form that collects the payer and card information. After the payer confirmed the form, the payment is created. With Smart Rendering, the appearance of the element and the displayed fields may vary based on your customizations.
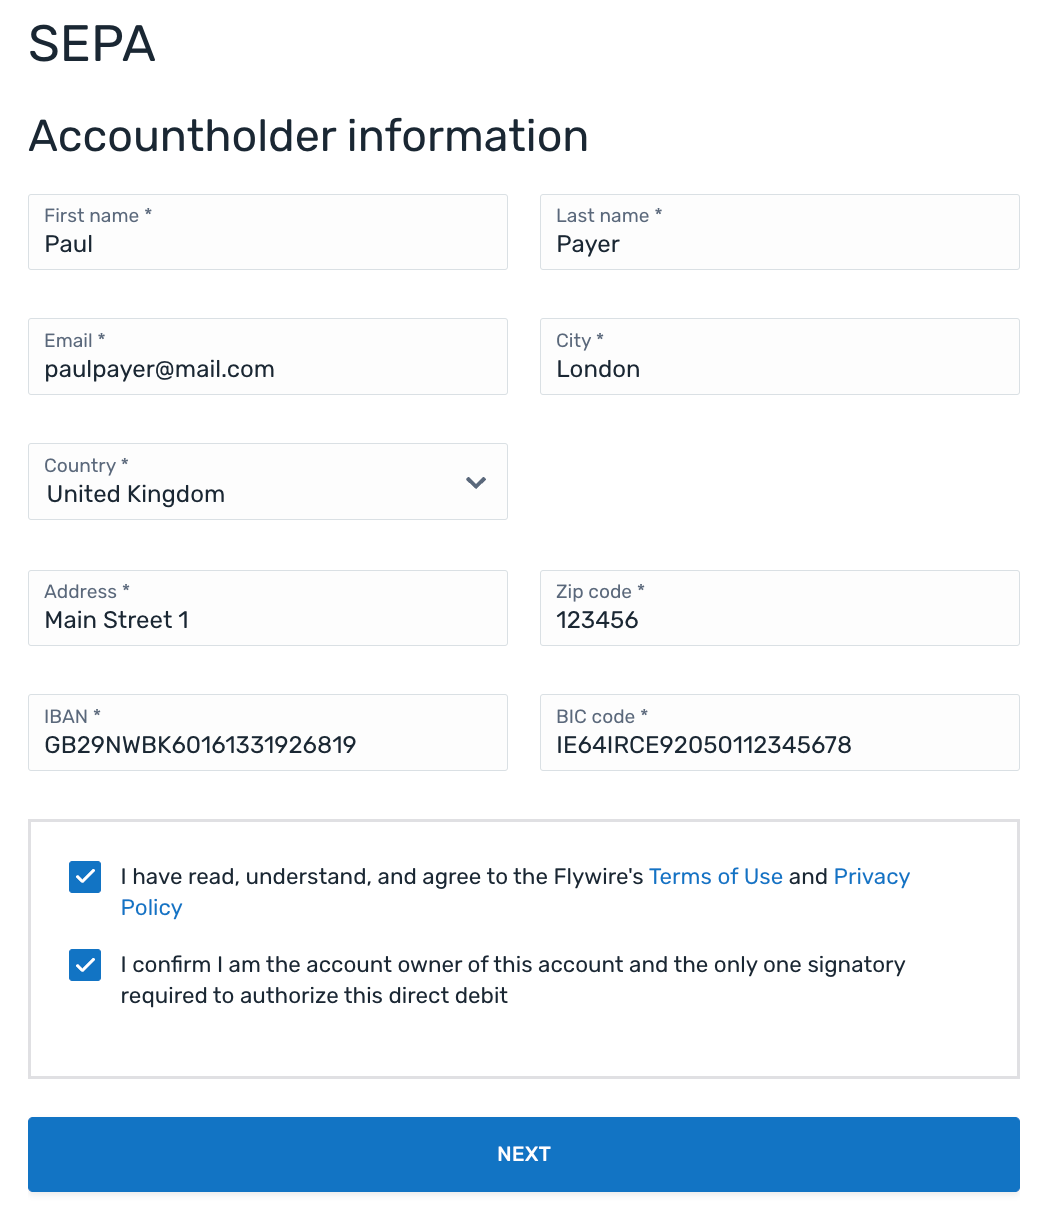
Your payer sees the SEPA form where they can enter their payer and bank account information.
After entering their info, your payer will see the mandate confirmation screen ("Review mandate info") to confirm or edit their info.
Your payer sees the BACS form where they can enter their payer and bank account information.
After entering their info, your payer will see the mandate confirmation screen ("Review mandate info") to confirm or edit their info.
Your payer sees the EFT Canada form where they can enter their payer information.
After entering their information, your payer will be redirected to Plaid. The third-party implementation will lead your payer through the steps to connect to their bank account.
After your payer successfully connected to their bank account, they will be redirected to the EFT Canada direct debit Form.
Back at the EFT Canada direct debit form, your payer can either edit their payer info, connect to a different bank account or confirm the information.
Your payer sees the ACH form where they can enter their payer and bank account information.
After entering their info, your payer will see the mandate confirmation screen ("Review mandate info") to confirm or edit their info.
The postMessage of the Event Listener
After your payer sent the form, the event listener will return a successful postMessage.
A successful postMessage confirms that the form was submitted and that you can confirm the Checkout Session now. However, it does not indicate payment success. Payment status updates will be sent via callback notifications, see Payment Status Notifications for details.
The postMessage contains the following information:
confirm_url object
Contains the confirm URL. The confirm URL is the full url for the request to confirm the session, already resolved with the correct session ID.
The method (POST).
The confirm URL. The confirm URL is the full url for the request to confirm the session, already resolved with the correct session ID.
payor object
The email address your payer entered in the UI Form. You need to use this email address to send mandatory emails to your payer, see
One Off Payments: Emails to Your Payer (only if you opted for sending emails yourself)
This parameter helps you filter the PostMessages to only return the result of the Checkout Session. This is only necessary when you render via iframe (see Implementing the Payment Element for Elements and Implementing the Checkout Experience for Checkout).
Indicates if the Checkout Session was successful.
true: Checkout Session successful
false: Checkout Session failed
You can use this parameter to filter the PostMessages to only return successful ones. This is only necessary when you render via iframe (see Implementing the Payment Element for Elements and Implementing the Checkout Experience for Checkout).
{
confirm_url: {
	method: "POST",
	url: "https://api-platform.flywire.com/payments/v1/checkout/sessions/494d2e9d-c0c9-407c-9094-5b3b2a02c00f/confirm",
},
payor: {
email: "[email protected]"
},
source: "checkout_session",
success: true
}
Confirming a Checkout Session
Request
As a security measure to ensure that you are the one who created the session, you have to confirm the Checkout Session.
How to Resolve the Path Placeholders of the Endpoint
You don't need to manually resolve the {ID} in the endpoint, as Flywire provides the fully resolved URL via postMessage.
Why should I use the confirm url from the postMessage?
-
It already contains the correct Checkout Session ID, no need to retrieve it from somewhere else.
-
You always receive the URL after the form has been sent. If you would try to confirm a Checkout Session before the form has been sent, you'll get an error message
curl https://base-url-placeholder/checkout/sessions/494d2e9d-c0c9-407c-9094-5b3b2a02c00f/confirm
  -X POST
  -H "Content-Type: application/json"
  -H "X-Authentication-Key: {api_key}"
Response
After you confirmed the Checkout Session, you’ll receive the payment method token and mandate ID. If you created a Checkout Session of type tokenize_and_pay you'll also receive information about the payment that has been created.
The content of the response depends on which type of Checkout Session you created:
- Card tokenization
-
Card tokenization_and_pay
-
Card new_mandate
- Direct Debit tokenization
- Direct Debit tokenization_and_pay
payment_method object
Contains information about the payment method the payer used and the payment method token.
The payment method token. You need this token to charge recurring payments for this payment method.
The payment method token is a unique string of numbers and characters that gets assigned to a card or bank account when they are stored. It identifies the payment method (e.g., last four digits of a card or bank account) and includes payer details, such as the cardholder or account owner. Note: the payer may differ from the purchaser, like a parent paying a student’s tuition.
The payment method type.
Possible values:
| bank_transfer | Payment is done via bank transfer. |
| online | Payment is done via an alternative payment method (APM), through a third-party provider. |
| card | Payment is done via credit or debit card. You'll get additional information about the type of card in the parameter card_classification (either credit or debit). |
direct_debit | Payment is done via direct debit. |
| 529_payments | Payment is done via a 529 provider. |
Only for card payments.
Credit or debit card.
Possible values:
creditdebit
The last four digits of the card number or bank account number.
Only for card payments.
The card expiration date in the format MM/YYYY.
The ISO2 code of the country where the card was issued.
Only for card payments.
The brand of the card (for example, Visa or Mastercard).
Indicates who issued the card to the payer (for example, a bank).
mandate object
It is mandatory to include the mandate ID when charging the payment.
For some card payments, this is mandatory to be compliant with policies. For example the mandate ID serves as the "Visa Transaction ID", which is mandatory since October 31st, 2022 (not providing the Visa Transaction ID could result in soft declines and fees for non-compliance). Other payment processors may require a similar ID for consent verification in the future.
Flywire generates mandate IDs for both cards and bank accounts to ensure future readiness.
The mandate ID.
The mandate ID is a Flywire-generated ID that represents the payer's consent for recurring payments, much like a signature authorizing future payments.
After tokenizing a card or bank account, the mandate ID is returned to you in the mandate_id parameter or in the id parameter inside the mandate object.
| Payment Method | Mandate ID Format |
|---|---|
| Bank account | MT+ recipient ID + date of mandate generation + string of characters Example: MTQQ20240430NTZTZX |
| Card that has only been tokenized, payments are charged later | MC + ZER + date of mandate generation + string of characters Example: MCZER20240430SaA8rNHh |
| Card that has been tokenized and the first payment has been charged immediately | MC + recipient ID + date of mandate generation + string of characters Example: MCTQQ20240430HaB7fKMg |
It is mandatory to include the mandate ID when charging the payment.
For some card payments, this is mandatory to be compliant with policies. For example the mandate ID serves as the "Visa Transaction ID", which is mandatory since October 31st, 2022 (not providing the Visa Transaction ID could result in soft declines and fees for non-compliance). Other payment processors may require a similar ID for consent verification in the future.
Flywire generates mandate IDs for both cards and bank accounts to ensure future readiness.
For bank accounts, the mandate is represented by the mandate ID and additionally in PDF form.
The mandate PDF is the mandate fully written out "on paper" (but paperless as a PDF). The PDF will be delivered to your payer by email.
There are different types of PDFs depending on the direct debit scheme for the payments:
SEPA mandate
| The SEPA mandate is a PDF with the written out SEPA contract. A SEPA mandate has a specific format and strictly defined content. It is part of the SEPA payment system, and you cannot charge a bank account without having a SEPA mandate.
The file name for the PDF with the SEPA mandate contains the date the SEPA mandate was created and the mandate ID that was generated by Flywire. |
BACS mandate
| The BACS mandate is a PDF with the written out contract including the Direct Debit Guarantee for BACS. A BACS mandate has a specific format and strictly defined content. It is part of the BACS payment system, and you cannot charge a bank account without having a BACS mandate. |
surcharge object
A surcharge may apply in certain situations, including, but not limited to, mismatches between card currency and payer country, as well as the use of certain card types. If a surcharge applies and the percentage of it depends on the individual settings for the recipient of the payment.
The percentage of the surcharge (only if a surcharge applies).
{
"payment_method": {
	"token": "232301485cfa4b36bc28",
	"type": "card",
	"card_classification": "credit",
	"last_four_digits": "1111",
	"card_expiration": "03/2030",
	"country": "US",
	"brand": "visa",
	"issuer": "JPMORGAN CHASE BANK, N.A."
	},
"mandate": {
	"id": "MCRUC20230330uAM584YC"
	"surcharge": {
		"percentage": 0.03
		}
	}
}The payment reference.
The payment reference identifies a payment.
The format for a payment reference is:
Recipient ID followed by a string of characters, for example FWU744586810.
With the payment reference, the payment can be tracked during its journey through the different stages of the payment process.
The payment reference is also important in other situations, for example:
-
When a payer is using bank transfer as payment method, they usually must provide the payment reference when sending the funds.
-
The payment reference helps Flywire to identify the payment if you or your payer needs support.
charge_info object
The payment amount in the payer currency.
The amount is specified in the smallest unit of the currency, called subunits. For example, in USD, the subunit is cents, and 100 cents equal 1 USD. So, an amount of 12025 (cents) is equivalent to 120.25 USD.
Note that the subunit-to-unit ratio varies by currency, it is not always 100. See Currencies for the subunits of each currency.
The payer currency in ISO 4217 format.
payment_method object
Contains information about the payment method the payer used and the payment method token.
The payment method token. You need this token to charge recurring payments for this payment method.
The payment method token is a unique string of numbers and characters that gets assigned to a card or bank account when they are stored. It identifies the payment method (e.g., last four digits of a card or bank account) and includes payer details, such as the cardholder or account owner. Note: the payer may differ from the purchaser, like a parent paying a student’s tuition.
The payment method type.
Possible values:
| bank_transfer |
Payment is done via bank transfer. |
| online |
Payment is done via an alternative payment method (APM), through a third-party provider. |
| card |
Payment is done via credit or debit card. You'll get additional information about the type of card in the parameter card_classification (either credit or debit). |
|
direct_debit |
Payment is done via direct debit. |
| 529_payments |
Payment is done via a 529 provider. |
Only for card payments.
Credit or debit card.
Possible values:
-
credit -
debit
The last four digits of the card number or bank account number.
Only for card payments.
The card expiration date in the format MM/YYYY.
The ISO2 code of the country where the card was issued.
Only for card payments.
The brand of the card (for example, Visa or Mastercard).
Indicates who issued the card to the payer (for example, a bank).
mandate object
It is mandatory to include the mandate ID when charging the payment.
For some card payments, this is mandatory to be compliant with policies. For example the mandate ID serves as the "Visa Transaction ID", which is mandatory since October 31st, 2022 (not providing the Visa Transaction ID could result in soft declines and fees for non-compliance). Other payment processors may require a similar ID for consent verification in the future.
Flywire generates mandate IDs for both cards and bank accounts to ensure future readiness.
The mandate ID.
The mandate ID is a Flywire-generated ID that represents the payer's consent for recurring payments, much like a signature authorizing future payments.
After tokenizing a card or bank account, the mandate ID is returned to you in the mandate_id parameter or in the id parameter inside the mandate object.
| Payment Method | Mandate ID Format |
|---|---|
| Bank account |
MT+ recipient ID + date of mandate generation + string of characters Example: MTQQ20240430NTZTZX |
| Card that has only been tokenized, payments are charged later |
MC + ZER + date of mandate generation + string of characters Example: MCZER20240430SaA8rNHh |
| Card that has been tokenized and the first payment has been charged immediately |
MC + recipient ID + date of mandate generation + string of characters Example: MCTQQ20240430HaB7fKMg |
It is mandatory to include the mandate ID when charging the payment.
For some card payments, this is mandatory to be compliant with policies. For example the mandate ID serves as the "Visa Transaction ID", which is mandatory since October 31st, 2022 (not providing the Visa Transaction ID could result in soft declines and fees for non-compliance). Other payment processors may require a similar ID for consent verification in the future.
Flywire generates mandate IDs for both cards and bank accounts to ensure future readiness.
For bank accounts, the mandate is represented by the mandate ID and additionally in PDF form.
The mandate PDF is the mandate fully written out "on paper" (but paperless as a PDF). The PDF will be delivered to your payer by email.
There are different types of PDFs depending on the direct debit scheme for the payments:
SEPA mandate
|
|
The SEPA mandate is a PDF with the written out SEPA contract. A SEPA mandate has a specific format and strictly defined content. It is part of the SEPA payment system, and you cannot charge a bank account without having a SEPA mandate.
The file name for the PDF with the SEPA mandate contains the date the SEPA mandate was created and the mandate ID that was generated by Flywire. |
BACS mandate
|
|
The BACS mandate is a PDF with the written out contract including the Direct Debit Guarantee for BACS. A BACS mandate has a specific format and strictly defined content. It is part of the BACS payment system, and you cannot charge a bank account without having a BACS mandate. |
surcharge object
A surcharge may apply in certain situations, including, but not limited to, mismatches between card currency and payer country, as well as the use of certain card types. If a surcharge applies and the percentage of it depends on the individual settings for the recipient of the payment.
The percentage of the surcharge (only if a surcharge applies).
{
"payment_reference": "RUC208967136",
"charge_info": {
	"amount": 100000,
	"currency": "EUR"
	},
"payment_method": {
	"token": "232301485cfa4b36bc28",
	"type": "card",
	"card_classification": "credit",
	"last_four_digits": "1111",
	"card_expiration": "03/2030",
	"country": "US",
	"brand": "visa",
	"issuer": "JPMORGAN CHASE BANK, N.A."
	},
"mandate": {
	"id": "MCRUC20230330uAM584YC"
	"surcharge": {
		"percentage": 0.03
		}
	}
}
payment_method object
Contains information about the payment method the payer used and the payment method token.
The payment method token. You need this token to charge recurring payments for this payment method.
The payment method token is a unique string of numbers and characters that gets assigned to a card or bank account when they are stored. It identifies the payment method (e.g., last four digits of a card or bank account) and includes payer details, such as the cardholder or account owner. Note: the payer may differ from the purchaser, like a parent paying a student’s tuition.
The payment method type.
Possible values:
| bank_transfer | Payment is done via bank transfer. |
| online | Payment is done via an alternative payment method (APM), through a third-party provider. |
| card | Payment is done via credit or debit card. You'll get additional information about the type of card in the parameter card_classification (either credit or debit). |
direct_debit | Payment is done via direct debit. |
| 529_payments | Payment is done via a 529 provider. |
Only for card payments.
Credit or debit card.
Possible values:
creditdebit
The last four digits of the card number or bank account number.
Only for card payments.
The card expiration date in the format MM/YYYY.
The ISO2 code of the country where the card was issued.
Only for card payments.
The brand of the card (for example, Visa or Mastercard).
Indicates who issued the card to the payer (for example, a bank).
mandate object
It is mandatory to include the mandate ID when charging the payment.
For some card payments, this is mandatory to be compliant with policies. For example the mandate ID serves as the "Visa Transaction ID", which is mandatory since October 31st, 2022 (not providing the Visa Transaction ID could result in soft declines and fees for non-compliance). Other payment processors may require a similar ID for consent verification in the future.
Flywire generates mandate IDs for both cards and bank accounts to ensure future readiness.
The mandate ID.
The mandate ID is a Flywire-generated ID that represents the payer's consent for recurring payments, much like a signature authorizing future payments.
After tokenizing a card or bank account, the mandate ID is returned to you in the mandate_id parameter or in the id parameter inside the mandate object.
| Payment Method | Mandate ID Format |
|---|---|
| Bank account | MT+ recipient ID + date of mandate generation + string of characters Example: MTQQ20240430NTZTZX |
| Card that has only been tokenized, payments are charged later | MC + ZER + date of mandate generation + string of characters Example: MCZER20240430SaA8rNHh |
| Card that has been tokenized and the first payment has been charged immediately | MC + recipient ID + date of mandate generation + string of characters Example: MCTQQ20240430HaB7fKMg |
It is mandatory to include the mandate ID when charging the payment.
For some card payments, this is mandatory to be compliant with policies. For example the mandate ID serves as the "Visa Transaction ID", which is mandatory since October 31st, 2022 (not providing the Visa Transaction ID could result in soft declines and fees for non-compliance). Other payment processors may require a similar ID for consent verification in the future.
Flywire generates mandate IDs for both cards and bank accounts to ensure future readiness.
For bank accounts, the mandate is represented by the mandate ID and additionally in PDF form.
The mandate PDF is the mandate fully written out "on paper" (but paperless as a PDF). The PDF will be delivered to your payer by email.
There are different types of PDFs depending on the direct debit scheme for the payments:
SEPA mandate
| The SEPA mandate is a PDF with the written out SEPA contract. A SEPA mandate has a specific format and strictly defined content. It is part of the SEPA payment system, and you cannot charge a bank account without having a SEPA mandate.
The file name for the PDF with the SEPA mandate contains the date the SEPA mandate was created and the mandate ID that was generated by Flywire. |
BACS mandate
| The BACS mandate is a PDF with the written out contract including the Direct Debit Guarantee for BACS. A BACS mandate has a specific format and strictly defined content. It is part of the BACS payment system, and you cannot charge a bank account without having a BACS mandate. |
surcharge object
A surcharge may apply in certain situations, including, but not limited to, mismatches between card currency and payer country, as well as the use of certain card types. If a surcharge applies and the percentage of it depends on the individual settings for the recipient of the payment.
The percentage of the surcharge (only if a surcharge applies).
{
"payment_method": {
	"token": "232301485cfa4b36bc28",
	"type": "card",
	"card_classification": "credit",
	"last_four_digits": "1111",
	"card_expiration": "03/2030",
	"country": "US",
	"brand": "visa",
	"issuer": "JPMORGAN CHASE BANK, N.A."
	},
"mandate": {
	"id": "MCRUC20230330uAM584YC"
	"surcharge": {
		"percentage": 0.03
		}
	}
}
payment_method object
Contains information about the payment method the payer used and the payment method token.
The payment method token. You need this token to charge recurring payments for this payment method.
The payment method token is a unique string of numbers and characters that gets assigned to a card or bank account when they are stored. It identifies the payment method (e.g., last four digits of a card or bank account) and includes payer details, such as the cardholder or account owner. Note: the payer may differ from the purchaser, like a parent paying a student’s tuition.
The payment method type.
Possible values:
| bank_transfer | Payment is done via bank transfer. |
| online | Payment is done via an alternative payment method (APM), through a third-party provider. |
| card | Payment is done via credit or debit card. You'll get additional information about the type of card in the parameter card_classification (either credit or debit). |
direct_debit | Payment is done via direct debit. |
| 529_payments | Payment is done via a 529 provider. |
The last four digits of the card number or bank account number.
mandate object
It is mandatory to include the mandate ID when charging the payment.
For some card payments, this is mandatory to be compliant with policies. For example the mandate ID serves as the "Visa Transaction ID", which is mandatory since October 31st, 2022 (not providing the Visa Transaction ID could result in soft declines and fees for non-compliance). Other payment processors may require a similar ID for consent verification in the future.
Flywire generates mandate IDs for both cards and bank accounts to ensure future readiness.
The mandate ID.
The mandate ID is a Flywire-generated ID that represents the payer's consent for recurring payments, much like a signature authorizing future payments.
After tokenizing a card or bank account, the mandate ID is returned to you in the mandate_id parameter or in the id parameter inside the mandate object.
| Payment Method | Mandate ID Format |
|---|---|
| Bank account | MT+ recipient ID + date of mandate generation + string of characters Example: MTQQ20240430NTZTZX |
| Card that has only been tokenized, payments are charged later | MC + ZER + date of mandate generation + string of characters Example: MCZER20240430SaA8rNHh |
| Card that has been tokenized and the first payment has been charged immediately | MC + recipient ID + date of mandate generation + string of characters Example: MCTQQ20240430HaB7fKMg |
It is mandatory to include the mandate ID when charging the payment.
For some card payments, this is mandatory to be compliant with policies. For example the mandate ID serves as the "Visa Transaction ID", which is mandatory since October 31st, 2022 (not providing the Visa Transaction ID could result in soft declines and fees for non-compliance). Other payment processors may require a similar ID for consent verification in the future.
Flywire generates mandate IDs for both cards and bank accounts to ensure future readiness.
For bank accounts, the mandate is represented by the mandate ID and additionally in PDF form.
The mandate PDF is the mandate fully written out "on paper" (but paperless as a PDF). The PDF will be delivered to your payer by email.
There are different types of PDFs depending on the direct debit scheme for the payments:
SEPA mandate
| The SEPA mandate is a PDF with the written out SEPA contract. A SEPA mandate has a specific format and strictly defined content. It is part of the SEPA payment system, and you cannot charge a bank account without having a SEPA mandate.
The file name for the PDF with the SEPA mandate contains the date the SEPA mandate was created and the mandate ID that was generated by Flywire. |
BACS mandate
| The BACS mandate is a PDF with the written out contract including the Direct Debit Guarantee for BACS. A BACS mandate has a specific format and strictly defined content. It is part of the BACS payment system, and you cannot charge a bank account without having a BACS mandate. |
{
    "payment_method": {
        "token": "_jRS8z0CrDyDI2KshDPZ",
        "type": "direct_debit",
        "last_four_digits": "6789"
    },
    "mandate": {
        "id": "MUUI20230131XCGPRT"
    }
}The payment reference.
The payment reference identifies a payment.
The format for a payment reference is:
Recipient ID followed by a string of characters, for example FWU744586810.
With the payment reference, the payment can be tracked during its journey through the different stages of the payment process.
The payment reference is also important in other situations, for example:
When a payer is using bank transfer as payment method, they usually must provide the payment reference when sending the funds.
The payment reference helps Flywire to identify the payment if you or your payer needs support.
charge_info object
The payment amount in the payer currency.
The amount is specified in the smallest unit of the currency, called subunits. For example, in USD, the subunit is cents, and 100 cents equal 1 USD. So, an amount of 12025 (cents) is equivalent to 120.25 USD.
Note that the subunit-to-unit ratio varies by currency, it is not always 100. See Currencies for the subunits of each currency.
The payer currency in ISO 4217 format.
payment_method object
Contains information about the payment method the payer used and the payment method token.
The payment method token. You need this token to charge recurring payments for this payment method.
The payment method token is a unique string of numbers and characters that gets assigned to a card or bank account when they are stored. It identifies the payment method (e.g., last four digits of a card or bank account) and includes payer details, such as the cardholder or account owner. Note: the payer may differ from the purchaser, like a parent paying a student’s tuition.
The payment method type.
Possible values:
| bank_transfer | Payment is done via bank transfer. |
| online | Payment is done via an alternative payment method (APM), through a third-party provider. |
| card | Payment is done via credit or debit card. You'll get additional information about the type of card in the parameter card_classification (either credit or debit). |
direct_debit | Payment is done via direct debit. |
| 529_payments | Payment is done via a 529 provider. |
The last four digits of the card number or bank account number.
mandate object
It is mandatory to include the mandate ID when charging the payment.
For some card payments, this is mandatory to be compliant with policies. For example the mandate ID serves as the "Visa Transaction ID", which is mandatory since October 31st, 2022 (not providing the Visa Transaction ID could result in soft declines and fees for non-compliance). Other payment processors may require a similar ID for consent verification in the future.
Flywire generates mandate IDs for both cards and bank accounts to ensure future readiness.
The mandate ID.
The mandate ID is a Flywire-generated ID that represents the payer's consent for recurring payments, much like a signature authorizing future payments.
After tokenizing a card or bank account, the mandate ID is returned to you in the mandate_id parameter or in the id parameter inside the mandate object.
| Payment Method | Mandate ID Format |
|---|---|
| Bank account | MT+ recipient ID + date of mandate generation + string of characters Example: MTQQ20240430NTZTZX |
| Card that has only been tokenized, payments are charged later | MC + ZER + date of mandate generation + string of characters Example: MCZER20240430SaA8rNHh |
| Card that has been tokenized and the first payment has been charged immediately | MC + recipient ID + date of mandate generation + string of characters Example: MCTQQ20240430HaB7fKMg |
It is mandatory to include the mandate ID when charging the payment.
For some card payments, this is mandatory to be compliant with policies. For example the mandate ID serves as the "Visa Transaction ID", which is mandatory since October 31st, 2022 (not providing the Visa Transaction ID could result in soft declines and fees for non-compliance). Other payment processors may require a similar ID for consent verification in the future.
Flywire generates mandate IDs for both cards and bank accounts to ensure future readiness.
For bank accounts, the mandate is represented by the mandate ID and additionally in PDF form.
The mandate PDF is the mandate fully written out "on paper" (but paperless as a PDF). The PDF will be delivered to your payer by email.
There are different types of PDFs depending on the direct debit scheme for the payments:
SEPA mandate
| The SEPA mandate is a PDF with the written out SEPA contract. A SEPA mandate has a specific format and strictly defined content. It is part of the SEPA payment system, and you cannot charge a bank account without having a SEPA mandate.
The file name for the PDF with the SEPA mandate contains the date the SEPA mandate was created and the mandate ID that was generated by Flywire. |
BACS mandate
| The BACS mandate is a PDF with the written out contract including the Direct Debit Guarantee for BACS. A BACS mandate has a specific format and strictly defined content. It is part of the BACS payment system, and you cannot charge a bank account without having a BACS mandate. |
{
    "payment_reference": "RUC670821548",
    "charge_info": {
        "amount": 101300,
        "currency": "EUR"
    },
    "payment_method": {
        "token": "UW6JqAuMcJje-SyR3iIG",
        "type": "direct_debit",
        "last_four_digits": "6789"
    },
    "mandate": {
        "id": "MRUC20230330QBZ6MP"
    }
Essentials about Token and Mandate
About the Payment Method Token
The payment method token is a unique string of numbers and characters that gets assigned to a card or bank account when they are stored. It identifies the payment method (e.g., last four digits of a card or bank account) and includes payer details, such as the cardholder or account owner. Note: the payer may differ from the purchaser, like a parent paying a student’s tuition.
Important Information
-
One payment method token can be used for multiple mandate IDs.
-
The payment method token needs to be included in each payment.
Since the token already contains information about the payer, sending the token means that you don’t need to include payer information manually in a payment anymore.
-
The payer information in the payment method token can be different from the payer information stored in your system.
The token stores the information gathered in the UI form. Even if you pre-filled the form with data from your system, the payer might have edited the fields in the form. This can be the case when data in your system is wrong (misspelled names etc.) or when the actual payer is different from what your system considers a “payer” (for example, your system contains information about your students as “payers” but the actual payer (card holder or bank account owner) is a parent).
Where can I find the payment method token for a payer?
The payment method token is returned to you in the response after you confirmed a Checkout Session.
You can also find all payment method tokens for a payer (identified by their payor_id) with this request:
For details see Getting a List of all stored Payment Methods for a Payer.
About the Mandate ID
The mandate ID is a Flywire-generated ID that represents the payer's consent for recurring payments, much like a signature authorizing future payments.
After tokenizing a card or bank account, the mandate ID is returned to you in the mandate_id parameter or in the id parameter inside the mandate object.
| Payment Method | Mandate ID Format |
|---|---|
| Bank account |
MT+ recipient ID + date of mandate generation + string of characters Example: MTQQ20240430NTZTZX |
| Card that has only been tokenized, payments are charged later |
MC + ZER + date of mandate generation + string of characters Example: MCZER20240430SaA8rNHh |
| Card that has been tokenized and the first payment has been charged immediately |
MC + recipient ID + date of mandate generation + string of characters Example: MCTQQ20240430HaB7fKMg |
It is mandatory to include the mandate ID when charging the payment.
For some card payments, this is mandatory to be compliant with policies. For example the mandate ID serves as the "Visa Transaction ID", which is mandatory since October 31st, 2022 (not providing the Visa Transaction ID could result in soft declines and fees for non-compliance). Other payment processors may require a similar ID for consent verification in the future.
Flywire generates mandate IDs for both cards and bank accounts to ensure future readiness.
For bank accounts, the mandate is represented by the mandate ID and additionally in PDF form.
The mandate PDF is the mandate fully written out "on paper" (but paperless as a PDF). The PDF will be delivered to your payer by email.
There are different types of PDFs depending on the direct debit scheme for the payments:
SEPA mandate
|
|
The SEPA mandate is a PDF with the written out SEPA contract. A SEPA mandate has a specific format and strictly defined content. It is part of the SEPA payment system, and you cannot charge a bank account without having a SEPA mandate.
The file name for the PDF with the SEPA mandate contains the date the SEPA mandate was created and the mandate ID that was generated by Flywire. |
BACS mandate
|
|
The BACS mandate is a PDF with the written out contract including the Direct Debit Guarantee for BACS. A BACS mandate has a specific format and strictly defined content. It is part of the BACS payment system, and you cannot charge a bank account without having a BACS mandate. |
Storing the mandate ID
Each mandate ID belongs to a specific plan (an installment plan, a subscription, etc.). You need to store the mandate together with the information about the plan and its payments in your system to ensure that you will be able to identify it.
The mandate PDF for bank accounts has other specific policies for storing:
Direct debit mandates for SEPA and BACS have to be stored for 3 years. Since the emails with the mandate are managed by Flywire (for SEPA) or Finastra (for BACS), Flywire or Finastra will store the mandate for you.
The mandate PDF is the mandate fully written out "on paper" (but paperless as a PDF). The PDF will be delivered to your payer by email.
There are different types of PDFs depending on the direct debit scheme for the payments:
SEPA mandate
|
|
The SEPA mandate is a PDF with the written out SEPA contract. A SEPA mandate has a specific format and strictly defined content. It is part of the SEPA payment system, and you cannot charge a bank account without having a SEPA mandate.
The file name for the PDF with the SEPA mandate contains the date the SEPA mandate was created and the mandate ID that was generated by Flywire. |
BACS mandate
|
|
The BACS mandate is a PDF with the written out contract including the Direct Debit Guarantee for BACS. A BACS mandate has a specific format and strictly defined content. It is part of the BACS payment system, and you cannot charge a bank account without having a BACS mandate. |
Using the mandate ID for recurring payments
The mandate ID needs to be included in each payment that belongs to the same plan (for example, installments of an installment plan or payments for an ongoing subscription). If the payer wants to pay for a different plan, you need to generate a new mandate.
How do I generate a new mandate ID?
-
New card or bank account
If a payer wants to use a new card or bank account for a plan, you have to save (and therefore tokenize) the card or bank account, as this will also give you a mandate.
-
Existing card
If a payer wants to use an existing card that is already tokenized, you can generate a new mandate for the new plan with this card.
Where do I find existing mandate IDs?
You can find all mandate IDs for a payment method token with this request:
For details see Getting the Mandate IDs for a Payment Method Token.
