With Flywire-hosted recurring payments, you use Flywire's pre-defined installment plans. You only have to configure the plan settings (for example the number of installments) in Flywire Dashboard, Flywire will take care of the rest.
Since Flywire knows your plan settings, payments get initiated automatically according to the schedule.
Flywire also handles all emails to your payers on your behalf - these are mandatory to inform them about the recurring payments.
You need access to Flywire Dashboard to define the settings for the plans. If you don't have access yet, contact your Relationship Manager.
Available payment methods:
Card
With Pay-By-Link
You can offer Flywire-hosted recurring payments via Pay-By-Link. The payer gets directed to your PayEx portal and can choose an installment plan.
Step-by-Step Guide
Ensure recurring payments are possible for your portal:
Please contact the Solutions team if recurring payments are not enabled for your portal yet.
Ensure you configured all the necessary settings in Flywire Dashboard.
Give the link to your payer, for example via email or by displaying it on your website.
When they access the link, they can choose between making the payment in full or paying with an installment plan.
With Checkout
Offering Flywire-hosted recurring payments with Checkout means your payer stays on your website to choose the plan within the Checkout Experience form.
This integration requires Flywire API credentials and the ability to make API requests for creating and confirming Checkout Sessions.
Step-by-Step Guide
In this scenario, your payer chose on your website what they want to pay for. Now you want to let your payer choose their installment plan and how they want to pay the recurring payments. At this point, you need to display the Flywire-Plans form.
Define the settings for your installment plans in Flywire Dashboard.
You need access to Flywire Dashboard to define the settings for the plans. If you don't have access yet, contact your Relationship Manager.
Implement a trigger on your website that sends an http request to your backend.
The trigger could be a button like "Make Payment". The http request tells your backend to send a secure request to the Flywire API to create a Checkout Session.
How exactly the http request looks like is up to you, If your payers have accounts on your website, you can use the request to transfer data from your system and use it to pre-fill the fields of the form. For security reasons, you should also implement some form of authentication.
Because you need your API Key to make an API request. Your API Key is secret and should never be sent from the frontend. Always make API request securely from your backend.
Create a Checkout Session via the API.
From your backend, you can securely create a Checkout Session. You need to know which recipient you want to use for this request.
Pre-filling fields is optional. If no values are provided, the fields will be empty for the payer to complete.
Pre-filling fields alone does not affect if fields are editable. Pre-filled fields remain editable unless you explicitly made them read-only or hide them via the settings.
Best practice
Before pre-filling payer fields, consider who the actual payer is.
The form asks for the cardholder or bank account owner’s information. There can be cases when the personal data you have on stored (for example, in your ERP system) is different from the data for the actual payer. Always consider which information you store in your system and how useful it is for pre-filling fields.
Example: Students log into your school portal to pay tuition. In most cases, their parents pay the tuition with their credit card. If you automatically pre-fill the payer fields with the student's profile info, every student has to correct the info and change it to their parent's information.
This distinction is crucial if you plan to hide fields or make them read-only. If you use the wrong data for pre-filling fields and make it impossible for the payer to change it, you could prevent them from completing the payment.
You can to set these fields to hidden or read-only for the payer through settings in the options object.
When using Elements, you can control which payer fields can be edited by your payer - either by setting them to read-only or be completely hiding the field from the payer.
What happens if a field has conflicting settings at multiple levels?
Smart Rendering > Individual Field
This means Smart Rendering settings win over individual field settings.
What happens if something goes wrong? - Automatic Field Unlocking
All payer fields are required to send the form. If your settings would prevent the payer from submitting the form - for example you're hiding the email field but provided an invalid address- the field automatically becomes visible and editable.
Automatic field unlocking happens for a hidden or read-only field when:
you didn't submit a value through the Checkout Session (results in an empty field for the payer to fill out)
you submitted an invalid value through the Checkout Session (results in a field showing the invalid value, highlighted with an error message so that the payer can correct it)
The validation rules of the UI form are more restrictive than the API. If you provide values that are invalid in the form, the API response will return warnings, but still allows you to render the form.
If the warning array contains warnings, it means that you tried to pre-fill the UI form with invalid values. You can use these warnings to check the data in your system for mistakes.
Are warnings an error?
No, warnings inform you of issues with field values, but you will still receive the URL and can display the form to your payer.
How do the warnings affect the form?
If a drop down field (like country) is affected by invalid values, the field will be empty, meaning no selection from the drop down is made yet. Your payer has to select the value from the drop down manually.
If you set a field to hidden or read-only, the settings will be disregarded and the field will become visible and editable in the form.
When using Elements, you can control which payer fields can be edited by your payer - either by setting them to read-only or be completely hiding the field from the payer.
What happens if a field has conflicting settings at multiple levels?
Smart Rendering > Individual Field
This means Smart Rendering settings win over individual field settings.
What happens if something goes wrong? - Automatic Field Unlocking
All payer fields are required to send the form. If your settings would prevent the payer from submitting the form - for example you're hiding the email field but provided an invalid address- the field automatically becomes visible and editable.
Automatic field unlocking happens for a hidden or read-only field when:
you didn't submit a value through the Checkout Session (results in an empty field for the payer to fill out)
you submitted an invalid value through the Checkout Session (results in a field showing the invalid value, highlighted with an error message so that the payer can correct it)
For a frictionless experience for your payer, ensure that the data you are providing conforms with the validation rules of the form.
Validation rules of the form:
This field accepts only letters (A-Z) and numbers (0-9).
The validation rules of the UI form are more restrictive than the API. If you provide values that are invalid in the form, the API response will return warnings, but still allows you to render the form.
If the warning array contains warnings, it means that you tried to pre-fill the UI form with invalid values. You can use these warnings to check the data in your system for mistakes.
Are warnings an error?
No, warnings inform you of issues with field values, but you will still receive the URL and can display the form to your payer.
How do the warnings affect the form?
If a drop down field (like country) is affected by invalid values, the field will be empty, meaning no selection from the drop down is made yet. Your payer has to select the value from the drop down manually.
If you set a field to hidden or read-only, the settings will be disregarded and the field will become visible and editable in the form.
When using Elements, you can control which payer fields can be edited by your payer - either by setting them to read-only or be completely hiding the field from the payer.
What happens if a field has conflicting settings at multiple levels?
Smart Rendering > Individual Field
This means Smart Rendering settings win over individual field settings.
What happens if something goes wrong? - Automatic Field Unlocking
All payer fields are required to send the form. If your settings would prevent the payer from submitting the form - for example you're hiding the email field but provided an invalid address- the field automatically becomes visible and editable.
Automatic field unlocking happens for a hidden or read-only field when:
you didn't submit a value through the Checkout Session (results in an empty field for the payer to fill out)
you submitted an invalid value through the Checkout Session (results in a field showing the invalid value, highlighted with an error message so that the payer can correct it)
For a frictionless experience for your payer, ensure that the data you are providing conforms with the validation rules of the form.
Validation rules of the form:
This field accepts only a valid email address in the standard format [email protected]. Only letters (A-Z), numbers (0-9), and basic symbols are allowed.
To make the Checkout Experience more lean, you can hide the payer information page if you are providing all required payer information fields.
Possible values:
true
(default)
Payer information page is displayed and the fields are editable for the payer. If you don't provide this parameter, the payer information page is shown by default.
false
Payer information page is not displayed.
For the page to be hidden, all required payer information fields must be provided by you.
What happens if payer information is missing or invalid?
If required field values are missing or are invalid, the payer information page will be displayed so that the payer can add or correct the information. Valid provided fields will be read-only, the payer can only provide the missing/invalid information.
If an optional field is not provided, the page will not be displayed to your payer.
recipientobject
Contains the fields of the recipient.
fieldsarray
It depends on the recipient which fields are optional or required. If a field is required, you must provide it here. Optional fields can be left out.
An item is something that your payer can pay for (for example: tuition fees, housing, etc.). When you create a payment, you display the items to your payer and they can choose for which items they want to pay. How many items there are depends on the recipient's configuration.
The billing currency is the currency in which the recipient of the payment is billing their payer. The billing currency depends on the recipient's configuration and is defined when the recipient is set up by Flywire.
The amount is specified in the smallest unit of the currency, called subunits. For example, in USD, the subunit is cents, and 100 cents equal 1 USD. So, an amount of 12025 (cents) is equivalent to 120.25 USD.
Note that the subunit-to-unit ratio varies by currency, it is not always 100. See Currencies for the subunits of each currency.
There are two different URLs for receiving callbacks:
Static URL
For API integrations:
When you set up your application that accesses the Flywire API, you had the option to define a notifications URL. This is the static notifications URL. Callbacks will be sent to this URL for all payments you created via the Flywire API.
The recipient of a payment may also have a static notifications URL defined which might be different from your static notifications URL as a client. In that case, callbacks will also be sent to the recipient's notifications URL.
For other integrations:
When you set up your portal together with Flywire, you had the option to define a callback URL for that portal. Callbacks will be sent to this URL for all payments for this portal.
If you don't use a static callback URL yet and want to start using it, please contact the Solutions team.
Dynamic URL
The URL you can set in a parameter when you are creating a payment is the dynamic notifications URL. Since this URL can be different for every payment you create, it is called dynamic.
How defining static and dynamic URLs affect callbacks
= not set
= set
Static URL
Dynamic URL
Result
You won't receive notifications.
You'll receive notifications to your static URL.
For API integrations:
The dynamic URL will override the static URL and you'll receive notifications only to the dynamic URL.
For other integrations:
You'll receive callbacks to both URLs. This is called "dual callback URL".
A dual callback URL means you defined a static URL in your portal and you are sending callbacks to a different callback URL via the parameter for the payment. In this case, callbacks will be sent to both URLs. This
approach can be useful if you want to update two separate systems.
The external reference helps you to identify a payment, since the Flywire-generated payment reference might not be the way you typically identify payments. With the external reference, you can enter your own identifier, such as an ID or invoice number.
The external reference is included in all status notifications to help you map a payment to a callback notification. (see Payment Status Notifications)
You can provide an external reference with a max size of 50 characters.
The payor_id depends on how you want to uniquely identify a payer. Usually, you use an ID from another system, for example your ERP. Spaces are not allowed.
When you are creating follow-up payments you must use the same payor_id you used when you created the Checkout Session.
The response after creating Checkout Session will return a URL to you (as the value of the url parameter in the hosted_form object). This is the URL you need in order to display the UI form in an iframe on your website.
When you are pre-filling the form, the response can contain warnings (in the warnings array) in case the pre-filling of any fields didn't pass the validation, see Field validation warnings after pre-filling a UI form for more details.
You can decide which information from the response you want to filter out in your backend before passing the URL to your frontend.
If the warning array contains warnings, it means that you tried to pre-fill the UI form with invalid values. You can use these warnings to check the data in your system for mistakes.
Are warnings an error?
No, warnings inform you of issues with field values, but you will still receive the URL and can display the form to your payer.
How do the warnings affect the form?
If a drop down field (like country) is affected by invalid values, the field will be empty, meaning no selection from the drop down is made yet. Your payer has to select the value from the drop down manually.
If you set a field to hidden or read-only, the settings will be disregarded and the field will become visible and editable in the form.
When using Elements, you can control which payer fields can be edited by your payer - either by setting them to read-only or be completely hiding the field from the payer.
What happens if a field has conflicting settings at multiple levels?
Smart Rendering > Individual Field
This means Smart Rendering settings win over individual field settings.
What happens if something goes wrong? - Automatic Field Unlocking
All payer fields are required to send the form. If your settings would prevent the payer from submitting the form - for example you're hiding the email field but provided an invalid address- the field automatically becomes visible and editable.
Automatic field unlocking happens for a hidden or read-only field when:
you didn't submit a value through the Checkout Session (results in an empty field for the payer to fill out)
you submitted an invalid value through the Checkout Session (results in a field showing the invalid value, highlighted with an error message so that the payer can correct it)
The billing currency is the currency in which the recipient of the payment is billing their payer. The billing currency depends on the recipient's configuration and is defined when the recipient is set up by Flywire.
What should you do?
Use a different direct debit scheme
Alternative: Use a different recipient (if you can't use a different recipient, contact Flywire to change the settings of the recipient)
{
    "type": "https://developers.flywire.com",
    "title": "Unprocessable entity",
    "status": 422,
    "detail": "Invalid parameters",
    "errors": [
        {
            "source": "/",
            "param": "recipient_id",
            "type": "invalid_param",
            "message": "BACS direct debit requires GBP. The recipient ARA cannot receive payments in GBP."
        }
    ]
}
Display the form on your website.
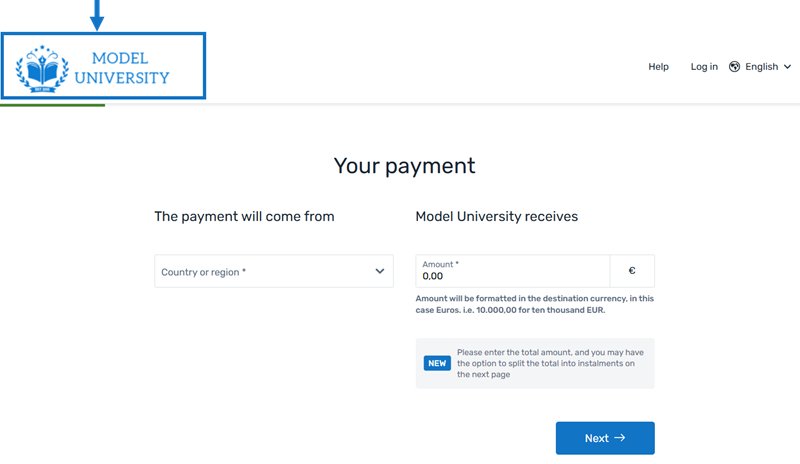
The form is where Flywire gathers the payer and payment information.
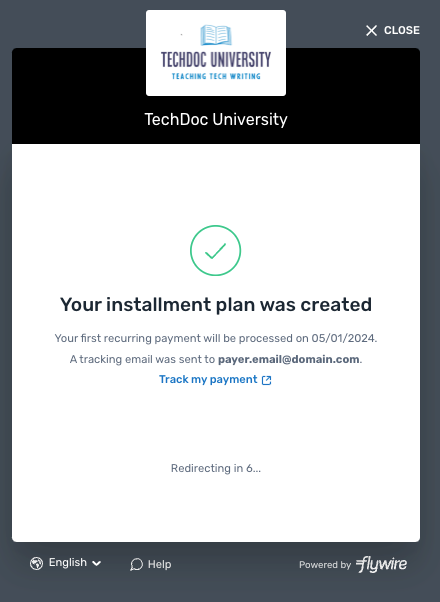
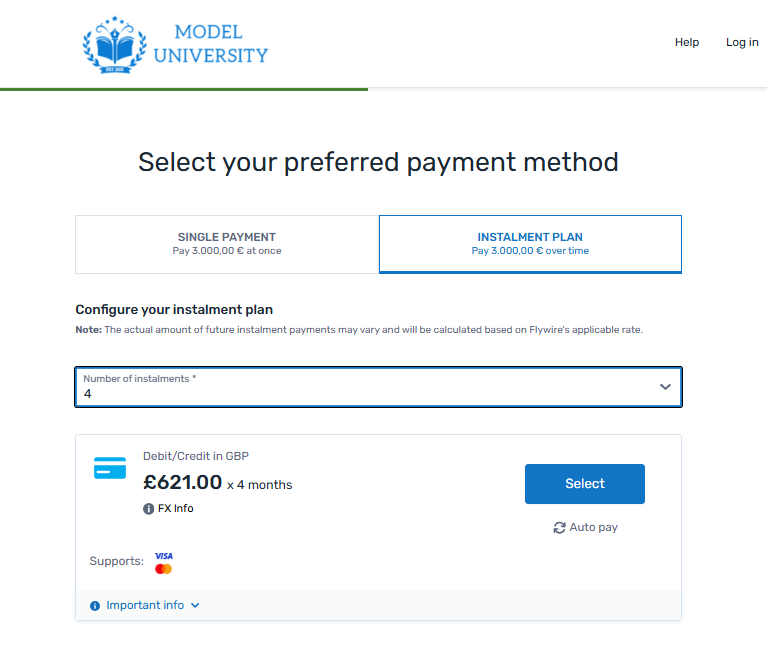
Your payer now fills out the form and creates an installment plan.
Your payer is asked to create an account or log into an existing one during the process in order to be able to manage the installment plan. After the payer completed the process, an installment plan is created.
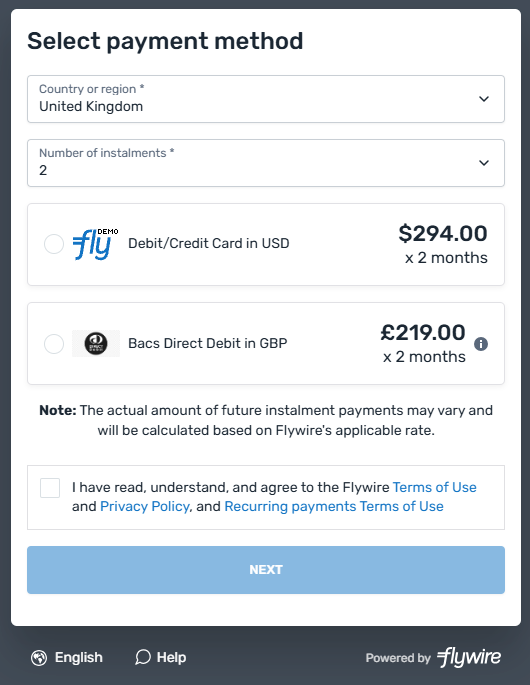
Your payer is asked to pick their country, the number of installments, and the payment method they want to use.
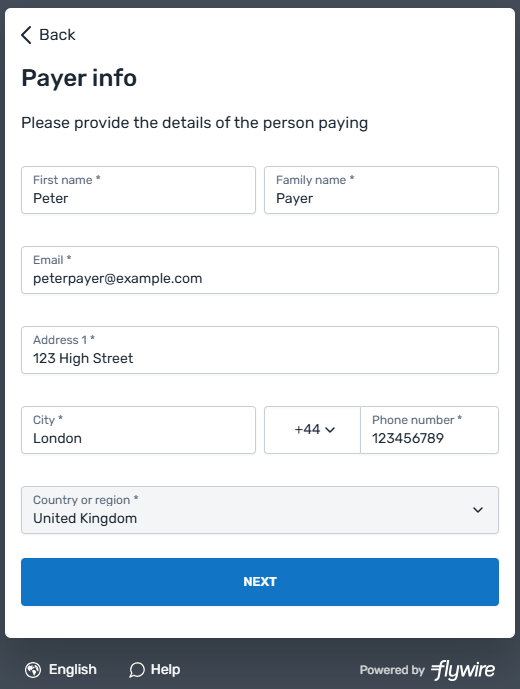
Next, the page that collects payer information is displayed (unless it has been hidden).
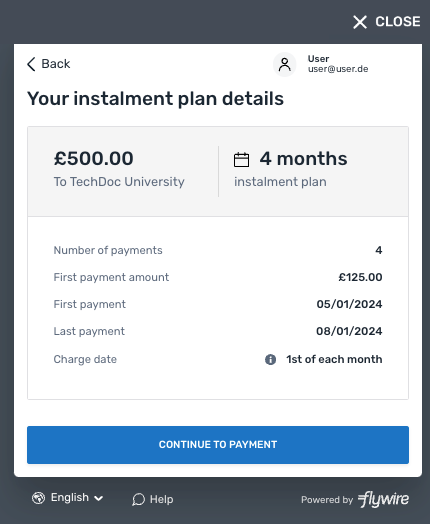
The payer sees an overview of the plan they chose.
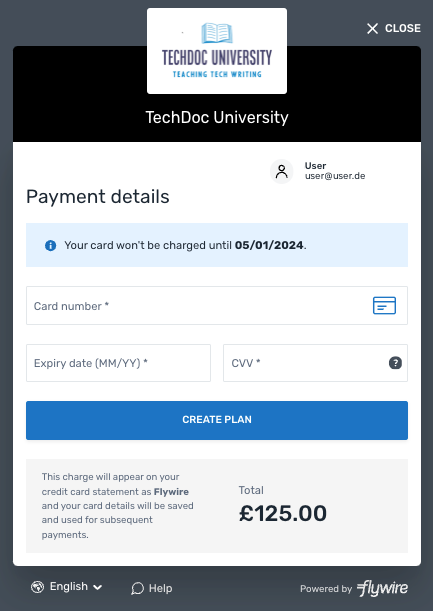
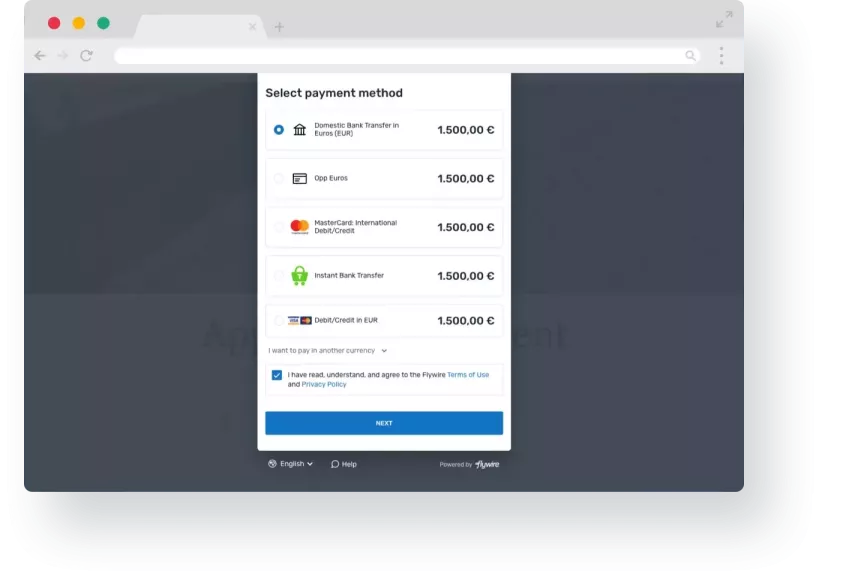
Your payer is then asked to enter their payment information depending on the payment method they chose.
An installment plan with the information provided is now created. The window will close automatically after a few seconds.
Receive the URL for confirming the Checkout Session.
There are many ways for your backend to receive the confirm URL. One option is to directly send it from the event listener you implemented on your website to your backend.
After your payer sent the form, the event listener will return a successful postMessage.
A successful postMessage confirms that the form was successfully submitted and that you can confirm the Checkout Session now. However, it does not indicate payment success. Payment status updates will be sent via callback notifications, see Payment Status Notifications for details.
The postMessage contains the following information:
confirm_urlobject
Contains the confirm URL. The confirm URL is the full URL for the request to confirm the session, already resolved with the correct session ID.
As a security measure to ensure that you are the one who created the session, you have to confirm the Checkout Session.
How to Resolve the Path Placeholders of the Endpoint
The session ID is the unique identifier for a Checkout Session.
You don't need to manually resolve the {sessionID} in the endpoint, as Flywire provides the fully resolved URL via the postMessage (see 3. The postMessage of the Event Listener).
Why should you use the confirm url from the postMessage?
It already contains the correct Checkout Session ID, no need to retrieve it from somewhere else.
You always receive the URL after the form has been sent. If you would try to confirm a Checkout Session before the form has been sent, you'll get an error message
You can only send the request to confirm the Checkout Session once. After a Checkout Session has been confirmed, you'll receive an error if you try to confirm it again.
If you provided a notifications URL for the payment, you’ll start receiving notifications that let you track the payment’s progress (refer to Payment Status Notifications) and the progress of the installment plan (refer to Installment Plan Status Notifications).
A plan ID is the unique identifier for a Flywire installment plan.
Format:
Either: IPABC18EADF349BE
IP3-letter portal/recipient ID11 characters
Or: IPABC1D18EADF349BE
IP5-alphanum portal/recipient ID11 characters
Plan IDs are only relevant for Flywire-hosted recurring payments. Self-managed recurring payments don't use plan IDs coming from Flywire.
payorobject
This information is returned so you can confirm the payer's country and email address.
Why is confirming the payer's country necessary?
Payments in the USA require delivering the receipt to the payer. If Flywire handles emails for you, Flywire will send the receipt automatically. If you are handling emails yourself, you need to ensure to send the receipt to your payer.
The Flywire API allows you to integrate Flywire’s payment services into your own system. You can build a custom user interface while taking advantage of Flywire’s payment network, ensuring a smooth and secure payment experience.
Pay-By-Link is the lightest and easiest integration. You simply generate a link for your payer that you can implement into emails and other places. After clicking the link, your payer will be directed to your unique PayEx portaloutside of your website and all fields you provided values for via the link (for example payer's name or the payment amount) are already pre-filled.
PayEx ("Payment Experience") is the service Flywire provides for you as a client to make payments easier, and your PayEx portal is your own unique instance of PayEx.
Your PayEx portal is the Flywire-hosted page your payer accesses when they want to make a payment.
Your logo in the upper left corner tells your payers that they are in your unique PayEx portal:
There are two types of Pay-By-Link integrations depending on your use case:
You use the Flywire API to invoke the Checkout Experience.
Tamper-proof out of the box: No configuration parameters on your website, generating the form is handled server-to-server with API calls.
More functionality: Once you are using the API, you have access to other integrations like Elements , getting detailed payment information, and more functionality like refunds.
 = not set
 = set
= set Success response (no warnings)
 Success response (with warnings)
 422 Error